Automationscribe.com
  • Home
  • AI Scribe
  • AI Tools
  • Artificial Intelligence
  • Contact Us
No Result
View All Result
Automation Scribe
  • Home
  • AI Scribe
  • AI Tools
  • Artificial Intelligence
  • Contact Us
No Result
View All Result
Automationscribe.com
No Result
View All Result

Create a SageMaker inference endpoint with customized mannequin & prolonged container

admin by admin
January 28, 2025
in Artificial Intelligence
0
Create a SageMaker inference endpoint with customized mannequin & prolonged container
399
SHARES
2.3k
VIEWS
Share on FacebookShare on Twitter


Amazon SageMaker supplies a seamless expertise for constructing, coaching, and deploying machine studying (ML) fashions at scale. Though SageMaker gives a variety of built-in algorithms and pre-trained fashions via Amazon SageMaker JumpStart, there are eventualities the place you may must convey your individual customized mannequin or use particular software program dependencies not out there in SageMaker managed container pictures. Examples for this might embrace use instances like geospatial evaluation, bioinformatics analysis, or quantum machine studying. In such instances, SageMaker lets you prolong its performance by creating customized container pictures and defining customized mannequin definitions. This method lets you package deal your mannequin artifacts, dependencies, and inference code right into a container picture, which you’ll be able to deploy as a SageMaker endpoint for real-time inference. This put up walks you thru the end-to-end strategy of deploying a single customized mannequin on SageMaker utilizing NASA’s Prithvi mannequin. The Prithvi mannequin is a first-of-its-kind temporal Imaginative and prescient transformer pre-trained by the IBM and NASA crew on contiguous US Harmonised Landsat Sentinel 2 (HLS) knowledge. It may be finetuned for picture segmentation utilizing the mmsegmentation library to be used instances like burn scars detection, flood mapping, and multi-temporal crop classification. Because of its distinctive structure and fine-tuning dependency on the MMCV library, it’s an efficient instance of the best way to deploy complicated customized fashions to SageMaker. We reveal the best way to use the pliability of SageMaker to deploy your individual customized mannequin, tailor-made to your particular use case and necessities. Whether or not you’re working with distinctive mannequin architectures, specialised libraries, or particular software program variations, this method empowers you to harness the scalability and administration capabilities of SageMaker whereas sustaining management over your mannequin’s atmosphere and dependencies.

Resolution overview

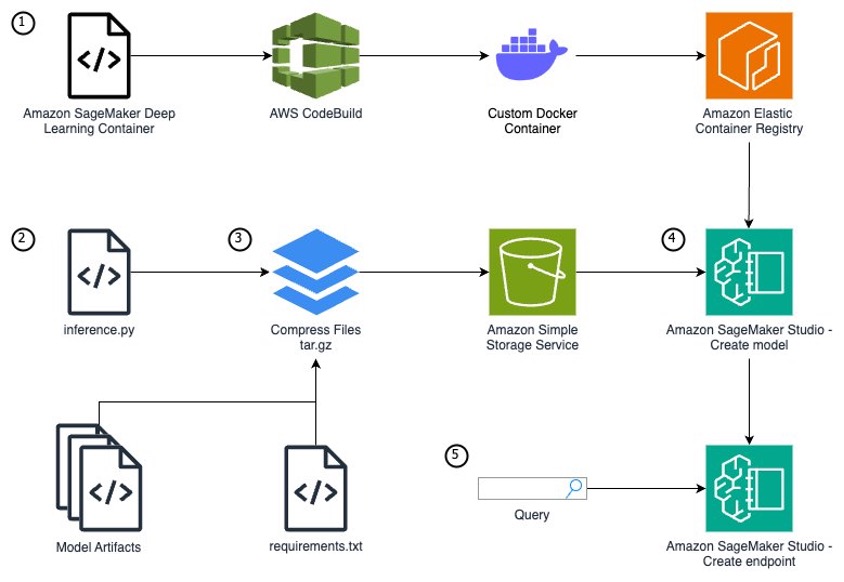
To run a customized mannequin that wants distinctive packages as a SageMaker endpoint, you might want to comply with these steps:

  1. In case your mannequin requires further packages or package deal variations unavailable from the SageMaker managed container pictures, you will want to increase one of many container pictures. By extending a SageMaker managed container vs. creating one from scratch, you may focus in your particular use case and mannequin growth as a substitute of the container infrastructure.
  2. Write a Python mannequin definition utilizing the SageMaker inference.py file format.
  3. Outline your mannequin artifacts and inference file inside a particular file construction, archive your mannequin information as a tar.gz file, and add your information to Amazon Easy Storage Service (Amazon S3).
  4. Along with your mannequin code and an prolonged SageMaker container, use Amazon SageMaker Studio to create a mannequin, endpoint configuration, and endpoint.
  5. Question the inference endpoint to substantiate your mannequin is operating accurately.

The next diagram illustrates the answer structure and workflow:

A picture of the Architecture for the post. It includes CodeBuild, Amazon Deep Learning Docker Containers, Amazon ECS, Amazon Sagemaker, and Amazon S3

Conditions

You want the next conditions earlier than you may proceed. For this put up, we use the us-east-1 AWS Area:

  1. Have entry to a POSIX primarily based (Mac/Linux) system or SageMaker notebooks. This put up doesn’t cowl establishing SageMaker entry and assumes a pocket book accessible to the web. Nevertheless, this isn’t a safety greatest follow and shouldn’t be achieved in manufacturing. To learn to create a SageMaker pocket book inside a digital personal cloud (VPC), see Connect with SageMaker AI Inside your VPC.
  2. Be sure you have AWS Identification and Entry Administration (IAM) permissions for SageMaker entry; S3 bucket create, learn, and PutObject entry; AWS CodeBuild entry; Amazon Elastic Container Registry (Amazon ECR) repository entry; and the flexibility to create IAM roles.
  3. Obtain the Prithvi mannequin artifacts and flood knowledge fine-tuning:
    curl -s https://packagecloud.io/set up/repositories/github/git-lfs/script.deb.sh | sudo bash 
    sudo apt-get set up git-lfs 
    git lfs set up 
    git clone https://huggingface.co/ibm-nasa-geospatial/Prithvi-100M 
    git clone https://huggingface.co/ibm-nasa-geospatial/Prithvi-100M-sen1floods11

Lengthen a SageMaker container picture to your mannequin

Though AWS supplies pre-built container pictures optimized for deep studying on the AWS Deep Studying Containers (DLCs) GitHub for PyTorch and TensorFlow use instances, there are eventualities the place fashions require further libraries not included in these containers. The set up of those dependencies can take minutes or hours, so it’s extra environment friendly to pre-build these dependencies right into a customized container picture. For this instance, we deploy the Prithvi mannequin, which depends on the MMCV library for superior pc imaginative and prescient methods. This library is just not out there inside any of the SageMaker DLCs, so you’ll have to create an prolonged container so as to add it. Each MMCV and Prithvi are third-party fashions which haven’t undergone AWS safety evaluations, so please evaluate these fashions your self or use at your individual threat. This put up makes use of CodeBuild and a Docker Dockerfile to construct the prolonged container.

Full the next steps:

  1. CodeBuild requires a supply location containing the supply code. Create an S3 bucket to function this supply location utilizing the next instructions:
    # generate a novel postfix 
    BUCKET_POSTFIX=$(python3 -S -c "import uuid; print(str(uuid.uuid4().hex)[:10])") 
    echo "export BUCKET_POSTFIX=${BUCKET_POSTFIX}" >> ~/.bashrc 
    echo "Your bucket title will probably be customsagemakercontainer-codebuildsource-${BUCKET_POSTFIX}" 
    # make your bucket 
    aws s3 mb s3://customsagemakercontainer-codebuildsource-${BUCKET_POSTFIX}

  2. Create an ECR repository to retailer the customized container picture produced by the CodeBuild mission. File the repository URI as an atmosphere variable.
    CONTAINER_REPOSITORY_NAME="prithvi" 
    aws ecr create-repository --repository-name ${CONTAINER_REPOSITORY_NAME} 
    export REPOSITORY_URI=$(aws ecr describe-repositories --repository-names ${CONTAINER_REPOSITORY_NAME} --query 'repositories[0].repositoryUri' --output textual content)

  3. Create a Dockerfile for the customized container. You employ an AWS Deep Studying SageMaker framework container as the bottom picture as a result of it consists of required dependencies resembling SageMaker libraries, PyTorch, and CUDA.

This Docker container installs the Prithvi mannequin and MMCV v1.6.2. These fashions are third-party fashions not produced by AWS and due to this fact could have safety vulnerabilities. Use at your individual threat.

cat > Dockerfile << EOF 
FROM 763104351884.dkr.ecr.us-east-1.amazonaws.com/pytorch-inference:1.13.1-gpu-py39-cu117-ubuntu20.04-sagemaker
WORKDIR /root
RUN DEBIAN_FRONTEND=noninteractive apt-get replace -y
RUN DEBIAN_FRONTEND=noninteractive apt-get improve -y
RUN git clone https://github.com/NASA-IMPACT/hls-foundation-os.git
RUN wget https://github.com/open-mmlab/mmcv/archive/refs/tags/v1.6.2.tar.gz
RUN tar xvzf v1.6.2.tar.gz
WORKDIR /root/hls-foundation-os
RUN pip set up -e . 
RUN pip set up -U openmim 
WORKDIR /root/mmcv-1.6.2
RUN MMCV_WITH_OPS=1 pip set up -e . -v

EOF

  1. Create a buildspec file to outline the construct course of for the CodeBuild mission. This buildspec file will instruct CodeBuild to put in the nvidia-container-toolkit to ensure the Docker container has GPU entry, run the Dockerfile construct, and push the constructed container picture to your ECR repository.
    cat > buildspec.yml << EOF
    model: 0.2
    
    phases:
        pre_build:
            instructions:
            - echo Logging in to Amazon ECR...
            - IMAGE_TAG=sagemaker-gpu
            - curl -s -L https://nvidia.github.io/libnvidia-container/secure/rpm/nvidia-container-toolkit.repo | sudo tee /and so on/yum.repos.d/nvidia-container-toolkit.repo
            - sudo yum set up -y nvidia-container-toolkit
            - sudo nvidia-ctk runtime configure --runtime=docker
            - | 
              cat > /and so on/docker/daemon.json << EOF
              {
                  "runtimes": {
                      "nvidia": {
                          "args": [],
                          "path": "nvidia-container-runtime"
                      }
                  },
                  "default-runtime": "nvidia"
              }
              EOF
            - kill $(ps aux | grep -v grep | grep "/usr/native/bin/dockerd --host" | awk '{print $2}')
            - sleep 10
            - nohup /usr/native/bin/dockerd --host=unix:///var/run/docker.sock --host=tcp://127.0.0.1:2375 --storage-driver=overlay2 &
            - sleep 10
            - aws ecr get-login-password --region $AWS_REGION | docker login --username AWS --password-stdin $REPOSITORY_URI_AWSDL
            - docker pull $REPOSITORY_URI_AWSDL/pytorch-inference:1.13.1-gpu-py39-cu117-ubuntu20.04-sagemaker
    
        construct:
            instructions:
            - echo Construct began at $(date)
            - echo Constructing the Docker picture...
            - aws ecr get-login-password --region $AWS_REGION | docker login --username AWS --password-stdin $REPOSITORY_URI
            - DOCKER_BUILDKIT=0 docker construct -t $REPOSITORY_URI:newest .
            - docker tag $REPOSITORY_URI:newest $REPOSITORY_URI:$IMAGE_TAG
    
        post_build:
            instructions:
            - echo Construct accomplished at $(date)
            - echo Pushing the Docker pictures...
            - docker push $REPOSITORY_URI:newest
            - docker push $REPOSITORY_URI:$IMAGE_TAG
    
    EOF

  2. Zip and add the Dockerfile and buildspec.yml information to the S3 bucket. This zip file will function the supply code for the CodeBuild mission.
    • To put in zip on a SageMaker pocket book, run the next command:
    • With zip put in, run the next command:
      zip prithvi_container_source.zip Dockerfile buildspec.yml
      aws s3 cp prithvi_container_source.zip s3://customsagemakercontainer-codebuildsource-${BUCKET_POSTFIX}/

  3. Create a CodeBuild service position so CodeBuild can entry the required AWS companies for the construct.
    • First, create a file defining the position’s belief coverage:
      cat > create-role.json << EOF
      {
        "Model": "2012-10-17",
        "Assertion": [
          {
            "Effect": "Allow",
            "Principal": {
              "Service": "codebuild.amazonaws.com"
            },
            "Action": "sts:AssumeRole"
          }
        ]
      }
      EOF

    • Create a file defining the service position’s permissions. This position has just a few wildcard permissions (/* or *). These may give extra permissions than wanted and break the rule of least privilege. For extra details about defining least privilege for manufacturing use instances, see Grant least privilege.
      cat > put-role-policy.json << EOF
      {
        "Model": "2012-10-17",
        "Assertion": [
          {
            "Sid": "CloudWatchLogsPolicy",
            "Effect": "Allow",
            "Action": [
              "logs:CreateLogGroup",
              "logs:CreateLogStream",
              "logs:PutLogEvents"
            ],
            "Useful resource": "arn:aws:logs:us-east-1:*:log-group:/aws/codebuild/*:*"
          },
          {
            "Sid": "S3GetObjectPolicy",
            "Impact": "Enable",
            "Motion": [
              "s3:GetObject",
              "s3:GetObjectVersion"
            ],
            "Useful resource": [
              "arn:aws:s3:::customsagemakercontainer-codebuildsource-${BUCKET_POSTFIX}",
              "arn:aws:s3:::customsagemakercontainer-codebuildsource-${BUCKET_POSTFIX}/*"
              ]
          },
          {
            "Sid": "S3BucketIdentity",
            "Impact": "Enable",
            "Motion": [
              "s3:GetBucketAcl",
              "s3:GetBucketLocation"
            ],
            "Useful resource": "arn:aws:s3:::customsagemakercontainer-codebuildsource-${BUCKET_POSTFIX}"
          },
          {
            "Sid": "ECRAccess",
            "Impact": "Enable",
            "Motion": [
              "ecr:GetImage",
              "ecr:BatchGetImage",
              "ecr:BatchCheckLayerAvailability",
              "ecr:CompleteLayerUpload",
              "ecr:UploadLayerPart",
              "ecr:GetDownloadUrlForLayer",
              "ecr:InitiateLayerUpload",
              "ecr:PutImage",
              "ecr:ListImages",
              "ecr:DescribeRepositories",
              "ecr:DescribeImages",
              "ecr:DescribeRegistry",
              "ecr:TagResource"
            ],
            "Useful resource": ["arn:aws:ecr:*:*:repository/prithvi",
                          "arn:aws:ecr:*:763104351884:repository/*"]
          },
          {
            "Sid": "ECRAuthToken",
            "Impact": "Enable",
            "Motion": [
              "ecr:GetAuthorizationToken"
            ],
            "Useful resource": "*"
          }
        ]
      }
      EOF

    • Create the CodeBuild service position:
      aws iam create-role --role-name CodeBuildServiceRole --assume-role-policy-document file://create-role.json

  4. Seize the title of the position Amazon Useful resource Identify (ARN) from the CLI command response and file as an atmosphere variable:
    export CODEBUILD_SERVICE_ROLE_ARN=$(aws iam get-role --role-name CodeBuildServiceRole --query 'Function.Arn' --output textual content)

  5. Connect the permission insurance policies to the service position:
    aws iam put-role-policy --role-name CodeBuildServiceRole --policy-name CodeBuildServiceRolePolicy --policy-document file://put-role-policy.json

  6. Outline the configurations for the CodeBuild construct mission utilizing the construct mission JSON specification:
    cat > codebuild-project.json << EOF
    {
        "title": "prithvi-container-build",
        "description": "construct course of to switch the AWS SageMaker Deep Studying Container to incorporate HLS/Prithvi",
        "supply": {
          "kind": "S3",
          "location": "customsagemakercontainer-codebuildsource-${BUCKET_POSTFIX}/prithvi_container_source.zip",
          "buildspec": "buildspec.yml",
          "insecureSsl": false
        },
        "artifacts": {
          "kind": "NO_ARTIFACTS"
        },
        "cache": {
          "kind": "NO_CACHE"
        },
        "atmosphere": {
          "kind": "LINUX_GPU_CONTAINER",
          "picture": "aws/codebuild/amazonlinux2-x86_64-standard:5.0",
          "computeType": "BUILD_GENERAL1_SMALL",
          "environmentVariables": [
            {
              "name": "REPOSITORY_URI_AWSDL",
              "value": "763104351884.dkr.ecr.us-east-1.amazonaws.com",
              "type": "PLAINTEXT"
            },
            {
              "name": "AWS_REGION",
              "value": "us-east-1",
              "type": "PLAINTEXT"
            },
            {
                "name": "REPOSITORY_URI",
                "value": "$REPOSITORY_URI",
                "type": "PLAINTEXT"
              }
          ],
          "imagePullCredentialsType": "CODEBUILD",
          "privilegedMode": true
        },
        "serviceRole": "$CODEBUILD_SERVICE_ROLE_ARN",
        "timeoutInMinutes": 60,
        "queuedTimeoutInMinutes": 480,
        "logsConfig": {
          "cloudWatchLogs": {
            "standing": "ENABLED"
          }
      }
    }
    EOF

  7. Create the CodeBuild mission utilizing the codebuild-project.json specification outlined within the earlier step:
    aws codebuild create-project --cli-input-json file://codebuild-project.json

  8. Run a construct for the CodeBuild mission:
    aws codebuild start-build --project-name prithvi-container-build

The construct will take roughly half-hour to finish and value roughly $1.50 to run. The CodeBuild compute occasion kind gpu1.small prices $0.05 per minute.

After you run the previous command, you may press Ctrl+C to exit and run future instructions. The construct will already be operating on AWS and won’t be canceled by closing the command.

  1. Monitor the standing of the construct utilizing the next command and wait till you observe buildStatus=SUCCEEDED earlier than continuing to the following step:
    export BUILD_ID=$(aws codebuild list-builds-for-project --project-name prithvi-container-build --query 'ids[0]' --output textual content) aws codebuild batch-get-builds --ids ${BUILD_ID} | grep buildStatus

After your CodeBuild mission has accomplished, just be sure you don’t shut your terminal. The atmosphere variables right here will probably be used once more.

Construct your inference.py file

To run a customized mannequin for inference on AWS, you might want to construct out an inference.py file that initializes your mannequin, defines the enter and output construction, and produces your inference outcomes. On this file, you could outline 4 capabilities:

  • model_fn – Initializes your mannequin
  •  input_fn – Defines how your knowledge must be enter and the best way to convert to a usable format
  • predict_fn – Takes the enter knowledge and receives the prediction
  • output_fn – Converts the prediction into an API name format

We use the next accomplished inference.py file for the SageMaker endpoint on this put up. Obtain this inference.py to proceed as a result of it consists of the helper capabilities to course of the TIFF information wanted for this mannequin’s enter. The next code is contained inside the inference.py and is barely proven to supply a proof of what’s being achieved within the file.

model_fn

The model_fn perform builds your mannequin, which is known as and used inside the predict_fn perform. This perform masses the mannequin weights right into a torch mannequin checkpoint, opens the mannequin config, defines international variables, instantiates the mannequin, masses the mannequin checkpoint into the mannequin, and returns the mannequin.

def model_fn(model_dir):
    # implement customized code to load the mannequin
    # load weights
    weights_path = "./code/prithvi/Prithvi_100M.pt"
    checkpoint = torch.load(weights_path, map_location="cpu")

    # learn mannequin config
    model_cfg_path = "./code/prithvi/Prithvi_100M_config.yaml"
    with open(model_cfg_path) as f:
        model_config = yaml.safe_load(f)

    model_args, train_args = model_config["model_args"], model_config["train_params"]

    international means
    international stds
    means = np.array(train_args["data_mean"]).reshape(-1, 1, 1)
    stds = np.array(train_args["data_std"]).reshape(-1, 1, 1)
    # allow us to use only one body for now (the mannequin was educated on 3 frames)
    model_args["num_frames"] = 1

    # instantiate mannequin
    mannequin = MaskedAutoencoderViT(**model_args)
    mannequin.eval()

    # load weights into mannequin
    # strict=false as a result of we're loading with only one body, however the warning is anticipated
    del checkpoint['pos_embed']
    del checkpoint['decoder_pos_embed']
    _ = mannequin.load_state_dict(checkpoint, strict=False)
    
    return mannequin

input_fn

This perform defines the anticipated enter for the mannequin and the best way to load the enter to be used in predict_fn. The endpoint expects a string URL path linked to a TIFF file you will discover on-line from the Prithvi demo on Hugging Face. This perform additionally defines the content material kind of the request despatched within the physique (resembling software/json, picture/tiff).

def input_fn(input_data, content_type):
    # decode the enter knowledge  (e.g. JSON string -> dict)
    # statistics used to normalize pictures earlier than passing to the mannequin
    raster_data = load_raster(input_data, crop=(224, 224))
    return raster_data

predict_fn:

In predict_fn, you create the prediction from the given enter. On this case, creating the prediction picture makes use of two helper capabilities particular to this endpoint (preprocess_image and enhance_raster_for_visualization). You could find each capabilities right here. The preprocess_image perform normalizes the picture, then the perform makes use of torch.no_grad to disable gradient calculations for the mannequin. That is helpful throughout inference to lower inference time and scale back reminiscence utilization. Subsequent, the perform collects the prediction from the instantiated mannequin. The masks ratio determines the variety of pixels on the picture zeroed out throughout inference. The 2 unpatchify capabilities convert the smaller patchified outcomes produced by the mannequin again to the unique picture area. The perform normalized.clone() clones the normalized pictures and replaces the masked Areas from rec_img with the Areas from the pred_img. Lastly, the perform reshapes the picture again into TIFF format, removes the normalization, and returns the picture in raster format, which is effective for visualization. The results of that is a picture that may be transformed to bytes for the person after which visualized on the person’s display screen.

def predict_fn(knowledge, mannequin):
    normalized = preprocess_image(knowledge)
    with torch.no_grad():
        mask_ratio = 0.5
        _, pred, masks = mannequin(normalized, mask_ratio=mask_ratio)
        mask_img = mannequin.unpatchify(masks.unsqueeze(-1).repeat(1, 1, pred.form[-1])).detach().cpu()
        pred_img = mannequin.unpatchify(pred).detach().cpu()#.numpy()
        rec_img = normalized.clone()
        rec_img[mask_img == 1] = pred_img[mask_img == 1]
        rec_img_np = (rec_img.numpy().reshape(6, 224, 224) * stds) + means
        print(rec_img_np.form)
        return enhance_raster_for_visualization(rec_img_np, ref_img=knowledge)

output_fn

output_fn returns the TIFF picture acquired from predict_fn as an array of bytes.

def output_fn(prediction, settle for):
    print(prediction.form)
    return prediction.tobytes()

Take a look at your inference.py file

Now that you’ve downloaded the whole inference.py file, there are two choices to check your mannequin earlier than compressing the information and importing them to Amazon S3:

  • Take a look at the inference.py capabilities in your customized container inside an Amazon Elastic Compute Cloud (Amazon EC2) occasion
  • Take a look at your endpoint on a neighborhood mode  SageMaker endpoint (requires a GPU or GPU-based workspace for this mannequin)

Mannequin file construction, tar.gz compressing, and S3 add

Earlier than you begin this step, obtain the Prithvi mannequin artifacts and the Prithvi flood fine-tuning of the mannequin. The primary hyperlink will present all the mannequin knowledge from the bottom Prithvi mannequin, and the flood fine-tuning of the mannequin builds upon the mannequin to carry out flood plain detection on satellite tv for pc pictures. Set up git-lfs utilizing brew on Mac or utilizing https://git-lfs.com/ on Home windows to put in the GitHub repo’s massive information.

curl -s https://packagecloud.io/set up/repositories/github/git-lfs/script.deb.sh | sudo bash
sudo apt-get set up git-lfs
git lfs set up

git clone https://huggingface.co/ibm-nasa-geospatial/Prithvi-100M
cd Prithvi-100M
git lfs pull
git checkout c2435efd8f92329d3ca79fc8a7a70e21e675a650
git clone https://huggingface.co/ibm-nasa-geospatial/Prithvi-100M-sen1floods11
cd Prithvi-100M-sen1floods11
git lfs pull
git checkout d48937bf588cd506dd73bc4deca543446ca5530d

To create a SageMaker mannequin on the SageMaker console, you could retailer your mannequin knowledge inside Amazon S3 as a result of your SageMaker endpoint will pull your mannequin artifacts instantly from Amazon S3 utilizing a tar.gz format. Inside your tar.gz file, the info should have a particular file format outlined by SageMaker. The next is the file construction for the Prithvi basis mannequin (our necessities are put in on the container, so necessities.txt has been left deliberately clean):

./mannequin
./mannequin/code/inference.py
./mannequin/code/sen1floods11_Prithvi_100M.py (prolonged mannequin config)
./mannequin/code/sen1floods11_Prithvi_100M.pth (prolonged mannequin weights)
./mannequin/code/necessities.txt
./mannequin/code/prithvi/Prithvi_100M.pt (prolonged mannequin weights)
./mannequin/code/prithvi/Prithvi_100M_config.yaml (mannequin config)
./mannequin/code/prithvi/Prithvi.py (mannequin)

This folder construction stays true for different fashions as properly. The /code folder should maintain the inference.py file and any information used inside inference.py. These further information are usually mannequin artifacts (configs, weights, and so forth). In our case, this would be the entire Prithvi base mannequin folder in addition to the weights and configs for the fine-tuned model we’ll use. As a result of we now have already put in these packages inside our container, this isn’t used; nevertheless, there nonetheless should be a necessities.txt file, in any other case your endpoint will fail to construct. All different information belong within the root folder.

With the previous file construction in place, open your terminal and route into the mannequin folder.

  1. Run the next command in your terminal:
    tar -czvf mannequin.tar.gz ./

    The command will create a compressed model of your mannequin information known as mannequin.tar.gz from the information in your present listing. Now you can add this file into an S3 bucket.

  2. If utilizing SageMaker, run the next command:
    sudo apt-get set up uuid-runtime

  3. Now create a brand new S3 bucket. The next CLI instructions create an S3 bucket and add your mannequin.tar.gz file:
    # generate a novel postfix
    
    BUCKET_POSTFIX=$(uuidgen --random | minimize -d'-' -f1)
    echo "export BUCKET_POSTFIX=${BUCKET_POSTFIX}" >> ~/.bashrc
    echo "Your bucket title will probably be customsagemakercontainer-model-${BUCKET_POSTFIX}"
    
    # make your bucket
    aws s3 mb s3://customsagemakercontainer-model-${BUCKET_POSTFIX}
    
    # add to your bucket
    aws s3 cp mannequin.tar.gz s3://customsagemakercontainer-model-${BUCKET_POSTFIX}/mannequin.tar.gz 

The file you uploaded will probably be used within the subsequent step to outline the mannequin to be created within the endpoint.

Create SageMaker mannequin, SageMaker endpoint configuration, and SageMaker endpoint

You now create a SageMaker inference endpoint utilizing the CLI. There are three steps to making a SageMaker endpoint: create a mannequin, create an endpoint configuration, and create an endpoint.

On this put up, you’ll create a public SageMaker endpoint as a result of it will simplify operating and testing the endpoint. For particulars about the best way to restrict entry to SageMaker endpoints, confer with Deploy fashions with SageMaker Studio.

Full the next steps:

  1. Get the ECR repository’s ARN:
    export REPOSITORY_ARN=$(aws ecr describe-repositories --repository-names ${CONTAINER_REPOSITORY_NAME} --query 'repositories[0].repositoryArn' --output textual content)

  2. Create a task for the SageMaker service to imagine. Create a file defining the position’s belief coverage.
    cat > create-sagemaker-role.json << EOF
    {
      "Model": "2012-10-17",
      "Assertion": [
        {
          "Effect": "Allow",
          "Principal": {
            "Service": "sagemaker.amazonaws.com"
          },
          "Action": "sts:AssumeRole"
        }
      ]
    }
    EOF

  3. Create a file defining the service position’s permissions:
    cat > put-sagemaker-role-policy.json << EOF
    {
        "Model": "2012-10-17",
        "Assertion": [
            {
                "Action": [
                    "s3:ListBucket"
                ],
                "Impact": "Enable",
                "Useful resource": [
                    "arn:aws:s3:::customsagemakercontainer-model-${BUCKET_POSTFIX}"
                ]
            },
            {
                "Motion": [
                    "s3:GetObject",
                    "s3:PutObject",
                    "s3:DeleteObject"
                ],
                "Impact": "Enable",
                "Useful resource": [
                    "arn:aws:s3:::customsagemakercontainer-model-${BUCKET_POSTFIX}/*"
                ]
            },
            {
                "Impact": "Enable",
                "Motion": [
                    "sagemaker:BatchPutMetrics",
                    "ecr:GetAuthorizationToken",
                    "ecr:ListImages"
                ],
                "Useful resource": "*"
            },
            {
                "Impact": "Enable",
                "Motion": [
                    "ecr:BatchCheckLayerAvailability",
                    "ecr:GetDownloadUrlForLayer",
                    "ecr:BatchGetImage"
                ],
                "Useful resource": [
                    "${REPOSITORY_ARN}"
                ]
            },
            {
                "Impact": "Enable",
                "Motion": "cloudwatch:PutMetricData",
                "Useful resource": "*",
                "Situation": {
                    "StringLike": {
                        "cloudwatch:namespace": [
                            "*SageMaker*",
                            "*Sagemaker*",
                            "*sagemaker*"
                        ]
                    }
                }
            },
            {
                "Impact": "Enable",
                "Motion": [
                    "logs:CreateLogStream",
                    "logs:PutLogEvents",
                    "logs:CreateLogGroup",
                    "logs:DescribeLogStreams"
                ],
                "Useful resource": "arn:aws:logs:*:*:log-group:/aws/sagemaker/*"
            }
        ]
    }
    EOF

  4. Create the SageMaker service position:
    aws iam create-role --role-name SageMakerInferenceRole --assume-role-policy-document file://create-sagemaker-role.json
    
    export SAGEMAKER_INFERENCE_ROLE_ARN=$(aws iam get-role --role-name SageMakerInferenceRole --query 'Function.Arn' --output textual content)

  5. Connect the permission insurance policies to the service position:
    aws iam put-role-policy --role-name SageMakerInferenceRole --policy-name SageMakerInferenceServiceRolePolicy --policy-document file://put-sagemaker-role-policy.json

    The mannequin definition will embrace the position you created, the ECR container picture, and the Amazon S3 location of the mannequin.tar.gz file that you simply created beforehand.

  6. Create a JSON file that defines the mannequin and run the create-model command:
    cat > create_model.json << EOF
    {
        "ModelName": "prithvi",
        "PrimaryContainer": {
            "Picture": "$REPOSITORY_URI:newest",
            "ModelDataUrl": "s3://customsagemakercontainer-model-${BUCKET_POSTFIX}/mannequin.tar.gz"
        },
        "ExecutionRoleArn": "$SAGEMAKER_INFERENCE_ROLE_ARN"
    }
    EOF

    aws sagemaker create-model --cli-input-json file://create_model.json

    A SageMaker endpoint configuration specifies the infrastructure that the mannequin will probably be hosted on. The mannequin will probably be hosted on a ml.g4dn.xlarge occasion for GPU-based acceleration.

  7. Create the endpoint configuration JSON file and create the SageMaker endpoint configuration:
    cat > create_endpoint_config.json << EOF
    {
        "EndpointConfigName": "prithvi-endpoint-config",
        "ProductionVariants": [
            {
                "VariantName": "default-variant",
                "ModelName": "prithvi",
                "InitialInstanceCount": 1,
                "InstanceType": "ml.g4dn.xlarge",
                "InitialVariantWeight": 1.0
            }
        ]
    }
    EOF
    
    aws sagemaker create-endpoint-config --cli-input-json file://create_endpoint_config.json

  8. Create the SageMaker endpoint by referencing the endpoint configuration created within the earlier step:
    aws sagemaker create-endpoint --endpoint-name prithvi-endpoint --endpoint-config-name prithvi-endpoint-config

    The ml.g4dn.xlarge inference endpoint will price $0.736 per hour whereas operating. It is going to take a number of minutes for the endpoint to complete deploying.

  9. Verify the standing utilizing the next command, ready for it to return InService:
    aws sagemaker describe-endpoint --endpoint-name prithvi-endpoint --query "EndpointStatus" --output textual content

When the endpoint’s standing is InService, proceed to the following part.

Take a look at your customized SageMaker inference endpoint

To check your SageMaker endpoint, you’ll question your endpoint with a picture and show it. The next command sends a URL that references a TIFF picture to the SageMaker endpoint, the mannequin sends again a byte array, and the command reforms the byte array into a picture. Open up a pocket book domestically or on Sagemaker Studio JupyterLab. The beneath code will should be run exterior of the command line to view the picture

from sagemaker.predictor import Predictor
from sagemaker.serializers import JSONSerializer

payload = "https://huggingface.co/ibm-nasa-geospatial/Prithvi-EO-1.0-100M/resolve/primary/examples/HLS.L30.T13REN.2018013T172747.v2.0.B02.B03.B04.B05.B06.B07_cropped.tif"

predictor = Predictor(endpoint_name="prithvi-endpoint")
predictor.serializer = JSONSerializer()

predictions = predictor.predict(payload)

This Python code creates a predictor object to your endpoint and units the predictor’s serializer to NumPy for the conversion on the endpoint. It queries the predictor object utilizing a payload of a URL pointing to a TIFF picture. You employ a helper perform to show the picture and improve the raster. It is possible for you to to seek out that helper perform right here. After you add the helper perform, show the picture:

import numpy as np
import matplotlib.pyplot as plt

NO_DATA_FLOAT = 0.0001
PERCENTILES = (0.1, 99.9)
NO_DATA = -9999

nppred = np.frombuffer(predictions).reshape((224, 224, 3))

def enhance_raster_for_visualization(raster, ref_img=None):
    if ref_img is None:
        ref_img = raster
    channels = []
    for channel in vary(raster.form[0]):
        valid_mask = np.ones_like(ref_img[channel], dtype=bool)
        valid_mask[ref_img[channel] == NO_DATA_FLOAT] = False
        minutes, maxs = np.percentile(ref_img[channel][valid_mask], PERCENTILES)
        normalized_raster = (raster[channel] - minutes) / (maxs - minutes)
        normalized_raster[~valid_mask] = 0
        clipped = np.clip(normalized_raster, 0, 1)
        channels.append(clipped)
    clipped = np.stack(channels)
    channels_last = np.moveaxis(clipped, 0, -1)[..., :3]
    rgb = channels_last[..., ::-1]
    return rgb
    
raster_for_visualization = enhance_raster_for_visualization(nppred)
plt.imshow(nppred)
plt.present()

It’s best to observe a picture that has been taken from a satellite tv for pc.

Clear up

To scrub up the sources from this put up and keep away from incurring prices, comply with these steps:

  1. Delete the SageMaker endpoint, endpoint configuration, and mannequin.
  2. Delete the ECR picture and repository.
  3. Delete the mannequin.tar.gz file within the S3 bucket that was created.
  4. Delete the customsagemakercontainer-model and customsagemakercontainer-codebuildsource S3 buckets.

Conclusion

On this put up, we prolonged a SageMaker container to incorporate customized dependencies, wrote a Python script to run a customized ML mannequin, and deployed that mannequin on the SageMaker container inside a SageMaker endpoint for real-time inference. This answer produces a operating GPU-enabled endpoint for inference queries. You should utilize this identical course of to create customized mannequin SageMaker endpoints by extending different SageMaker containers and writing an inference.py file for brand new customized fashions. Moreover, with changes, you possibly can create a multi-model SageMaker endpoint for customized fashions or run a batch processing endpoint for eventualities the place you run massive batches of queries directly. These options allow you to transcend the preferred fashions used as we speak and customise fashions to suit your personal distinctive use case.


In regards to the Authors

Picture of Aidan Ricci, AWS Solutions ArchitectAidan is a options architect supporting US federal authorities well being prospects. He assists prospects by growing technical architectures and offering greatest practices on Amazon Internet Companies (AWS) cloud with a give attention to AI/ML companies. In his free time, Aidan enjoys touring, lifting, and cooking

Nate Haynes, AWS Solutions ArchitectNate is a options architect supporting US federal authorities sciences prospects. He assists prospects in growing technical architectures on Amazon Internet Companies (AWS), with a give attention to knowledge analytics and excessive efficiency computing. In his free time, he enjoys snowboarding and {golfing}.

Charlotte Fondren, AWS Solutions ArchitectCharlotte is a options architect on the aerospace & satellite tv for pc crew at Amazon Internet Companies (AWS), the place she helps prospects obtain their mission targets via modern cloud options. Charlotte focuses on machine studying with a give attention to Generative AI. In her free time, she enjoys touring, portray, and operating.

Tags: containerCreatecustomendpointextendedInferenceModelSageMaker
Previous Post

Extracting Structured Car Knowledge from Photographs | by Lihi Gur Arie, PhD | Jan, 2025

Next Post

Constructing a Regression Mannequin to Predict Supply Durations: A Sensible Information | by Jimin Kang | Dec, 2024

Next Post
Constructing a Regression Mannequin to Predict Supply Durations: A Sensible Information | by Jimin Kang | Dec, 2024

Constructing a Regression Mannequin to Predict Supply Durations: A Sensible Information | by Jimin Kang | Dec, 2024

Leave a Reply Cancel reply

Your email address will not be published. Required fields are marked *

Popular News

  • How Aviva constructed a scalable, safe, and dependable MLOps platform utilizing Amazon SageMaker

    How Aviva constructed a scalable, safe, and dependable MLOps platform utilizing Amazon SageMaker

    401 shares
    Share 160 Tweet 100
  • Diffusion Mannequin from Scratch in Pytorch | by Nicholas DiSalvo | Jul, 2024

    401 shares
    Share 160 Tweet 100
  • Unlocking Japanese LLMs with AWS Trainium: Innovators Showcase from the AWS LLM Growth Assist Program

    401 shares
    Share 160 Tweet 100
  • Proton launches ‘Privacy-First’ AI Email Assistant to Compete with Google and Microsoft

    400 shares
    Share 160 Tweet 100
  • Streamlit fairly styled dataframes half 1: utilizing the pandas Styler

    400 shares
    Share 160 Tweet 100

About Us

Automation Scribe is your go-to site for easy-to-understand Artificial Intelligence (AI) articles. Discover insights on AI tools, AI Scribe, and more. Stay updated with the latest advancements in AI technology. Dive into the world of automation with simplified explanations and informative content. Visit us today!

Category

  • AI Scribe
  • AI Tools
  • Artificial Intelligence

Recent Posts

  • Empowering LLMs to Assume Deeper by Erasing Ideas
  • Construct an clever neighborhood agent to revolutionize IT assist with Amazon Q Enterprise
  • How To not Write an MCP Server
  • Home
  • Contact Us
  • Disclaimer
  • Privacy Policy
  • Terms & Conditions

© 2024 automationscribe.com. All rights reserved.

No Result
View All Result
  • Home
  • AI Scribe
  • AI Tools
  • Artificial Intelligence
  • Contact Us

© 2024 automationscribe.com. All rights reserved.