Jupyter AI brings generative AI capabilities proper into the interface. Having a neighborhood AI assistant ensures privateness, reduces latency, and gives offline performance, making it a robust software for builders. On this article, we’ll learn to arrange a neighborhood AI coding assistant in JupyterLab utilizing Jupyter AI, Ollama and Hugging Face. By the top of this text, you’ll have a totally useful coding assistant in JupyterLab able to autocompleting code, fixing errors, creating new notebooks from scratch, and far more, as proven within the screenshot beneath.

⚠️ Jupyter AI remains to be beneath heavy improvement, so some options might break. As of writing this text, I’ve examined the setup to verify it really works, however count on potential modifications because the challenge evolves. Additionally the efficiency of the assistant is dependent upon the mannequin that you choose so ensure you select the one that’s match to your use case.
First issues first — what’s Jupyter AI? Because the identify suggests, Jupyter AI is a JupyterLab extension for generative AI. This highly effective software transforms your commonplace Jupyter notebooks or JupyterLab surroundings right into a generative AI playground. The very best half? It additionally works seamlessly in environments like Google Colaboratory and Visible Studio Code. This extension does all of the heavy lifting, offering entry to a wide range of mannequin suppliers (each open and closed supply) proper inside your Jupyter surroundings.

Establishing the surroundings includes three fundamental parts:
- JupyterLab
- The Jupyter AI extension
- Ollama (for Native Mannequin Serving)
- [Optional] Hugging Face (for GGUF fashions)
Actually, getting the assistant to resolve coding errors is the straightforward half. What is difficult is guaranteeing all of the installations have been completed accurately. It’s due to this fact important you comply with the steps accurately.
1. Putting in the Jupyter AI Extension
It’s beneficial to create a new surroundings particularly for Jupyter AI to maintain your present surroundings clear and organised. As soon as completed comply with the subsequent steps. Jupyter AI requires JupyterLab 4.x or Jupyter Pocket book 7+, so ensure you have the newest model of Jupyter Lab put in. You may set up/improve JupyterLab with pip or conda:
# Set up JupyterLab 4 utilizing pip
pip set up jupyterlab~=4.0
Subsequent, set up the Jupyter AI extension as follows.
pip set up "jupyter-ai[all]"That is the best methodology for set up because it consists of all supplier dependencies (so it helps Hugging Face, Ollama, and so on., out of the field). Up to now, Jupyter AI helps the next mannequin suppliers :

In the event you encounter errors throughout the Jupyter AI set up, manually set up Jupyter AI utilizing pip with out the [all] non-obligatory dependency group. This manner you possibly can management which fashions can be found in your Jupyter AI surroundings. For instance, to put in Jupyter AI with solely added assist for Ollama fashions, use the next:
pip set up jupyter-ai langchain-ollamaThe dependencies depend on the mannequin suppliers (see desk above). Subsequent, restart your JupyterLab occasion. In the event you see a chat icon on the left sidebar, this implies every thing has been put in completely. With Jupyter AI, you possibly can chat with fashions or use inline magic instructions immediately inside your notebooks.

2. Setting Up Ollama for Native Fashions
Now that Jupyter AI is put in, we have to configure it with a mannequin. Whereas Jupyter AI integrates with Hugging Face fashions immediately, some fashions might not work correctly. As an alternative, Ollama gives a extra dependable option to load fashions regionally.
Ollama is a helpful software for working Giant Language Fashions regionally. It allows you to obtain pre-configured AI fashions from its library. Ollama helps all main platforms (macOS, Home windows, Linux), so select the tactic to your OS and obtain and set up it from the official web site. After set up, confirm that it’s arrange accurately by working:
Ollama --version
------------------------------
ollama model is 0.6.2
Additionally, make sure that your Ollama server should be working which you’ll test by calling ollama serve on the terminal:
$ ollama serve
Error: hear tcp 127.0.0.1:11434: bind: deal with already in use
If the server is already energetic, you will note an error like above confirming that Ollama is working and in use.
Possibility 1: Utilizing Pre-Configured Fashions
Ollama gives a library of pre-trained fashions that you may obtain and run regionally. To start out utilizing a mannequin, obtain it utilizing the pull command. For instance, to make use of qwen2.5-coder:1.5b, run:
ollama pull qwen2.5-coder:1.5bIt will obtain the mannequin in your native surroundings. To substantiate if the mannequin has been downloaded, run:
ollama recordIt will record all of the fashions you’ve downloaded and saved regionally in your system utilizing Ollama.
Possibility 2: Loading a Customized Mannequin
If the mannequin you want isn’t accessible in Ollama’s library, you possibly can load a customized mannequin by making a Mannequin File that specifies the mannequin’s supply.For detailed directions on this course of, confer with the Ollama Import Documentation.
Possibility 3: Operating GGUF Fashions immediately from Hugging Face
Ollama now helps GGUF fashions immediately from the Hugging Face Hub, together with each private and non-private fashions. This implies if you wish to use GGUF mannequin immediately from Hugging Face Hub you are able to do so with out requiring a customized Mannequin File as talked about in Possibility 2 above.
For instance, to load a 4-bit quantized Qwen2.5-Coder-1.5B-Instruct mannequin from Hugging Face:
1. First, allow Ollama beneath your Native Apps settings.

2. On the mannequin web page, select Ollama from the Use this mannequin dropdown as proven beneath.

We’re virtually there. In JupyterLab, open the Jupyter AI chat interface on the sidebar. On the prime of the chat panel or in its settings (gear icon), there’s a dropdown or area to pick the Mannequin supplier and mannequin ID. Select Ollama because the supplier, and enter the mannequin identify precisely as proven by Ollama record within the terminal (e.g. qwen2.5-coder:1.5b). Jupyter AI will hook up with the native Ollama server and cargo that mannequin for queries. No API keys are wanted since that is native.
- Set Language mannequin, Embedding mannequin and inline completions fashions primarily based on the fashions of your selection.
- Save the settings and return to the chat interface.

This configuration hyperlinks Jupyter AI to the regionally working mannequin by way of Ollama. Whereas inline completions must be enabled by this course of, if that doesn’t occur, you are able to do it manually by clicking on the Jupyternaut icon, which is positioned within the backside bar of the JupyterLab interface to the left of the Mode indicator (e.g., Mode: Command). This opens a dropdown menu the place you possibly can choose Allow completions by Jupyternaut to activate the characteristic.

As soon as arrange, you should utilize the AI coding assistant for varied duties like code autocompletion, debugging assist, and producing new code from scratch. It’s necessary to notice right here that you may work together with the assistant both by means of the chat sidebar or immediately in pocket book cells utilizing %%ai magic instructions. Let’s have a look at each the methods.
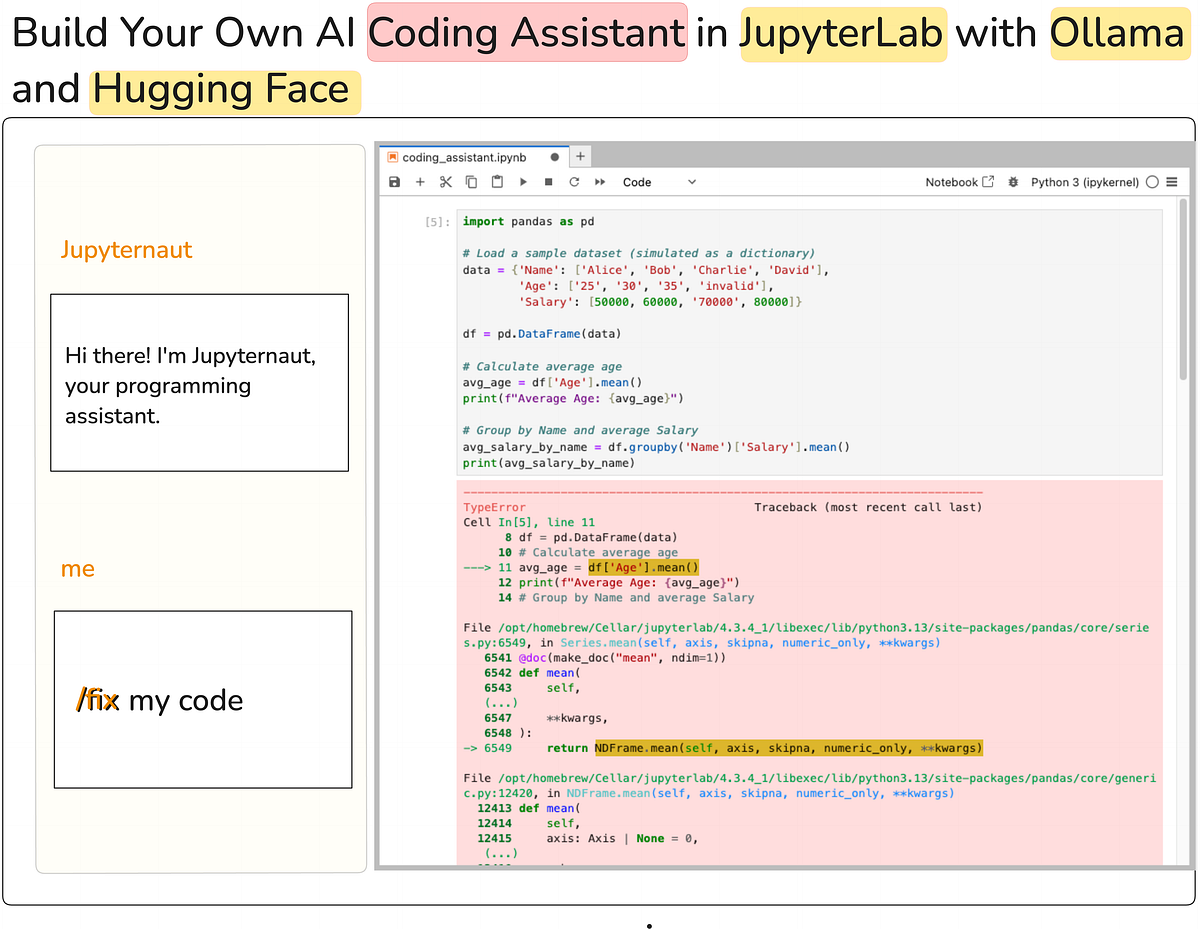
Coding assistant by way of Chat interface
That is fairly simple. You may merely chat with the mannequin to carry out an motion. As an example, right here is how we will ask the mannequin to elucidate the error within the code after which subsequently repair the error by deciding on code within the pocket book.

You can too ask the AI to generate code for a activity from scratch, simply by describing what you want in pure language. Here’s a Python operate that returns all prime numbers as much as a given optimistic integer N, generated by Jupyternaut.

Coding assistant by way of pocket book cell or IPython shell:
You can too work together with fashions immediately inside a Jupyter pocket book. First, load the IPython extension:
%load_ext jupyter_ai_magicsNow, you should utilize the %%ai cell magic to work together together with your chosen language mannequin utilizing a specified immediate. Let’s replicate the above instance however this time inside the pocket book cells.

For extra particulars and choices you possibly can confer with the official documentation.
As you possibly can gauge from this text, Jupyter AI makes it simple to arrange a coding assistant, supplied you’ve gotten the suitable installations and setup in place. I used a comparatively small mannequin, however you possibly can select from a wide range of fashions supported by Ollama or Hugging Face. The important thing benefit right here is that utilizing a neighborhood mannequin gives vital advantages: it enhances privateness, reduces latency, and reduces dependence on proprietary mannequin suppliers. Nevertheless, working large fashions regionally with Ollama may be resource-intensive so guarantee that you’ve got enough RAM. With the fast tempo at which open-source fashions are bettering, you possibly can obtain comparable efficiency even with these alternate options.


