Multi-channel transcription streaming is a characteristic of Amazon Transcribe that can be utilized in lots of instances with an online browser. Creating this stream supply has it challenges, however with the JavaScript Net Audio API, you possibly can join and mix totally different audio sources like movies, audio information, or {hardware} like microphones to acquire transcripts.
On this put up, we information you thru the way to use two microphones as audio sources, merge them right into a single dual-channel audio, carry out the required encoding, and stream it to Amazon Transcribe. A Vue.js utility supply code is supplied that requires two microphones linked to your browser. Nevertheless, the flexibility of this method extends far past this use case—you possibly can adapt it to accommodate a variety of units and audio sources.
With this method, you may get transcripts for 2 sources in a single Amazon Transcribe session, providing value financial savings and different advantages in comparison with utilizing a separate session for every supply.
Challenges when utilizing two microphones
For our use case, utilizing a single-channel stream for 2 microphones and enabling Amazon Transcribe speaker label identification to determine the audio system is likely to be sufficient, however there are a number of issues:
- Speaker labels are randomly assigned at session begin, that means you’ll have to map the ends in your utility after the stream has began
- Mislabeled audio system with comparable voice tones can occur, which even for a human is difficult to differentiate
- Voice overlapping can happen when two audio system speak on the similar time with one audio supply
By utilizing two audio sources with microphones, you possibly can handle these considerations by ensuring every transcription is from a hard and fast enter supply. By assigning a tool to a speaker, our utility is aware of prematurely which transcript to make use of. Nevertheless, you may nonetheless encounter voice overlapping if two close by microphones are choosing up a number of voices. This may be mitigated by utilizing directional microphones, quantity administration, and Amazon Transcribe word-level confidence scores.
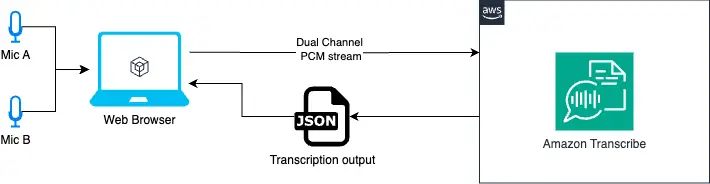
Answer overview
The next diagram illustrates the answer workflow.

Utility diagram for 2 microphones
We use two audio inputs with the Net Audio API. With this API, we will merge the 2 inputs, Mic A and Mic B, right into a single audio information supply, with the left channel representing Mic A and the correct channel representing Mic B.
Then, we convert this audio supply to PCM (Pulse-Code Modulation) audio. PCM is a standard format for audio processing, and it’s one of many codecs required by Amazon Transcribe for the audio enter. Lastly, we stream the PCM audio to Amazon Transcribe for transcription.
Stipulations
You need to have the next stipulations in place:
{
  "Model": "2012-10-17",
  "Assertion": [
    {
      "Sid": "DemoWebAudioAmazonTranscribe",
      "Effect": "Allow",
      "Action": "transcribe:StartStreamTranscriptionWebSocket",
      "Resource": "*"
    }
  ]
}
Begin the appliance
Full the next steps to launch the appliance:
- Go to the basis listing the place you downloaded the code.
- Create a .env file to arrange your AWS entry keys from the
env.patternfile. - Set up packages and run
bun set up(for those who’re utilizing node, runnode set up). - Begin the online server and run
bun dev(for those who’re utilizing node, runnode dev). - Open your browser in
http://localhost:5173/.
Utility working on http://localhost:5173 with two linked microphones
Code walkthrough
On this part, we look at the essential code items for the implementation:
- Step one is to record the linked microphones by utilizing the browser API
navigator.mediaDevices.enumerateDevices():
const units = await navigator.mediaDevices.enumerateDevices()
return units.filter((d) => d.form === 'audioinput')
- Subsequent, it is advisable receive the
MediaStreamobject for every of the linked microphones. This may be carried out utilizing thenavigator.mediaDevices.getUserMedia()API, which permits entry the consumer’s media units (resembling cameras and microphones). You may then retrieve aMediaStreamobject that represents the audio or video information from these units:
const streams = []
const stream = await navigator.mediaDevices.getUserMedia({
  audio: {
    deviceId: system.deviceId,
    echoCancellation: true,
    noiseSuppression: true,
    autoGainControl: true,
  },
})

if (stream) streams.push(stream)- To mix the audio from the a number of microphones, it is advisable create an AudioContext interface for audio processing. Inside this
AudioContext, you should use ChannelMergerNode to merge the audio streams from the totally different microphones. Thejoin(vacation spot, src_idx, ch_idx)technique arguments are:- vacation spot – The vacation spot, in our case mergerNode.
- src_idx – The supply channel index, in our case each 0 (as a result of every microphone is a single-channel audio stream).
- ch_idx – The channel index for the vacation spot, in our case 0 and 1 respectively, to create a stereo output.
// occasion of audioContext
const audioContext = new AudioContext({
       sampleRate: SAMPLE_RATE,
})
// that is used to course of the microphone stream information
const audioWorkletNode = new AudioWorkletNode(audioContext, 'recording-processor', {...})
// microphone A
const audioSourceA = audioContext.createMediaStreamSource(mediaStreams[0]);
// microphone B
const audioSourceB = audioContext.createMediaStreamSource(mediaStreams[1]);
// audio node for 2 inputs
const mergerNode = audioContext.createChannelMerger(2);
// join the audio sources to the mergerNode vacation spot.
audioSourceA.join(mergerNode, 0, 0);
audioSourceB.join(mergerNode, 0, 1);
// join our mergerNode to the AudioWorkletNode
merger.join(audioWorkletNode);
- The microphone information is processed in an AudioWorklet that emits information messages each outlined variety of recording frames. These messages will include the audio information encoded in PCM format to ship to Amazon Transcribe. Utilizing the p-event library, you possibly can asynchronously iterate over the occasions from the Worklet. A extra in-depth description about this Worklet is supplied within the subsequent part of this put up.
import { pEventIterator } from 'p-event'
...

// Register the worklet
attempt {
  await audioContext.audioWorklet.addModule('./worklets/recording-processor.js')
} catch (e) {
  console.error('Did not load audio worklet')
}

//  An async iterator
const audioDataIterator = pEventIterator<'message', MessageEvent>(
  audioWorkletNode.port,
  'message',
)
...

// AsyncIterableIterator: Each time the worklet emits an occasion with the message `SHARE_RECORDING_BUFFER`, this iterator will return the AudioEvent object that we want.
const getAudioStream = async perform* (
  audioDataIterator: AsyncIterableIterator>,
) {
  for await (const chunk of audioDataIterator) {
    if (chunk.information.message === 'SHARE_RECORDING_BUFFER') {
      const { audioData } = chunk.information
      yield {
        AudioEvent: {
          AudioChunk: audioData,
        },
      }
    }
  }
}
- To start out streaming the info to Amazon Transcribe, you should use the fabricated iterator and enabled
NumberOfChannels: 2andEnableChannelIdentification: trueto allow the twin channel transcription. For extra data, discuss with the AWS SDK StartStreamTranscriptionCommand documentation.
import {
  LanguageCode,
  MediaEncoding,
  StartStreamTranscriptionCommand,
} from '@aws-sdk/client-transcribe-streaming'

const command = new StartStreamTranscriptionCommand({
    LanguageCode: LanguageCode.EN_US,
    MediaEncoding: MediaEncoding.PCM,
    MediaSampleRateHertz: SAMPLE_RATE,
    NumberOfChannels: 2,
    EnableChannelIdentification: true,
    ShowSpeakerLabel: true,
    AudioStream: getAudioStream(audioIterator),
  })
- After you ship the request, a WebSocket connection is created to alternate audio stream information and Amazon Transcribe outcomes:
const information = await shopper.ship(command)
for await (const occasion of knowledge.TranscriptResultStream) {
    for (const results of occasion.TranscriptEvent.Transcript.Outcomes || []) {
        callback({ ...end result })
    }
}
The end result object will embrace a ChannelId property that you should use to determine your microphone supply, resembling ch_0 and ch_1, respectively.
Deep dive: Audio Worklet
Audio Worklets can execute in a separate thread to supply very low-latency audio processing. The implementation and demo supply code could be discovered within the public/worklets/recording-processor.js file.
For our case, we use the Worklet to carry out two foremost duties:
- Course of the
mergerNodeaudio in an iterable means. This node contains each of our audio channels and is the enter to our Worklet. - Encode the info bytes of the
mergerNodenode into PCM signed 16-bit little-endian audio format. We do that for every iteration or when required to emit a message payload to our utility.
The overall code construction to implement that is as follows:
class RecordingProcessor extends AudioWorkletProcessor {
  constructor(choices) {
    tremendous()
  }
  course of(inputs, outputs) {...}
}

registerProcessor('recording-processor', RecordingProcessor)
You may cross customized choices to this Worklet occasion utilizing the processorOptions attribute. In our demo, we set a maxFrameCount: (SAMPLE_RATE * 4) / 10 as a bitrate information to find out when to emit a brand new message payload. A message is for instance:
this.port.postMessage({
  message: 'SHARE_RECORDING_BUFFER',
  buffer: this._recordingBuffer,
  recordingLength: this.recordedFrames,
  audioData: new Uint8Array(pcmEncodeArray(this._recordingBuffer)), // PCM encoded audio format
})
PCM encoding for 2 channels
Probably the most essential sections is the way to encode to PCM for 2 channels. Following the AWS documentation within the Amazon Transcribe API Reference, the AudioChunk is outlined by: Length (s) * Pattern Charge (Hz) * Variety of Channels * 2. For 2 channels, 1 second at 16000Hz is: 1 * 16000 * 2 * 2 = 64000 bytes. Our encoding perform it ought to then appear like this:
// Discover that enter is an array, the place every factor is a channel with Float32 values between -1.0 and 1.0 from the AudioWorkletProcessor.
const pcmEncodeArray = (enter: Float32Array[]) => {
  const numChannels = enter.size
  const numSamples = enter[0].size
  const bufferLength = numChannels * numSamples * 2 // 2 bytes per pattern per channel
  const buffer = new ArrayBuffer(bufferLength)
  const view = new DataView(buffer)

  let index = 0

  for (let i = 0; i < numSamples; i++) {
    // Encode for every channel
    for (let channel = 0; channel < numChannels; channel++) {
      const s = Math.max(-1, Math.min(1, enter[channel][i]))
      // Convert the 32 bit float to 16 bit PCM audio waveform samples.
      // Max worth: 32767 (0x7FFF), Min worth: -32768 (-0x8000)
      view.setInt16(index, s < 0 ? s * 0x8000 : s * 0x7fff, true)
      index += 2
    }
  }
  return buffer
}
For extra data how the audio information blocks are dealt with, see AudioWorkletProcessor: course of() technique. For extra data on PCM format encoding, see Multimedia Programming Interface and Information Specs 1.0.
Conclusion
On this put up, we explored the implementation particulars of an online utility that makes use of the browser’s Net Audio API and Amazon Transcribe streaming to allow real-time dual-channel transcription. By utilizing the mixture of AudioContext, ChannelMergerNode, and AudioWorklet, we had been capable of seamlessly course of and encode the audio information from two microphones earlier than sending it to Amazon Transcribe for transcription. The usage of the AudioWorklet specifically allowed us to attain low-latency audio processing, offering a easy and responsive consumer expertise.
You may construct upon this demo to create extra superior real-time transcription purposes that cater to a variety of use instances, from assembly recordings to voice-controlled interfaces.
Check out the answer for your self, and go away your suggestions within the feedback.
Concerning the Creator
 Jorge Lanzarotti is a Sr. Prototyping SA at Amazon Net Providers (AWS) based mostly on Tokyo, Japan. He helps prospects within the public sector by creating revolutionary options to difficult issues.


