
Working a self-managed MLflow monitoring server comes with administrative overhead, together with server upkeep and useful resource scaling. As groups scale their ML experimentation, effectively managing sources throughout peak utilization and idle intervals is a problem. Organizations working MLflow on Amazon EC2 or on-premises can optimize prices and engineering sources through the use of Amazon SageMaker AI with serverless MLflow.
This publish exhibits you the best way to migrate your self-managed MLflow monitoring server to a MLflow App – a serverless monitoring server on SageMaker AI that mechanically scales sources based mostly on demand whereas eradicating server patching and storage administration duties for gratis. Learn to use the MLflow Export Import instrument to switch your experiments, runs, fashions, and different MLflow sources, together with directions to validate your migration’s success.
Whereas this publish focuses on migrating from self-managed MLflow monitoring servers to SageMaker with MLflow, the MLflow Export Import instrument affords broader utility. You possibly can apply the identical strategy emigrate current SageMaker managed MLflow monitoring servers to the brand new serverless MLflow functionality on SageMaker. The instrument additionally helps with model upgrades and establishing backup routines for catastrophe restoration.
Step-by-step information: Monitoring server migration to SageMaker with MLflow
The next information gives step-by-step directions for migrating an current MLflow monitoring server to SageMaker with MLflow. The migration course of consists of three fundamental phases: exporting your MLflow artifacts to intermediate storage, configuring an MLflow App, and importing your artifacts. You possibly can select to execute the migration course of from an EC2 occasion, your private laptop, or a SageMaker pocket book. Whichever surroundings you choose should preserve connectivity to each your supply monitoring server and your goal monitoring server. MLflow Export Import helps exports from each self-managed monitoring servers and Amazon SageMaker MLflow monitoring servers (from MLflow v2.16 onwards) to Amazon SageMaker Serverless MLflow.
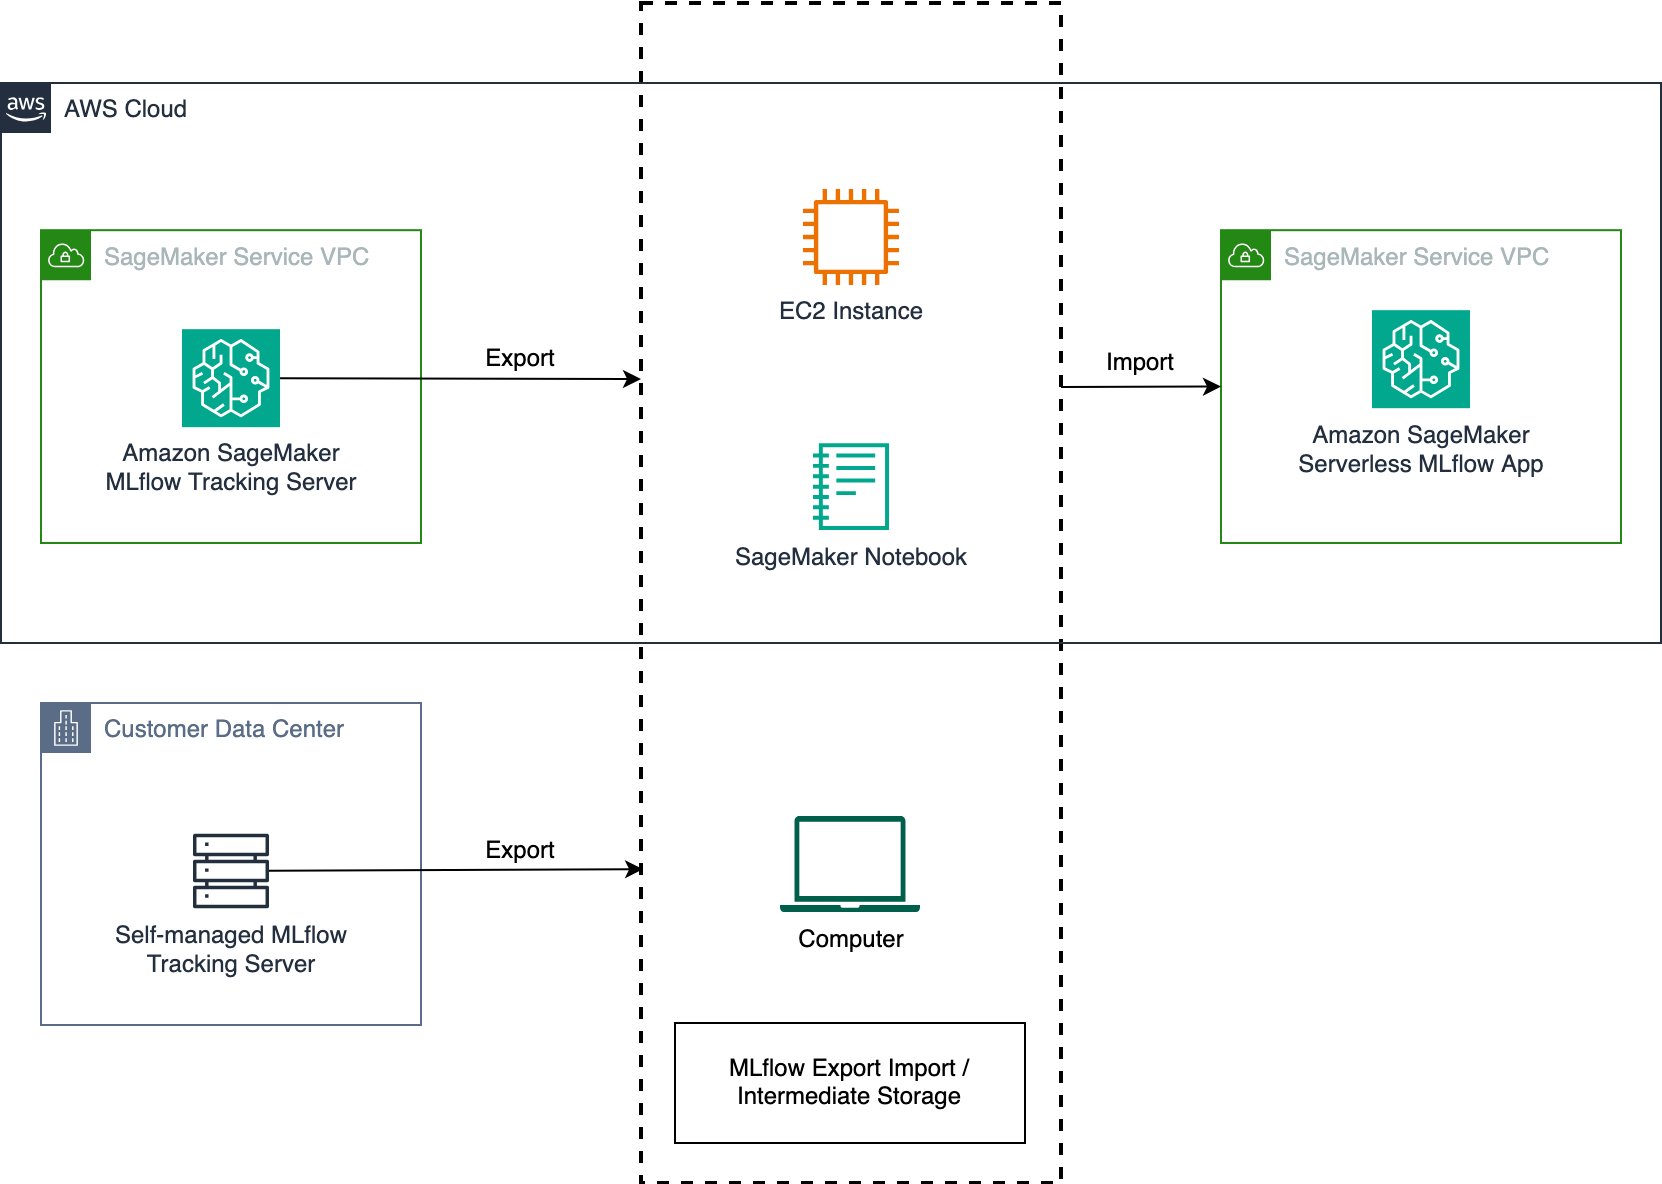
Determine 1: Migration course of with MLflow Export Import instrument
Conditions
To comply with together with this publish, be sure to have the next conditions:
Step 1: Confirm MLflow model compatibility
Earlier than beginning the migration, do not forget that not all MLflow options could also be supported within the migration course of. The MLflow Export Import instrument helps totally different objects based mostly in your MLflow model. To organize for a profitable migration:
- Confirm the present MLflow model of your current MLflow monitoring server:
- Evaluation the most recent supported MLflow model within the Amazon SageMaker MLflow documentation. When you’re working an older MLflow model in a self-managed surroundings, we suggest upgrading to the newest model supported by Amazon SageMaker MLflow earlier than continuing with the migration:
- For an up-to-date listing of MLflow sources that may be transferred utilizing MLflow Export Import, please consult with the MLflow Export Import documentation.
Step 2: Create a brand new MLflow App
To organize your goal surroundings, you first must create a brand new SageMaker Serverless MLflow App.
- After you’ve setup SageMaker AI (see additionally Information to getting arrange with Amazon SageMaker AI), you’ll be able to entry Amazon SageMaker Studio and within the MLflow part, create a brand new MLflow App (if it wasn’t mechanically created through the preliminary area setup). Observe the directions outlined within the SageMaker documentation.
- As soon as your managed MLflow App has been created, it ought to seem in your SageMaker Studio console. Remember the fact that the creation course of can take as much as 5 minutes.
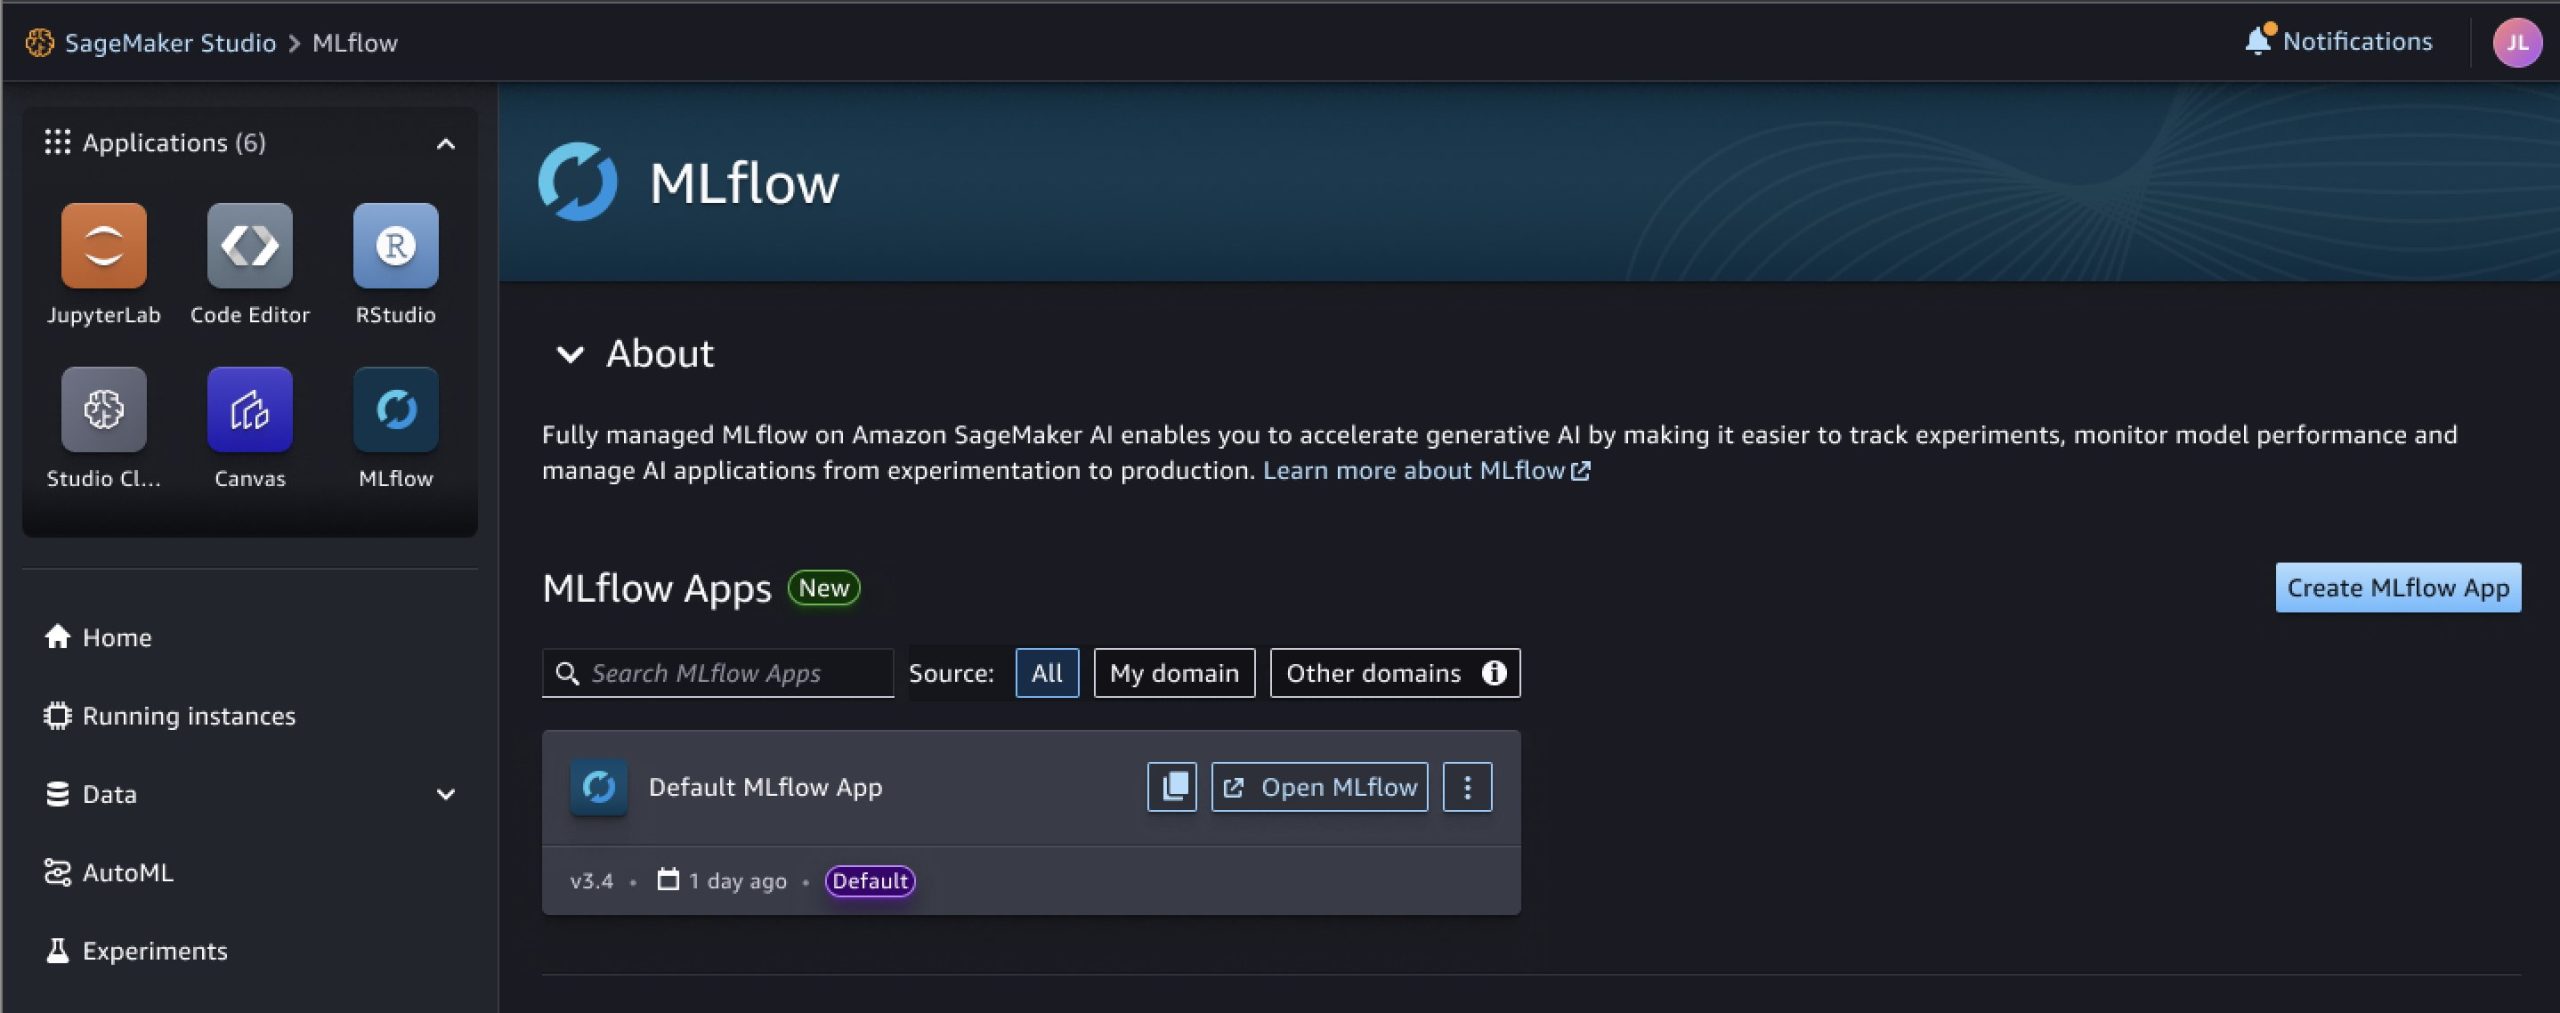
Determine 2: MLflow App in SageMaker Studio Console
Alternatively, you’ll be able to view it by executing the next AWS Command Line Interface (CLI) command:
- Copy the Amazon Useful resource Identify (ARN) of your monitoring server to a doc, it’s wanted in Step 4.
- Select Open MLflow, which leads you to an empty MLflow dashboard. Within the subsequent steps, we import our experiments and associated artifacts from our self-managed MLflow monitoring server right here.
Determine 3: MLflow consumer interface, touchdown web page
Step 3: Set up MLflow and the SageMaker MLflow plugin
To organize your execution surroundings for the migration, it’s essential set up connectivity to your current MLflow servers (see conditions) and set up and configure the required MLflow packages and plugins.
- Earlier than you can begin with the migration, it’s essential set up connectivity and authenticate to the surroundings internet hosting your current self-managed MLflow monitoring server (e.g., a digital machine).
- After you have entry to your monitoring server, it’s essential set up MLflow and the SageMaker MLflow plugin in your execution surroundings. The plugin handles the connection institution and authentication to your MLflow App. Execute the next command (see additionally the documentation):
Step 4: Set up the MLflow Export Import instrument
Earlier than you’ll be able to export your MLflow sources, it’s essential set up the MLflow Export Import instrument.
- Familiarize your self with the MLflow Export Import instrument and its capabilities by visiting its GitHub web page. Within the following steps, we make use of its bulk instruments (particularly
export-allandimport-all), which let you create a duplicate of your monitoring server with its experiments and associated artefacts. This strategy maintains the referential integrity between objects. If you wish to migrate solely chosen experiments or change the identify of current experiments, you need to use Single instruments. Please assessment the MLflow Export Import documentation for extra data on supported objects and limitations. - Set up the MLflow Export Import instrument in your surroundings, by executing the next command:
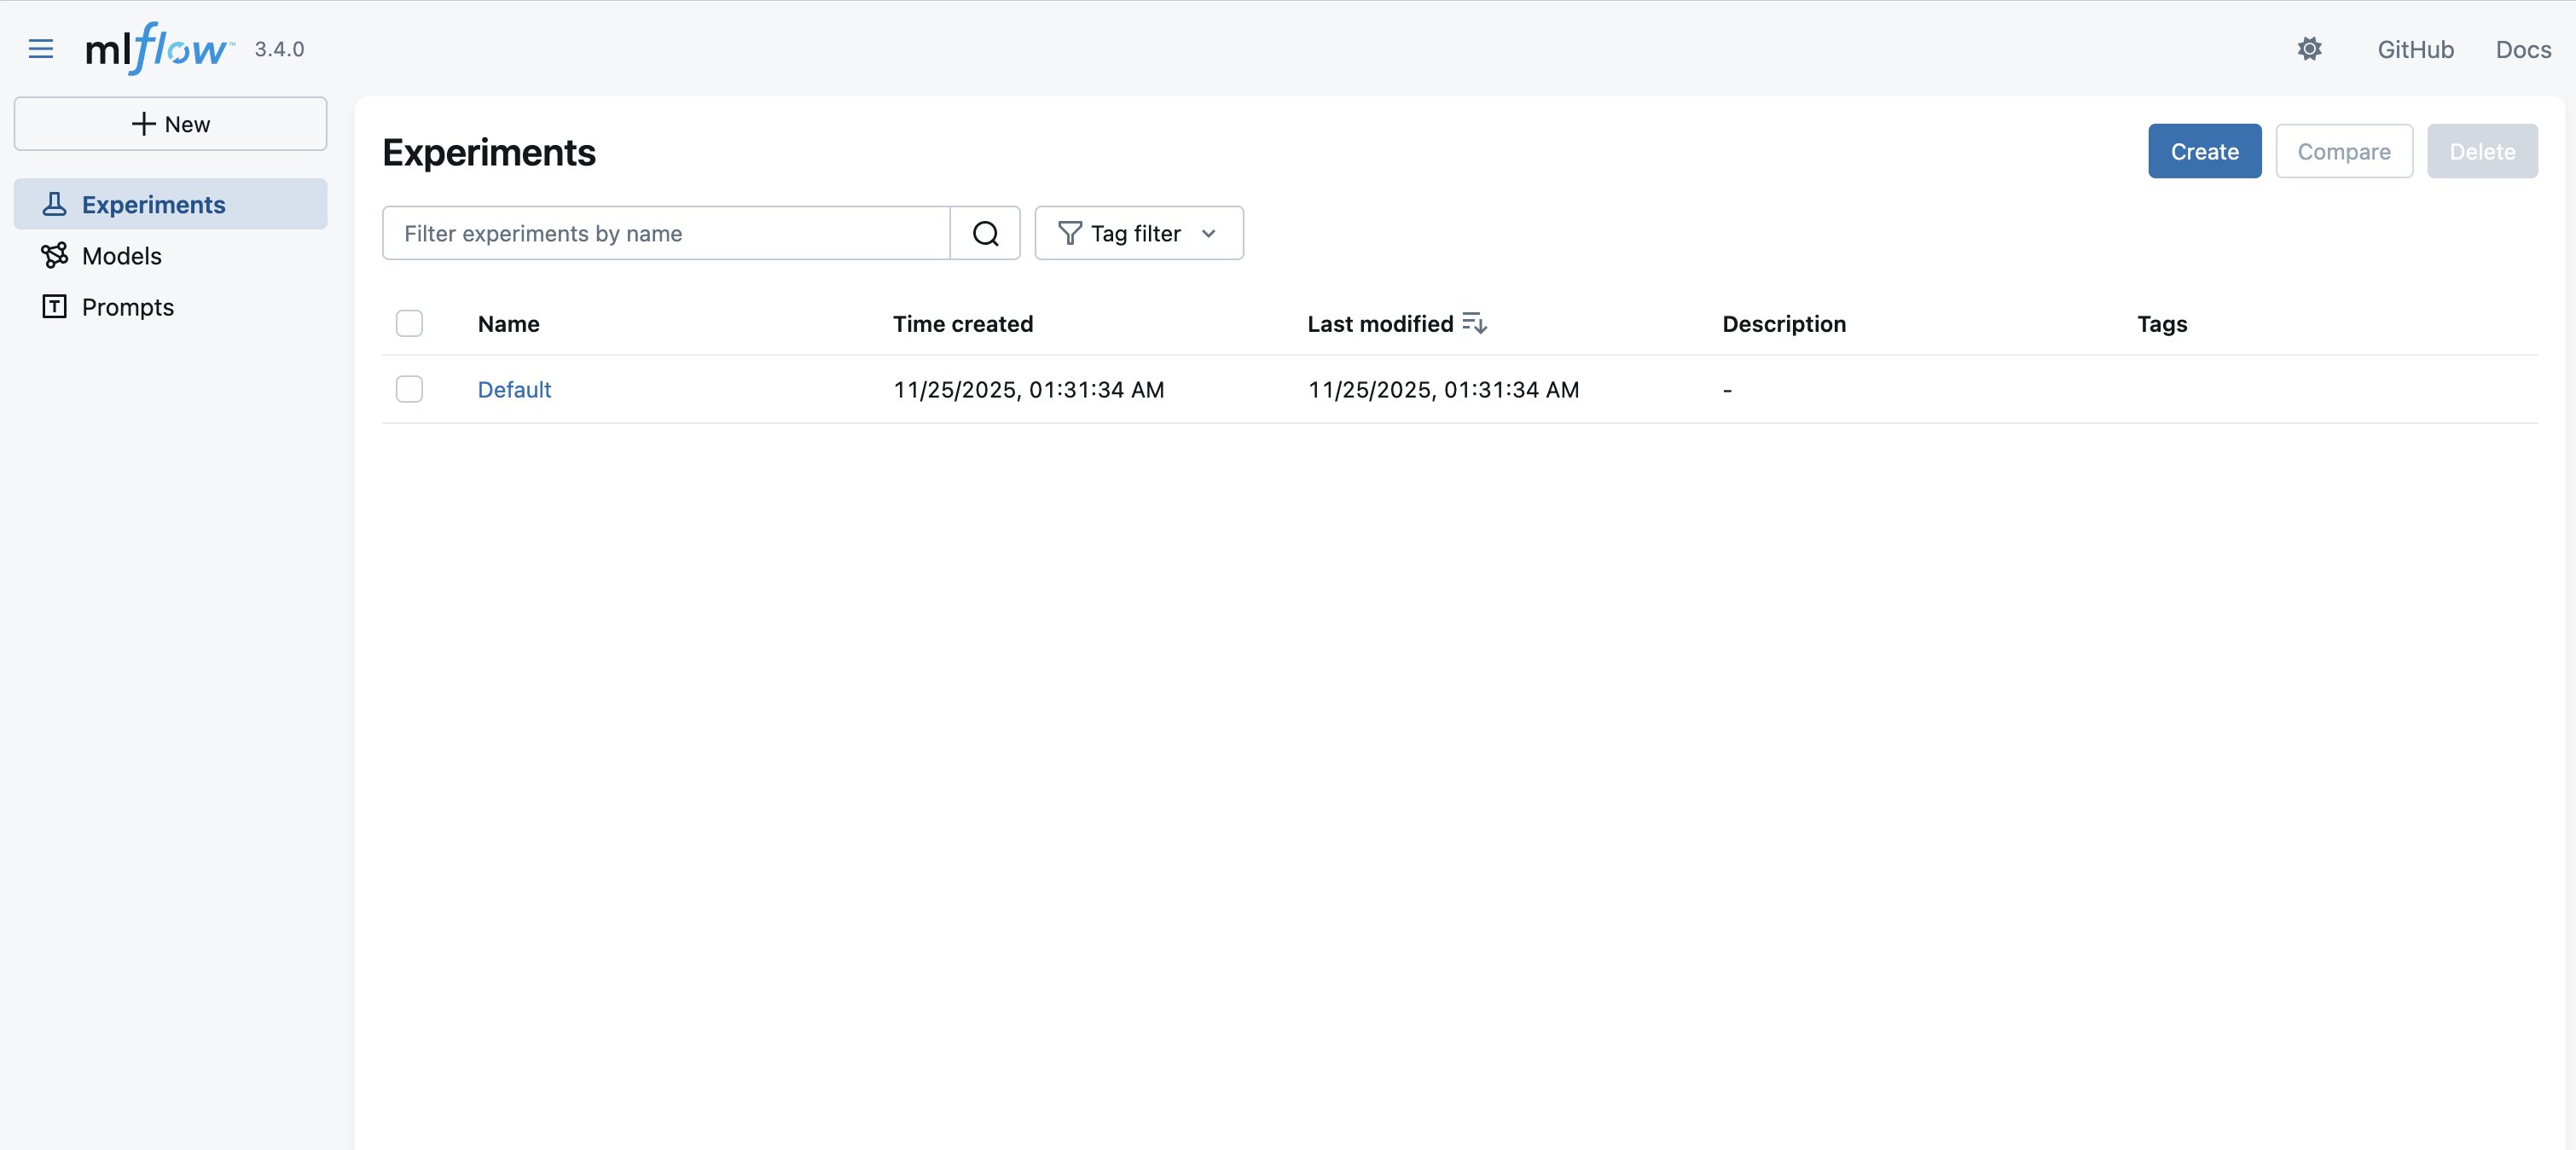
Step 5: Export MLflow sources to a listing
Now that your surroundings is configured, we are able to start the precise migration course of by exporting your MLflow sources out of your supply surroundings.
- After you’ve put in the MLflow Export Import instrument, you’ll be able to create a goal listing in your execution surroundings as a vacation spot goal for the sources, which you extract within the subsequent step.
- Examine your current experiments and the related MLflow sources you need to export. Within the following instance, we need to export the presently saved objects (for instance, experiments and registered fashions).
Determine 4: Experiments saved in MLflow
- Begin the migration by configuring the Uniform Useful resource Identifier (URI) of your monitoring server as an environmental variable and executing the next bulk export instrument with the parameters of your current MLflow monitoring server and a goal listing (see additionally the documentation):
- Wait till the export has completed to examine the output listing (within the previous case:
mlflow-export).
Step 6: Import MLflow sources to your MLflow App
Throughout import, user-defined attributes are retained, however system-generated tags (e.g., creation_date) are usually not preserved by MLflow Export Import. To protect unique system attributes, use the --import-source-tags possibility as proven within the following instance. This protects them as tags with the mlflow_exim prefix. For extra data, see MLflow Export Import – Governance and Lineage. Pay attention to further limitations detailed right here: Import Limitations.
The next process transfers your exported MLflow sources into your new MLflow App:Begin the import by configuring the URI on your MLflow App. You need to use the ARN–which you saved in Step 1–for this. The beforehand put in SageMaker MLflow plugin mechanically interprets the ARN in a sound URI and creates an authenticated request to AWS (bear in mind to configure your AWS credentials as environmental variables so the plugin can decide them up).
Step 7: Validate your migration outcomes
To substantiate your migration was profitable, confirm that your MLflow sources have been transferred appropriately:
- As soon as the import-all script has migrated your experiments, runs, and different objects to the brand new monitoring server, you can begin verifying the success of the migration, by opening the dashboard of your serverless MLflow App (which you opened in Step 2) and confirm that:
- Exported MLflow sources are current with their unique names and metadata
- Run histories are full with the metrics and parameters
- Mannequin artifacts are accessible and downloadable
- Tags and notes are preserved
Determine 5: MLflow consumer interface, touchdown web page after migration
- You possibly can confirm programmatic entry by beginning a brand new SageMaker pocket book and working the next code:
Issues
When planning your MLflow migration, confirm your execution surroundings (whether or not EC2, native machine, or SageMaker notebooks) has enough storage and computing sources to deal with your supply monitoring server’s knowledge quantity. Whereas the migration can run in varied environments, efficiency might range based mostly on community connectivity and accessible sources. For big-scale migrations, think about breaking down the method into smaller batches (for instance, particular person experiments).
Cleanup
A SageMaker managed MLflow monitoring server will incur prices till you delete or cease it. Billing for monitoring servers is predicated on the period the servers have been working, the dimensions chosen, and the quantity of information logged to the monitoring servers. You possibly can cease monitoring servers after they’re not in use to save lots of prices, or you’ll be able to delete them utilizing API or the SageMaker Studio UI. For extra particulars on pricing, consult with Amazon SageMaker pricing.
Conclusion
On this publish, we demonstrated the best way to migrate a self-managed MLflow monitoring server to SageMaker with MLflow utilizing the open supply MLflow Export Import instrument. The migration to a serverless MLflow App on Amazon SageMaker AI reduces the operational overhead related to sustaining MLflow infrastructure whereas offering seamless integration with the great AI/ML serves in SageMaker AI.
To get began with your individual migration, comply with the previous step-by-step information and seek the advice of the referenced documentation for extra particulars. You’ll find code samples and examples in our AWS Samples GitHub repository. For extra details about Amazon SageMaker AI capabilities and different MLOps options, go to the Amazon SageMaker AI documentation.
In regards to the authors
 Rahul Easwar is a Senior Product Supervisor at AWS, main managed MLflow and Companion AI Apps inside the SageMaker AIOps group. With over 20 years of expertise spanning startups to enterprise know-how, he leverages his entrepreneurial background and MBA from Chicago Sales space to construct scalable ML platforms that simplify AI adoption for organizations worldwide. Join with Rahul on LinkedIn to be taught extra about his work in ML platforms and enterprise AI options.
 Roland Odorfer is a Options Architect at AWS, based mostly in Berlin, Germany. He works with German business and manufacturing clients, serving to them architect safe and scalable options. Roland is focused on distributed techniques and safety. He enjoys serving to clients use the cloud to resolve complicated challenges.
 Anurag Gajam is a Software program Improvement Engineer with the Amazon SageMaker MLflow group at AWS. His technical pursuits span AI/ML infrastructure and distributed techniques, the place he’s a acknowledged MLflow contributor who enhanced the mlflow-export-import instrument by including assist for extra MLflow objects to allow seamless migration between SageMaker MLflow companies. He focuses on fixing complicated issues and constructing dependable software program that powers AI workloads at scale. In his free time, he enjoys enjoying badminton and going for hikes.


