Our prospects’ key strategic goals are value financial savings and constructing safe and resilient infrastructure. At AWS, we’re devoted to serving to you meet these crucial objectives with our unparalleled experience and industry-leading instruments. Probably the most invaluable sources we provide is the AWS Trusted Advisor detailed report, which supplies deep insights into value optimization, safety enhancement, infrastructure resilience, efficiency optimization, and repair restrict administration. This complete evaluation is invaluable for purchasers of all sizes and throughout various enterprise models and groups. Nonetheless, the complexity of recent cloud environments could make it difficult to effectively determine, prioritize, and tackle the lots of of Trusted Advisor dangers (and every danger might need hundreds of affected sources) that is perhaps impacting your operations.
On this put up, we exhibit how Amazon Q Enterprise can empower you to effectively determine, prioritize, and tackle Trusted Advisor dangers.
Amazon Q Enterprise is a generative AI–powered assistant that may reply questions, present summaries, generate content material, and securely full duties based mostly on knowledge and data in your enterprise programs. It empowers staff to be extra artistic, data-driven, environment friendly, ready, and productive.
Trusted Advisor helps you optimize prices, improve efficiency, enhance safety and resilience, and function at scale within the cloud. Trusted Advisor repeatedly evaluates your AWS surroundings utilizing finest observe checks throughout the classes of cloud value optimization, efficiency, resilience, safety, operational excellence, and repair limits, and it recommends actions to remediate deviations from finest practices.
Jira is a venture administration and situation monitoring instrument that helps groups plan, monitor, and handle work. By integrating Jira with Amazon Q Enterprise, you’ll be able to effortlessly create Jira duties utilizing pure language.
By profiting from the capabilities of Amazon Q Enterprise, you’ll be able to acquire sooner and extra actionable insights into your detailed Trusted Advisor knowledge. This could allow you to proactively take focused actions on Trusted Advisor dangers that might in any other case considerably impression your enterprise.
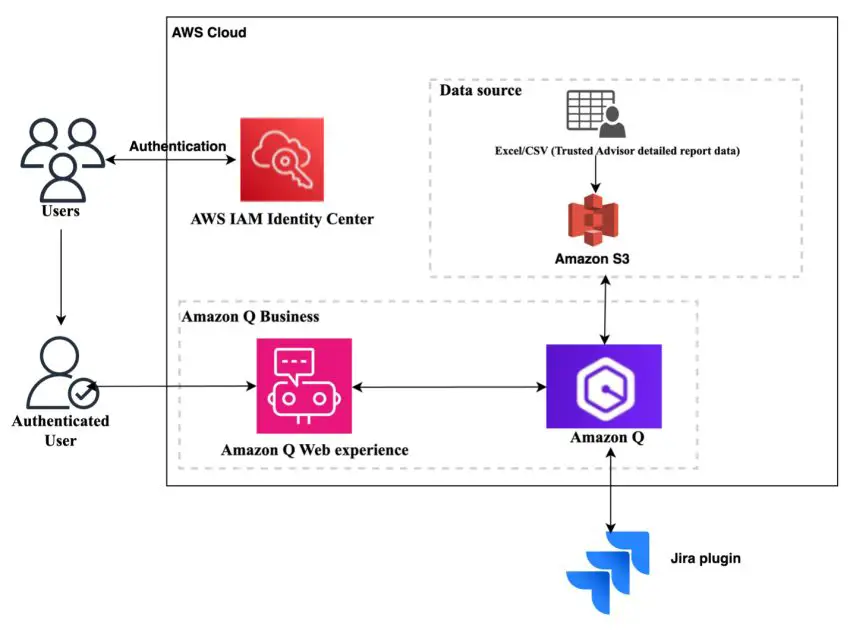
Resolution overview
The answer makes use of the next parts:
The next diagram illustrates the answer structure.

Stipulations
Full the next prerequisite steps:
- Arrange Amazon Q Enterprise.
- Configure an IAM Id Heart occasion.
- Create IAM Id Heart customers and teams.
- Have a Trusted Advisor detailed report (Excel or CSV).
- Have the next Jira sources:
- A Jira account URL (web site base URL) out of your Jira account settings. For instance,
https://firm.atlassian.web/ - Entry to the Jira Developer Console.
- A Jira venture for creating Jira duties.
- A Jira account URL (web site base URL) out of your Jira account settings. For instance,
Create the Amazon Q Enterprise utility
Full the next steps to create the Amazon Q Enterprise utility:
- On the Amazon Q Enterprise console, select Create utility.
- For Utility title, enter a reputation (for instance,
TrustedAdvisorGenAIApplication). - For Entry administration technique, IAM Id Heart is the beneficial technique. You may as well use the opposite choice obtainable: AWS IAM Id Supplier.
- For Fast Begin person, use the Choose Person dropdown menu to decide on both a person person or a bunch containing the customers you wish to use the applying with.
- Select a subscription for customers or teams utilizing the Choose Subscription dropdown menu.
- Increase Utility particulars, and for Select a technique to authorize Amazon Q Enterprise, choose Create and use a brand new service-linked position (SLR).
- For Internet expertise settings in Select a technique to authorize Amazon Q Enterprise, choose Create and use a brand new service position, or it’s also possible to use an current position through the use of the choice Use an current service position. Seek advice from IAM roles for Amazon Q Enterprise for extra particulars.
- Select Create.


After the applying is created, you will note utility particulars much like these within the following screenshot.
Make word of the worth for Deployed URL as a result of you’ll use it to talk with Amazon Q Enterprise.

Create an index
Indexing in Amazon Q Enterprise is finished earlier than configuring the info sources to ascertain a safe and arranged framework for knowledge administration. This pre-configuration makes positive correct entry controls are in place and creates an environment friendly construction for categorizing and retrieving data, much like making a library’s organizational system earlier than including books.
Full the next steps to allow indexing:
- On the applying particulars web page, select Knowledge sources.
- Select Add an index.
- For Index title, enter a reputation in your index.
- For Index provisioning, choose an index choice:
- Enterprise is right for manufacturing workloads which can be deployed in a Multi-AZ setup for enhanced fault tolerance.
- Starter is right for workloads reminiscent of proofs of idea, improvement, and testing which can be deployed in a single Availability Zone.
- For Items, enter the variety of models relying in your wants.
- Select Add an index.

Underneath Knowledge sources, you will note the index has been added and is energetic.

Configure an information supply
Now that you just created an index, you’ll be able to add an information supply. Full the next steps:
- Underneath Knowledge sources, select Add knowledge supply.
- Select Add recordsdata, as a result of we shall be utilizing a spreadsheet. Different knowledge supply choices can be found, which you’ll be able to choose relying on your enterprise necessities.
- Select the file you wish to add utilizing Select recordsdata.
- Select Add.

Amazon Q Enterprise can deal with embedded tables in PDF, Phrase, HTML, and tables in CSV and Excel.
- Select Carried out.
You will note that the file has been efficiently uploaded.

The next screenshot is a pattern of some rows and columns which can be a part of the dataset.

To get the detailed Trusted Advisor report, you’ll be able to coordinate along with your technical account managers or confer with Organizational view for AWS Trusted Advisor to grasp the conditions and steps for producing an identical report.
Configure the Jira Cloud plugin
On this part, we stroll via the steps to arrange Jira Cloud and the Jira plugin.
Arrange Jira Cloud
Full the next steps to arrange Jira Cloud:
- Entry the Jira Cloud Developer console.
- Select Create and select OAuth 2.0 integration from the dropdown menu.

- Enter a reputation and select Create.

- On the Permissions tab, select Add below Motion for Jira API after which select Configure.


- Edit scopes (Traditional and Granular) so as to add the next required scopes:
- learn:jira-work
- write:jira-work
- handle:jira-project
- learn:dash:jira-software
- write:dash:jira-software
- delete:dash:jira-software
- learn:board-scope:jira-software
- learn:venture:jira

- On the Authorization tab, for Callback URL, enter
/oauth/callback. 
Arrange the Jira plugin
Collect the next data, which shall be wanted to arrange the Jira plugin:
- Area URL of your Jira Cloud occasion:
https://api.atlassian.com/ex/jira/<Occasion ID>, the place the occasion ID is retrieved utilizinghttps://<your namespace>.atlassian.web/_edge/tenant_info - Entry token URL:
https://auth.atlassian.com/oauth/token - Authorization URL:
https://auth.atlassian.com/authorize - Shopper ID and secret out of your OAuth 2.0 utility: To get the consumer ID and secret, navigate to the Settings tab out of your OAuth 2.0 utility

Full the next steps to arrange the Jira plugin:
- On the Amazon Q Enterprise console, navigate to your utility.
- Within the navigation pane, below Actions, select Plugins.

- Select Add plugin.
- Select the plus signal for Jira Cloud.

- Enter a reputation for Plugin title and a URL for Area URL.

- Underneath OAuth2.0 authorization, choose Create and use a brand new secret.
- Enter values for Secret title, Shopper ID, Shopper secret, and Redirect URL, then select Create.

- For Service entry, choose Create and use a brand new service position.

- Select Add.
The Jira plugin shall be added, as proven within the following screenshot.

Customise the net expertise
You’ll be able to select Customise net expertise and alter the title, subtitle, and welcome message. Additionally, you’ll be able to show pattern prompts by choosing Show pattern prompts.


Now, whenever you open the applying, it can present you the title, subtitle, and welcome message you set.

Entry the Amazon Q utility’s net expertise endpoint
Within the subsequent steps, we work together with the chat interface of the TrustedAdvisorGenAIApplication utility to get sooner insights and make it actionable by making a Jira activity.
- On the Amazon Q Enterprise console, navigate to the
TrustedAdvisorGenAIApplicationutility. - Within the Internet expertise settings part, copy the deployed URL of the applying. This would be the UI of Amazon Q utility, as proven within the following screenshot.

Work together with the Amazon Q utility
Now, let’s see the TrustedAdvisorGenAIApplication utility in motion.
We enter the next immediate to get insights: “Prime 5 Lambda capabilities with Operate Title from Lambda over-provisioned capabilities for reminiscence measurement.”
The next screenshot exhibits the immediate output given by our Amazon Q Enterprise utility.

We received the insights we wished, however insights alone aren’t sufficient—we have to rework that information into tangible outcomes. Amazon Q Enterprise has options the place you should use plugins with highly effective venture administration instruments (like Jira), streamlining remediation efforts and enabling most impression.
Let’s ask the Amazon Q Enterprise utility to create a Jira activity utilizing the previous output data. We use the next immediate and ask Amazon Q to create a Jira activity with the insights we received earlier: “Utilizing the above vital perform particulars, create a JIRA activity in amazonqbusiness venture.”
In the course of the first use of the Jira plugin, Amazon Q Enterprise will authenticate the person via the Jira login interface, as proven within the following screenshot. For customers who’ve already authenticated via enterprise single sign-on (SSO) or immediately utilizing their Jira login, solely an API entry approval shall be requested.
Select Authorize after which select Settle for.


The applying will ask for particulars to create the Jira activity. Enter data if wanted and select Submit. The Amazon Q Enterprise utility will create the duty within the Jira venture you specified.

You will note that the Jira activity has been created, as proven within the following screenshot.

Queries shall be routinely routed to the plugins you’ve configured. Customers won’t must invoke a plugin within the dialog window after which run the queries.
Clear up
After you’re executed testing the answer, you’ll be able to delete the sources to keep away from incurring expenses. Observe the directions in Managing Amazon Q Enterprise functions to delete the applying. See Amazon Q Enterprise pricing for extra pricing data.
Conclusion
On this put up, we confirmed learn how to create an utility utilizing Amazon Q Enterprise with Jira integration that used a dataset containing a Trusted Advisor detailed report. This resolution demonstrates learn how to use new generative AI providers like Amazon Q Enterprise to get knowledge insights sooner and make them actionable.
You’ll be able to increase this resolution to make use of different knowledge sources and use pure language to get knowledge insights sooner, which is able to show you how to make data-driven selections.
To be taught extra about Amazon Q, see the Amazon Q primary product web page, Amazon Q Developer, and Getting began with Amazon Q. Moreover, try the next weblog posts:
Concerning the writer
 Satish Bhonsle is a Senior Technical Account Supervisor at AWS. He’s obsessed with buyer success and expertise. He loves working backwards by shortly understanding strategic buyer goals, aligning them to software program capabilities and successfully driving buyer success.


