
of AI hype, it appears like everyone seems to be utilizing Imaginative and prescient-Language Fashions and huge Imaginative and prescient Transformers for each drawback in Pc Imaginative and prescient. Many individuals see these instruments as one-size-fits-all options and instantly use the newest, shiniest mannequin as a substitute of understanding the underlying sign they need to extract. However oftentimes there’s magnificence to simplicity. It’s one of the vital vital classes I’ve discovered as an engineer: don’t overcomplicate options to easy issues.

Let me present you a sensible software of some easy classical Pc Imaginative and prescient strategies to detect rectangular objects on flat surfaces and apply a perspective transformation to remodel the skewed rectangle. Comparable strategies are broadly used, for instance, in doc scanning and extraction purposes.
Alongside the best way you’ll be taught some fascinating ideas from customary classical Pc Imaginative and prescient strategies to easy methods to order polygon factors and why that is associated to a combinatoric project drawback.
Overview
- Detection
- Grayscale
- Edge Detection
- Dilation
- Contour Detection
- Perspective Transformation
- Variant A: Easy type based mostly on sum/diff
- Variant B: Task Optimization Downside
- Variant C: Cyclic sorting with anchor
- Making use of the Perspective Transformation
- Conclusion
Detection
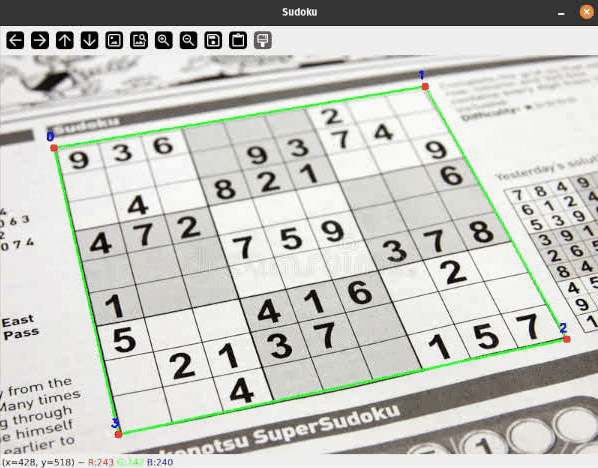
To detect Sudoku grids I thought-about many various approaches starting from easy thresholding, hough line transformations or some type of edge detection to coaching a deep studying mannequin for segmentation or keypoint detection.
Let’s outline some assumptions to scope the issue:
- The Sudoku grid is clearly and totally seen within the body with a transparent quadrilateral border, with sturdy distinction from the background.
- The floor on which the Sudoku grid is printed must be flat, however may be captured from an angle and seem skewed or rotated.

I’ll present you a easy pipeline with some filtering steps to detect the bounds of our Sudoku grid. On a excessive degree, the processing pipeline appears as follows:


Grayscale
On this first step we merely convert the enter picture from its three shade channels to a single channel grayscale picture, as we don’t want any shade info to course of these photos.
def find_sudoku_grid(
    picture: np.ndarray,
) -> np.ndarray | None:
    """
    Finds the most important square-like contour in a picture, doubtless the Sudoku grid.

    Returns:
        The contour of the discovered grid as a numpy array, or None if not discovered.
    """

    grey = cv2.cvtColor(picture, cv2.COLOR_BGR2GRAY)
Edge Detection
After changing the picture to grayscale we will use the Canny edge detection algorithm to extract edges. There are two thresholds to decide on for this algorithm that decide if pixels are accepted as edges:

In our case of detecting Sudoku grids, we assume very sturdy edges on the border strains of our grid. We are able to select a excessive higher threshold to reject noise from showing in our masks, and a decrease threshold not too low to reject small noisy edges linked to the principle border from displaying up in our masks.
A blur filter is usually used earlier than passing photos to Canny to cut back noise, however on this case the perimeters are very sturdy however slim, therefore the blur is omitted.
def find_sudoku_grid(
    picture: np.ndarray,
    canny_threshold_1: int = 100,
    canny_threshold_2: int = 255,
) -> np.ndarray | None:
    """
    Finds the most important square-like contour in a picture, doubtless the Sudoku grid.

    Args:
        picture: The enter picture.
        canny_threshold_1: Decrease threshold for the Canny edge detector.
        canny_threshold_2: Higher threshold for the Canny edge detector.

    Returns:
        The contour of the discovered grid as a numpy array, or None if not discovered.
    """

    ...

    canny = cv2.Canny(grey, threshold1=canny_threshold_1, threshold2=canny_threshold_2)
Dilation
On this subsequent step, we post-process the sting detection masks with a dilation kernel to shut small gaps within the masks.
def find_sudoku_grid(
    picture: np.ndarray,
    canny_threshold_1: int = 100,
    canny_threshold_2: int = 255,
    morph_kernel_size: int = 3,
) -> np.ndarray | None:
    """
    Finds the most important square-like contour in a picture, doubtless the Sudoku grid.

    Args:
        picture: The enter picture.
        canny_threshold_1: First threshold for the Canny edge detector.
        canny_threshold_2: Second threshold for the Canny edge detector.
        morph_kernel_size: Dimension of the morphological operation kernel.

    Returns:
        The contour of the discovered grid as a numpy array, or None if not discovered.
    """

    ...

    kernel = cv2.getStructuringElement(
        form=cv2.MORPH_RECT, ksize=(morph_kernel_size, morph_kernel_size)
    )
    masks = cv2.morphologyEx(canny, op=cv2.MORPH_DILATE, kernel=kernel, iterations=1)
Contour Detection
Now that the binary masks is prepared, we will run a contour detection algorithm to seek out coherent blobs and filter all the way down to a single contour with 4 factors.
contours, _ = cv2.findContours(
    masks, mode=cv2.RETR_EXTERNAL, methodology=cv2.CHAIN_APPROX_SIMPLE
)
This preliminary contour detection will return an inventory of contours that include each single pixel that’s a part of the contour. We are able to use the Douglas–Peucker algorithm to iteratively cut back the variety of factors within the contour and approximate the contour with a easy polygon. We are able to select a minimal distance between factors for the algorithm.


If we assume that even for a few of the most skewed rectangle, the shortest aspect is at the very least 10% of the circumference of the form, we will filter the contours all the way down to polygons with precisely 4 factors.
contour_candidates: checklist[np.ndarray] = []
for cnt in contours:
    # Approximate the contour to a polygon
    epsilon = 0.1 * cv2.arcLength(curve=cnt, closed=True)
    approx = cv2.approxPolyDP(curve=cnt, epsilon=epsilon, closed=True)

    # Hold solely polygons with 4 vertices
    if len(approx) == 4:
        contour_candidates.append(approx)
Lastly we take the most important detected contour, presumably the ultimate Sudoku grid. We type the contours by space in reverse order after which take the primary factor, comparable to the most important contour space.
best_contour = sorted(contour_candidates, key=cv2.contourArea, reverse=True)[0]
Perspective Transformation
Lastly we have to remodel the detected grid again to its sq.. To attain this, we will use a perspective transformation. The transformation matrix may be calculated by specifying the place the 4 factors of our Sudoku grid contour have to be positioned in the long run: the 4 corners of the picture.
rect_dst = np.array(
    [[0, 0], [width - 1, 0], [width - 1, height - 1], [0, height - 1]],
)
To match the contour factors to the corners, they have to be ordered first, to allow them to be assigned accurately. Let’s outline the next order for our nook factors:

Variant A: Easy type based mostly on sum/diff
To type the extracted corners and assign them to those goal factors, a easy algorithm may take a look at the sum and variations of the x and y coordinates for every nook.
p_sum = p_x + p_y
p_diff = p_x - p_y
Primarily based on these values, it’s now attainable to distinguish the corners:
- The highest left nook has each a small x and y worth, it has the smallest sum
argmin(p_sum) - Backside proper nook has the most important sum
argmax(p_sum) - Prime proper nook has the most important diff
argmax(p_diff) - Backside left nook has the smallest distinction
argmin(p_diff)
Within the following animation, I attempted to visualise this project of the 4 corners of a rotating sq.. The coloured strains characterize the respective picture nook assigned to every sq. nook.

def order_points(pts: np.ndarray) -> np.ndarray:
    """
    Orders the 4 nook factors of a contour in a constant
    top-left, top-right, bottom-right, bottom-left sequence.

    Args:
        pts: A numpy array of form (4, 2) representing the 4 corners.

    Returns:
        A numpy array of form (4, 2) with the factors ordered.
    """
    # Reshape from (4, 1, 2) to (4, 2) if wanted
    pts = pts.reshape(4, 2)
    rect = np.zeros((4, 2), dtype=np.float32)

    # The highest-left level could have the smallest sum, whereas
    # the bottom-right level could have the most important sum
    s = pts.sum(axis=1)
    rect[0] = pts[np.argmin(s)]
    rect[2] = pts[np.argmax(s)]

    # The highest-right level could have the smallest distinction,
    # whereas the bottom-left could have the most important distinction
    diff = np.diff(pts, axis=1)
    rect[1] = pts[np.argmin(diff)]
    rect[3] = pts[np.argmax(diff)]

    return rect
This works effectively until the rectangle is closely skewed, like the next one. On this case, you may clearly see that this methodology is flawed, as there the identical rectangle nook is assigned a number of picture corners.

Variant B: Task Optimization Downside
One other method can be to reduce the distances between every level and its assigned nook. This may be carried out utilizing a pairwise_distances calculation between every level and the corners and the linear_sum_assignment operate from scipy, which solves the project drawback whereas minimizing a value operate.
def order_points_simplified(pts: np.ndarray) -> np.ndarray:
    """
    Orders a set of factors to finest match a goal set of nook factors.

    Args:
        pts: A numpy array of form (N, 2) representing the factors to order.

    Returns:
        A numpy array of form (N, 2) with the factors ordered.
    """
    # Reshape from (N, 1, 2) to (N, 2) if wanted
    pts = pts.reshape(-1, 2)

    # Calculate the gap between every level and every goal nook
    D = pairwise_distances(pts, pts_corner)

    # Discover the optimum one-to-one project
    # row_ind[i] must be matched with col_ind[i]
    row_ind, col_ind = linear_sum_assignment(D)

    # Create an empty array to carry the sorted factors
    ordered_pts = np.zeros_like(pts)

    # Place every level within the right slot based mostly on the nook it was matched to.
    # For instance, the purpose matched to target_corners[0] goes into ordered_pts[0].
    ordered_pts[col_ind] = pts[row_ind]

    return ordered_pts
Though this resolution works, it’s not splendid, because it depends on the picture distance between the form factors and the corners and it’s computationally costlier as a result of a distance matrix must be constructed. In fact right here within the case of 4 factors assigned that is negligible, however this resolution wouldn’t be effectively fitted to a polygon with many factors!
Variant C: Cyclic sorting with anchor
This third variant is a really light-weight and environment friendly approach to type and assign the factors of the form to the picture corners. The concept is to calculate an angle for every level of the form based mostly on the centroid place.

For the reason that angles are cyclic, we have to select an anchor to ensure absolutely the order of the factors. We merely choose the purpose with the bottom sum of x and y.
def order_points(self, pts: np.ndarray) -> np.ndarray:
    """
    Orders factors by angle across the centroid, then rotates to start out from top-left.

    Args:
        pts: A numpy array of form (4, 2).

    Returns:
        A numpy array of form (4, 2) with factors ordered."""
    pts = pts.reshape(4, 2)
    middle = pts.imply(axis=0)
    angles = np.arctan2(pts[:, 1] - middle[1], pts[:, 0] - middle[0])
    pts_cyclic = pts[np.argsort(angles)]
    sum_of_coords = pts_cyclic.sum(axis=1)
    top_left_idx = np.argmin(sum_of_coords)
    return np.roll(pts_cyclic, -top_left_idx, axis=0)
We are able to now use this operate to type our contour factors:
rect_src = order_points(grid_contour)Making use of the Perspective Transformation
Now that we all know which factors must go the place, we will lastly transfer on to probably the most fascinating half: creating and really making use of the angle transformation to the picture.

Since we have already got our checklist of factors for the detected quadrilateral sorted in rect_src, and we’ve our goal nook factors in rect_dst, we will use the OpenCV methodology for calculating the transformation matrix:
warp_mat = cv2.getPerspectiveTransform(rect_src, rect_dst)The result’s a 3×3 warp matrix, defining easy methods to remodel from a skewed 3D perspective view to a 2D flat top-down view. To get this flat top-down view of our Sudoku grid, we will apply this attitude transformation to our unique picture:
warped = cv2.warpPerspective(img, warp_mat, (side_len, side_len))And voilà, we’ve our completely sq. Sudoku grid!

Conclusion
On this mission we walked by way of a easy pipeline utilizing classical Pc Imaginative and prescient strategies to extract Sudoku grids from photos. These strategies present a easy approach to detect the bounds of the Sudoku grids. In fact resulting from its simplicity there are some limitations to how effectively this method generalizes to completely different settings and excessive environments equivalent to low gentle or arduous shadows. Utilizing a deep-learning based mostly method may make sense if the detection must generalize to an unlimited quantity of various settings.
Subsequent, a perspective transformation is used to get a flat top-down view of the grid. This picture can now be utilized in additional processing, equivalent to extracting the numbers within the grid and really fixing the Sudoku. In a subsequent article we’ll look additional into these pure subsequent steps on this mission.
Take a look at the supply code of the mission beneath and let me know when you’ve got any questions or ideas on this mission. Till then, completely happy coding!
For extra particulars and the complete implementation together with the code for the all of the animations and visualizations, take a look at the supply code of this mission on my GitHub:
https://github.com/trflorian/sudoku-extraction
All visualizations on this publish have been created by the creator.


