
Final 12 months, AWS introduced an integration between Amazon SageMaker Unified Studio and Amazon S3 normal goal buckets. This integration makes it simple for groups to make use of unstructured information saved in Amazon Easy Storage Service (Amazon S3) for machine studying (ML) and information analytics use circumstances.
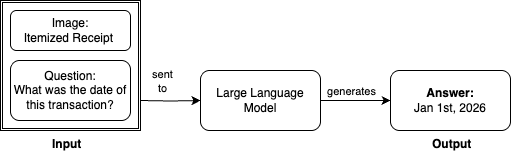
On this publish, we present the right way to combine S3 normal goal buckets with Amazon SageMaker Catalog to fine-tune Llama 3.2 11B Imaginative and prescient Instruct for visible query answering (VQA) utilizing Amazon SageMaker Unified Studio. For this process, we offer our massive language mannequin (LLM) with an enter picture and query and obtain a solution. For instance, asking to establish the transaction date from an itemized receipt:
For this demonstration, we use Amazon SageMaker JumpStart to entry the Llama 3.2 11B Imaginative and prescient Instruct mannequin. Out of the field, this base mannequin achieves an Common Normalized Levenshtein Similarity (ANLS) rating of 85.3% on the DocVQA dataset. ANLS is a metric used to judge the efficiency of fashions on visible query answering duties, which measures the similarity between the mannequin’s predicted reply and the bottom reality reply. Whereas 85.3% demonstrates robust baseline efficiency, this stage may not be essentially the most environment friendly for duties requiring the next diploma of accuracy and precision.
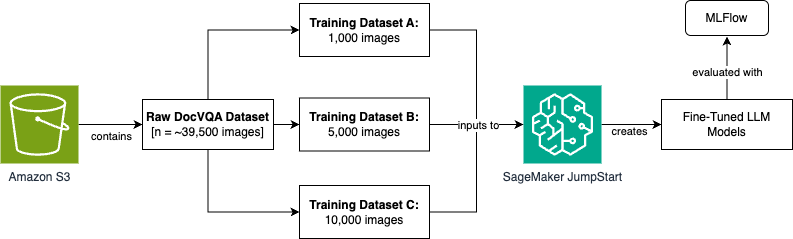
To enhance mannequin efficiency by means of fine-tuning, we’ll use the DocVQA dataset from Hugging Face. This dataset incorporates 39,500 rows of coaching information, every with an enter picture, a query, and a corresponding anticipated reply. We’ll create three fine-tuned mannequin variations utilizing various dataset sizes (1,000, 5,000, and 10,000 photos). We’ll then consider them utilizing Amazon SageMaker totally managed serverless MLflow to trace experimentation and measure accuracy enhancements.
The complete end-to-end information ingestion, mannequin growth, and metric analysis course of shall be orchestrated utilizing Amazon SageMaker Unified Studio. Right here is the high-level course of move diagram that we’ll step by means of for this situation. We’ll broaden on this all through the weblog publish.
To realize this course of move, we construct an structure that performs the info ingestion, information preprocessing, mannequin coaching, and analysis utilizing Amazon SageMaker Unified Studio. We get away every step within the following sections.
The Jupyter pocket book used and referenced all through this train may be present in this GitHub repository.
Conditions
To arrange your group to make use of the brand new integration between Amazon SageMaker Unified Studio and Amazon S3 normal goal buckets, you should full the next stipulations. Be aware that these steps happen on an Identification Middle-based area.
- Create an AWS account.
- Create an Amazon SageMaker Unified Studio area utilizing fast setup.
- Create two initiatives throughout the SageMaker Unified Studio area to mannequin the situation on this publish: one for the info producer persona and one for the info shopper persona. The primary mission is used for locating and cataloging the dataset in an Amazon S3 bucket. The second mission consumes the dataset to fine-tune three iterations of our massive language mannequin. See Create a mission for added info.
- Your information shopper mission will need to have entry to a operating SageMaker managed MLflow serverless utility, which shall be used for experimentation and analysis functions. For extra info, see the directions for making a serverless MLflow utility.
- An Amazon S3 bucket needs to be pre-populated with the uncooked dataset for use to your ML growth use case. On this weblog publish, we use the DocVQA dataset from Hugging Face for fine-tuning a visible query answering (VQA) use case.
- A service quota enhance request to make use of p4de.24xlarge compute for coaching jobs. See Requesting a quota enhance for extra info.
Structure
The next is the reference structure that we construct all through this publish:
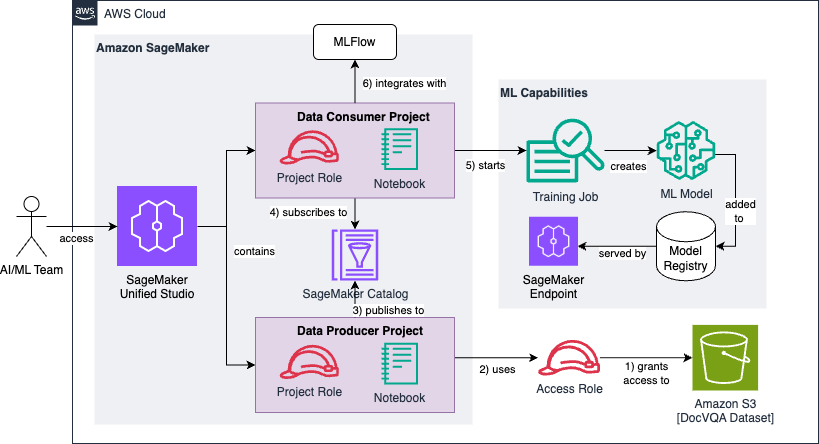
We will break the structure diagram right into a sequence of six high-level steps, which we’ll observe all through the next sections:
- First, you create and configure an IAM entry position that grants learn permissions to a pre-existing Amazon S3 bucket containing the uncooked and unprocessed DocVQA dataset.
- The info producer mission makes use of the entry position to find and add the dataset to the mission catalog.
- The info producer mission enriches the dataset with optionally available metadata and publishes it to the SageMaker Catalog.
- The info shopper mission subscribes to the revealed dataset, making it obtainable to the mission workforce answerable for creating (or fine-tuning) the machine studying fashions.
- The info shopper mission preprocesses the info and transforms it into three coaching datasets of various sizes (1k, 5k, and 10k photos). Every dataset is used to fine-tune our base massive language mannequin.
- We use MLflow for monitoring experimentation and analysis outcomes of the three fashions towards our Common Normalized Levenshtein Similarity (ANLS) success metric.
Answer walkthrough
As talked about beforehand, we are going to decide to make use of the DocVQA dataset from Hugging Face for a visible query answering process. In your group’s situation, this uncooked dataset is perhaps any unstructured information related to your ML use case. Examples embody buyer help chat logs, inside paperwork, product opinions, authorized contracts, analysis papers, social media posts, e-mail archives, sensor information, and monetary transaction data.
Within the prerequisite part of our Jupyter pocket book, we pre-populate our Amazon S3 bucket utilizing the Datasets API from Hugging Face:
After retrieving the dataset, we full the prerequisite by synchronizing it to an Amazon S3 bucket. This represents the bucket depicted within the bottom-right part of our structure diagram proven beforehand.
At this level, we’re prepared to start working with our information in Amazon SageMaker Unified Studio, beginning with our information producer mission. A mission in Amazon SageMaker Unified Studio is a boundary inside a website the place you may collaborate with others on a enterprise use case. To convey Amazon S3 information into your mission, you should first add entry to the info after which add the info to your mission. On this publish, we comply with the method of utilizing an entry position to facilitate this course of. See Including Amazon S3 information for extra info.
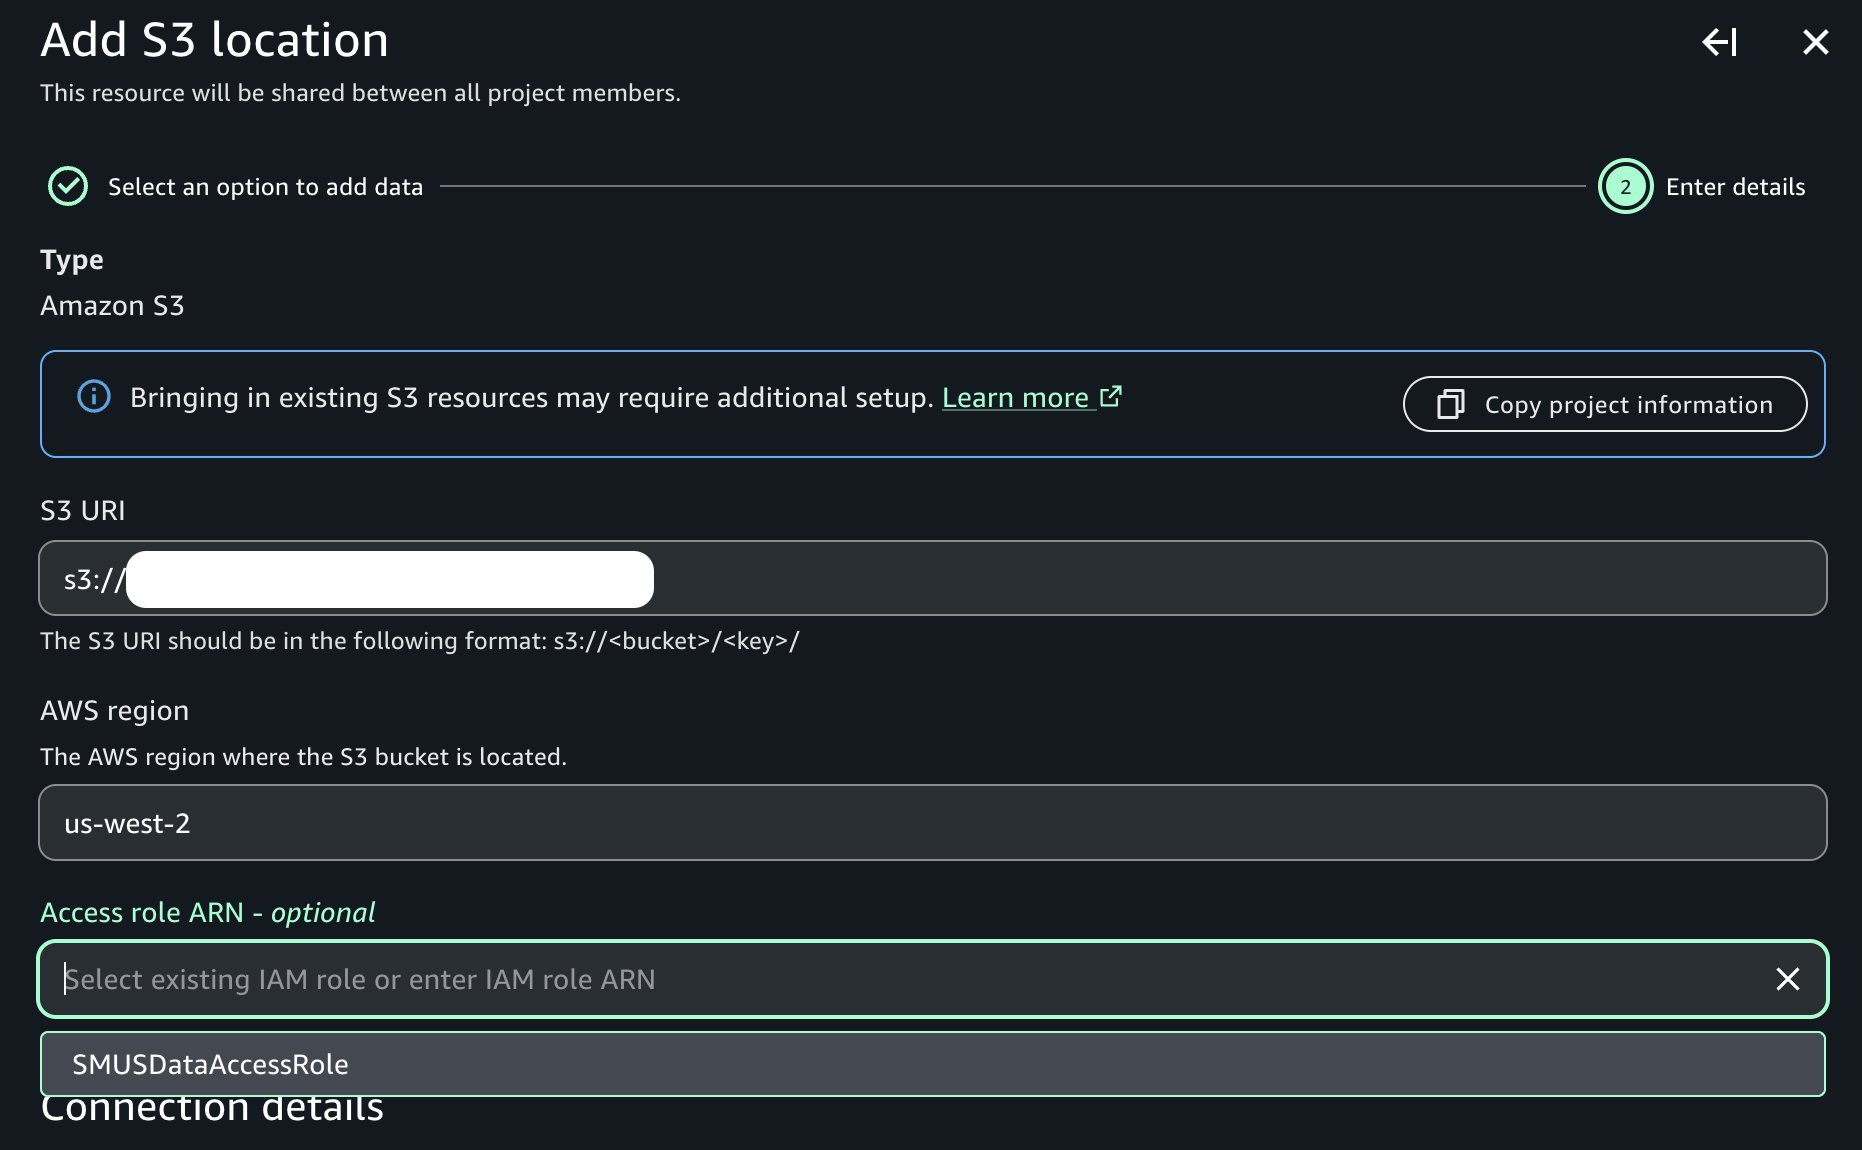
As soon as our entry position is created following the directions within the documentation referenced beforehand, we are able to proceed with discovering and cataloging our dataset. In our information producer mission, we navigate to the Knowledge → Add information → Add S3 location:
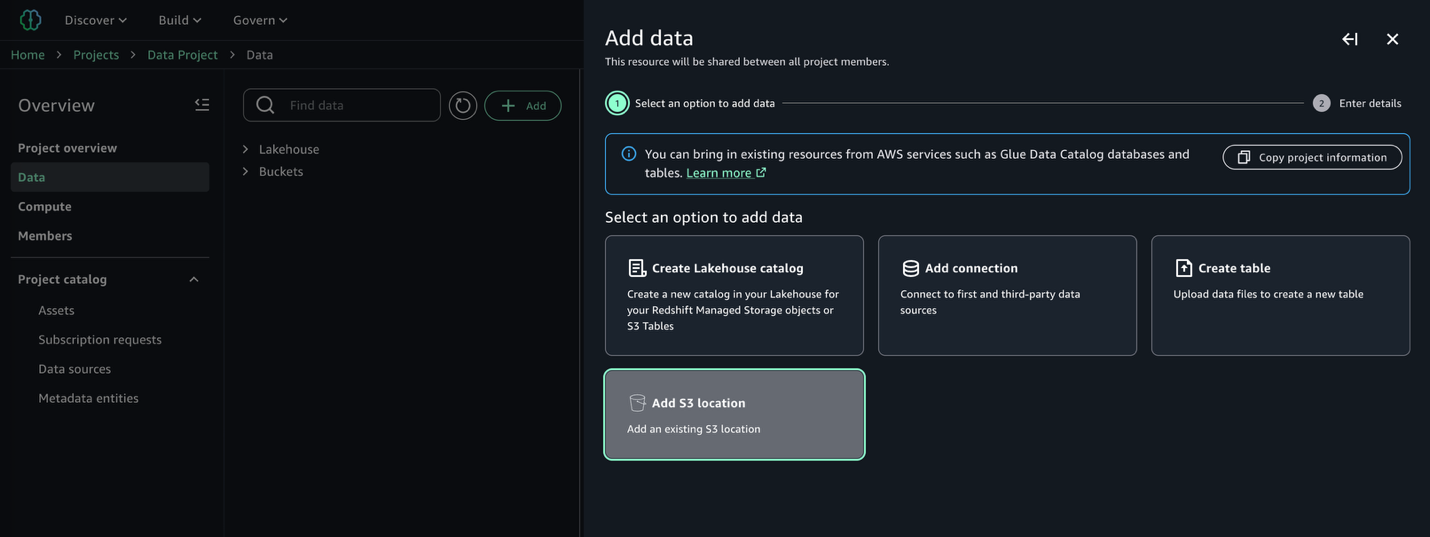
Present the identify of the Amazon S3 bucket and corresponding prefix containing our uncooked information, and observe the presence of the entry position dropdown containing the prerequisite entry position beforehand created:
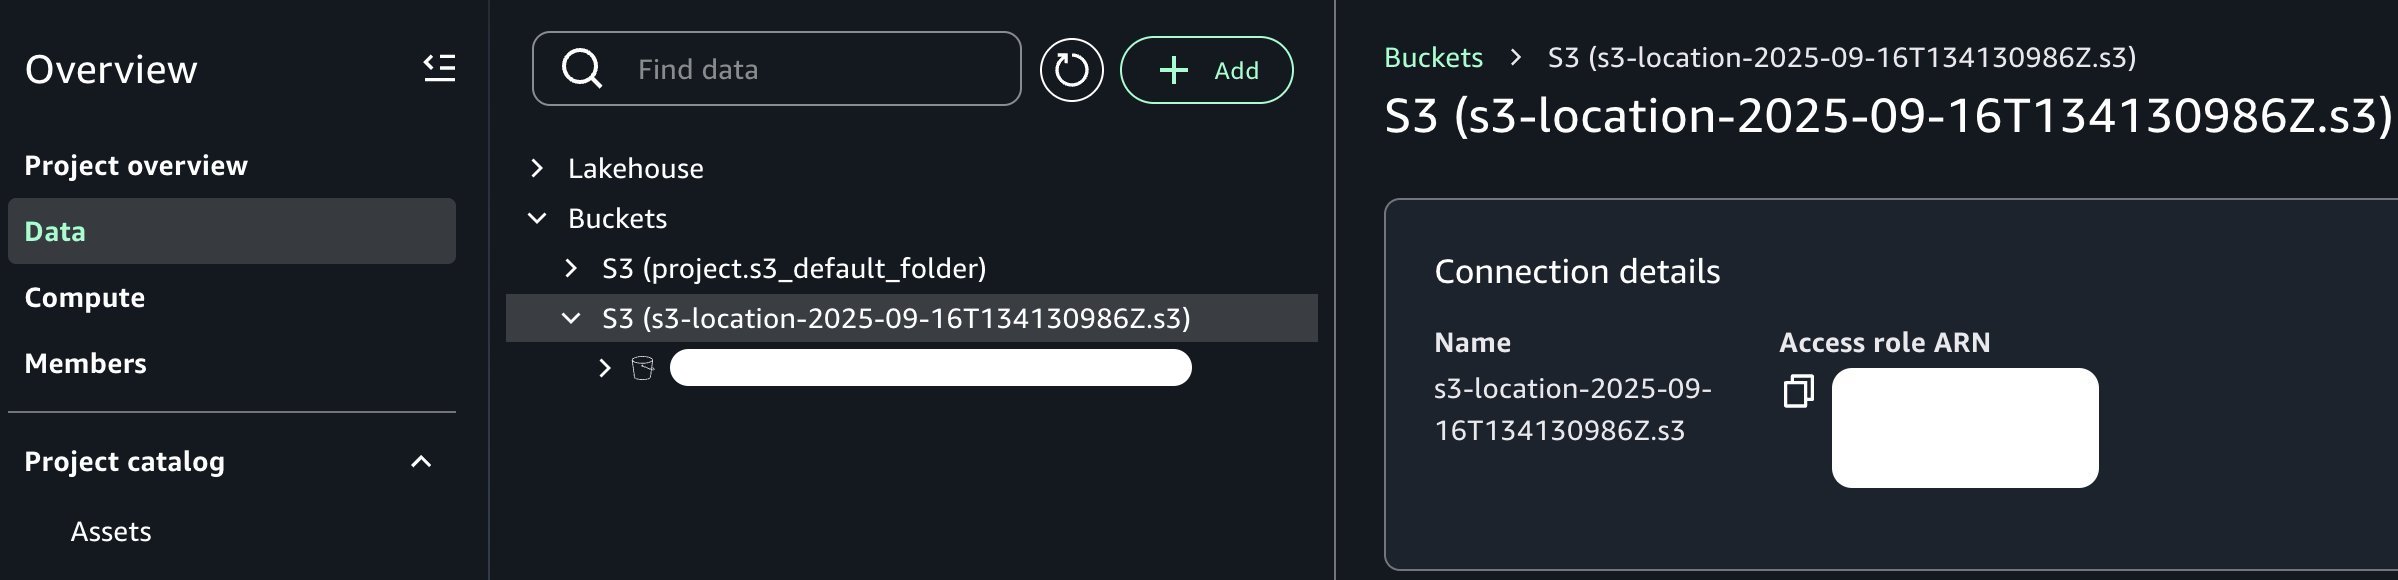
As soon as added, observe that we are able to now see our new Amazon S3 bucket within the mission catalog as proven within the following picture:
From the attitude of our information producer persona, the dataset is now obtainable inside our mission context. Relying in your group and necessities, you may need to additional enrich this information asset. For instance, you may be a part of it with further information sources, apply business-specific transformations, implement information high quality checks, or create derived options by means of characteristic engineering pipelines. Nonetheless, for the needs of this publish, we’ll work with the dataset in its present type to maintain our concentrate on the core level of integrating Amazon S3 normal goal buckets with Amazon SageMaker Unified Studio.
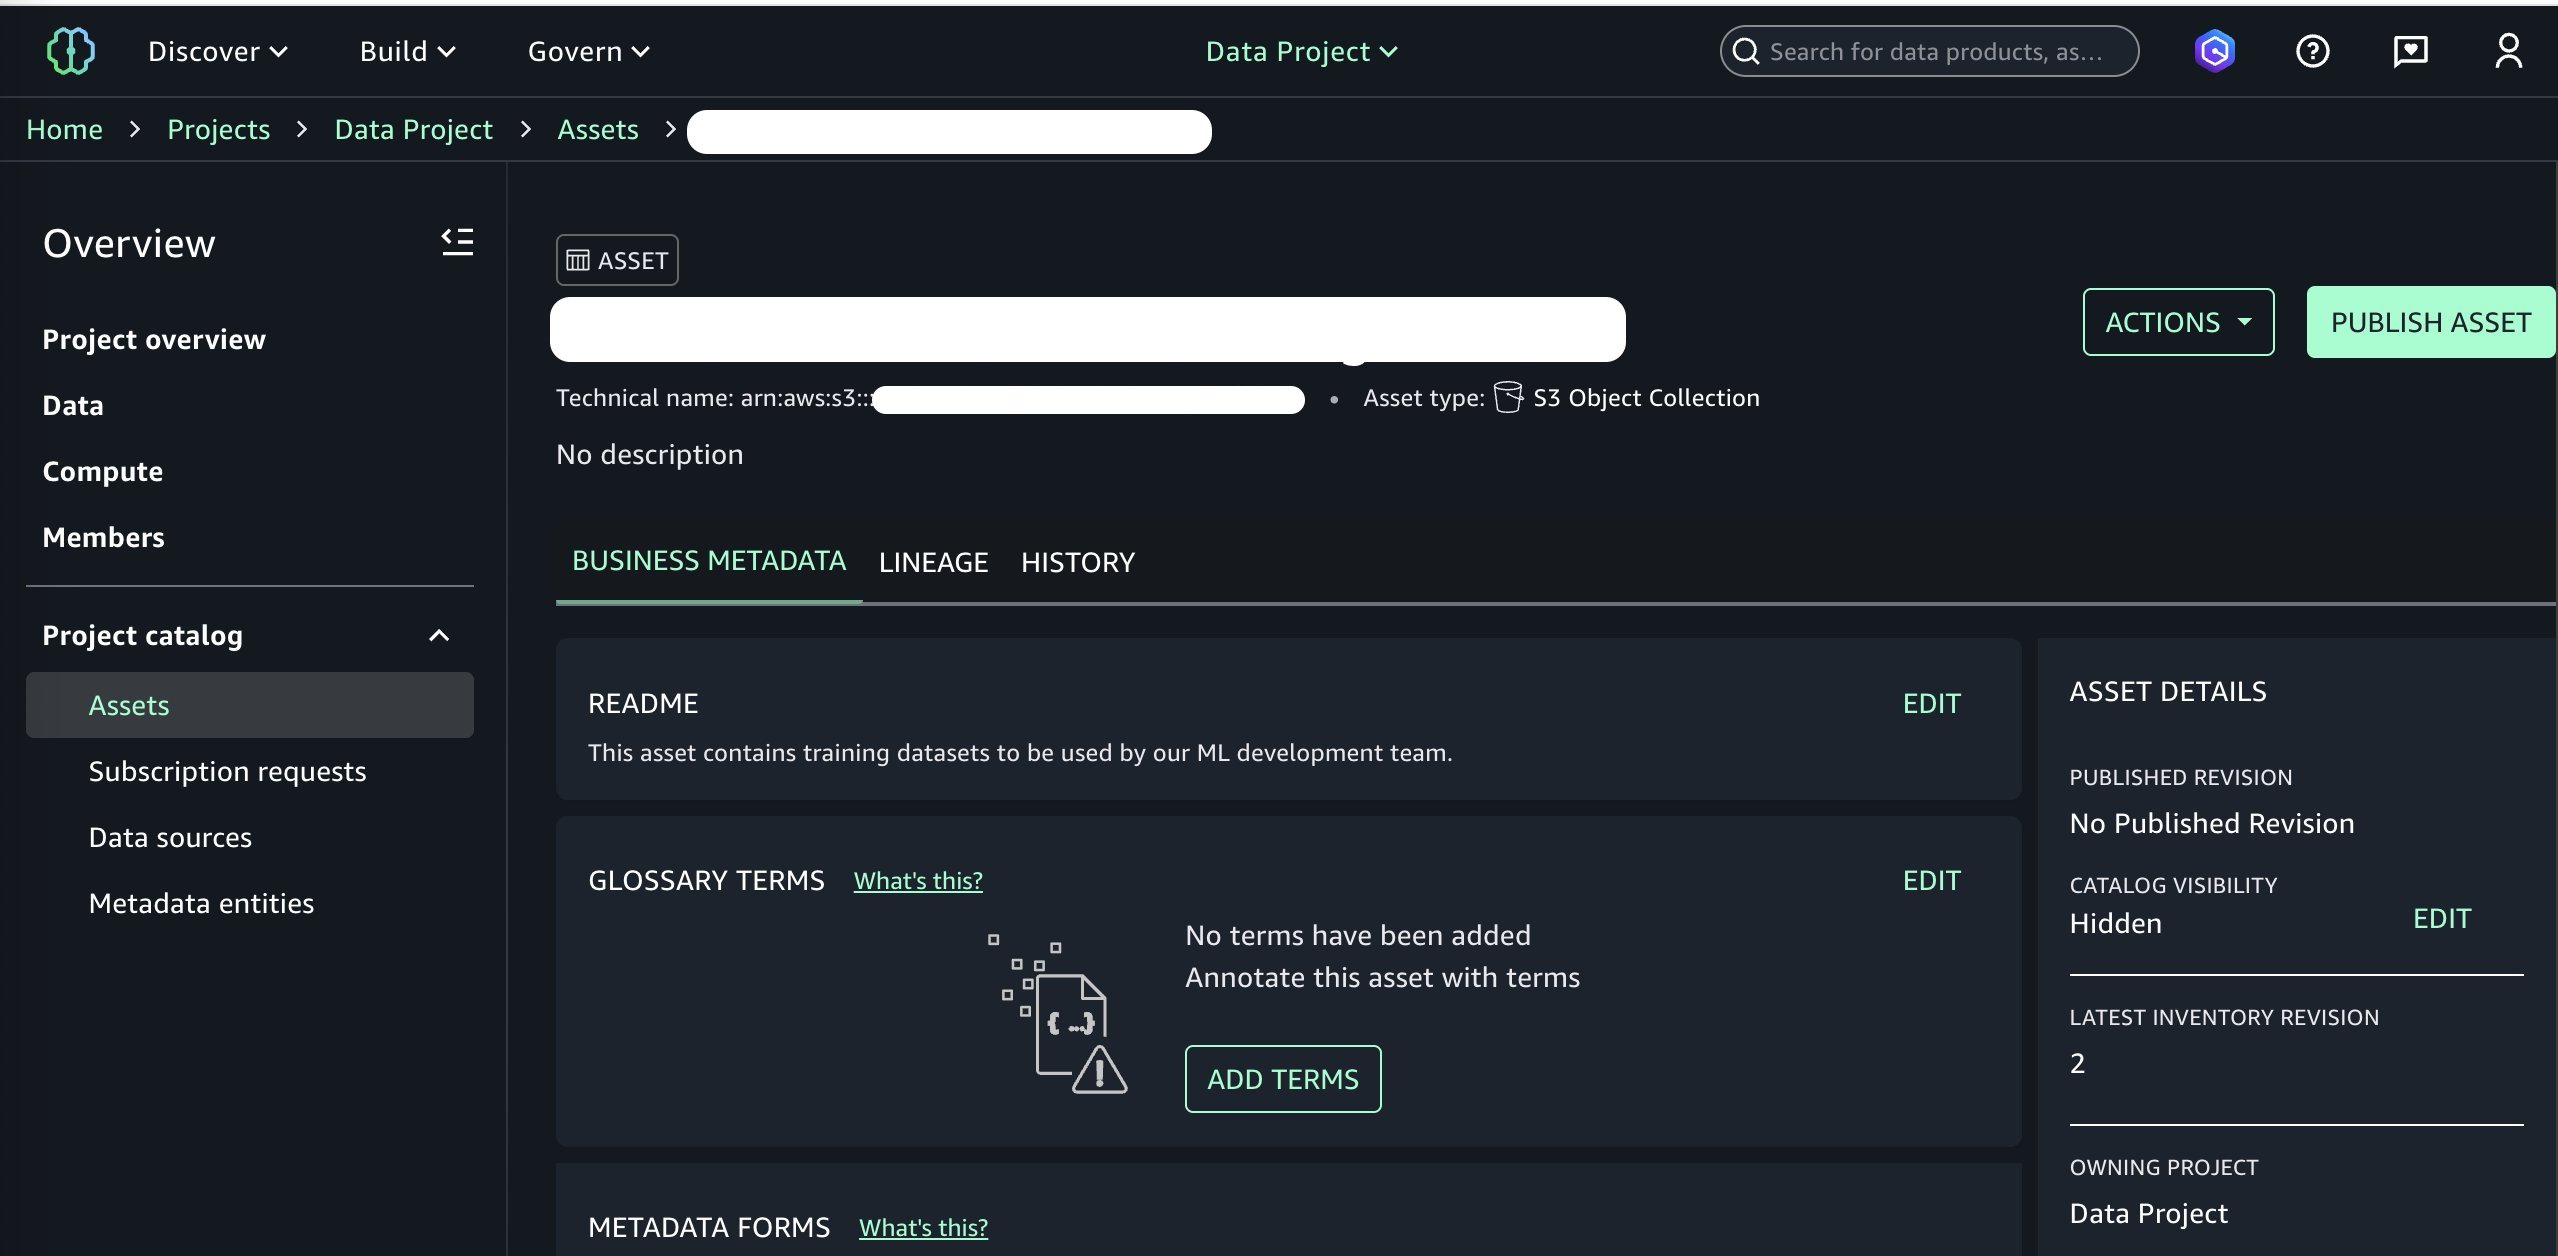
We at the moment are able to publish this bucket to our SageMaker Catalog. We will add optionally available enterprise metadata corresponding to a README file, glossary phrases, and different information varieties. We add a easy README, skip different metadata fields for brevity, and proceed to publishing by selecting Publish to Catalog underneath the Actions menu.
At this level, we’ve added the info asset to our SageMaker Catalog and it is able to be consumed by different initiatives in our area. Switching over to the attitude of our information shopper persona and choosing the patron mission, we are able to now subscribe to our newly revealed information asset. See Subscribe to an information product in Amazon SageMaker Unified Studio for extra info.
Now that we’ve subscribed to the info asset in our shopper mission the place we’ll construct the ML mannequin, we are able to start utilizing it inside a managed JupyterLab IDE in Amazon SageMaker Unified Studio. The JupyterLab web page of Amazon SageMaker Unified Studio gives a JupyterLab interactive growth setting (IDE) so that you can use as you carry out information integration, analytics, or machine studying in your initiatives.
In our ML growth mission, navigate to the Compute → Areas → Create house possibility, and select JupyterLab within the Software (house sort) menu to launch a brand new JupyterLab IDE.
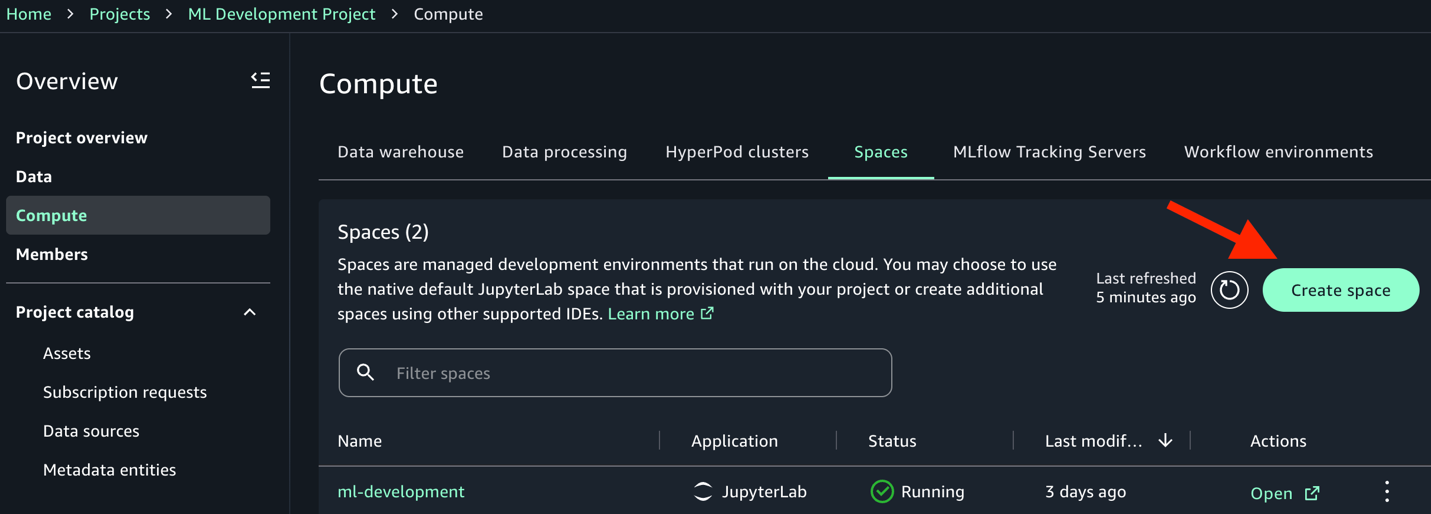
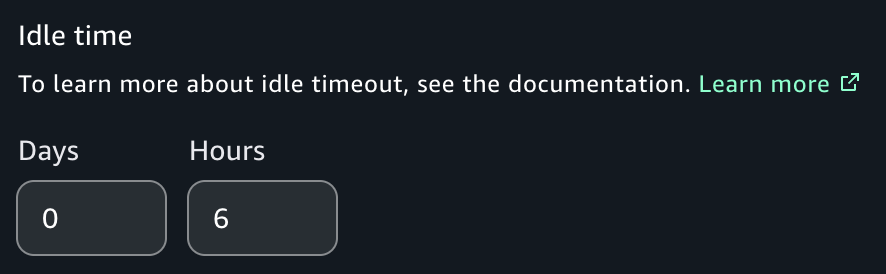
Be aware that some fashions in our instance pocket book can take upwards of 4 hours to coach utilizing the ml.p4de.24xlarge occasion sort. Consequently, we suggest that you simply set the Idle Time to six hours to permit the pocket book to run to completion and keep away from errors. Moreover, if executing the pocket book from finish to finish for the primary time, set the house storage to 100 GB to permit for the dataset to be totally ingested in the course of the fine-tuning course of. See Creating a brand new house for extra info.
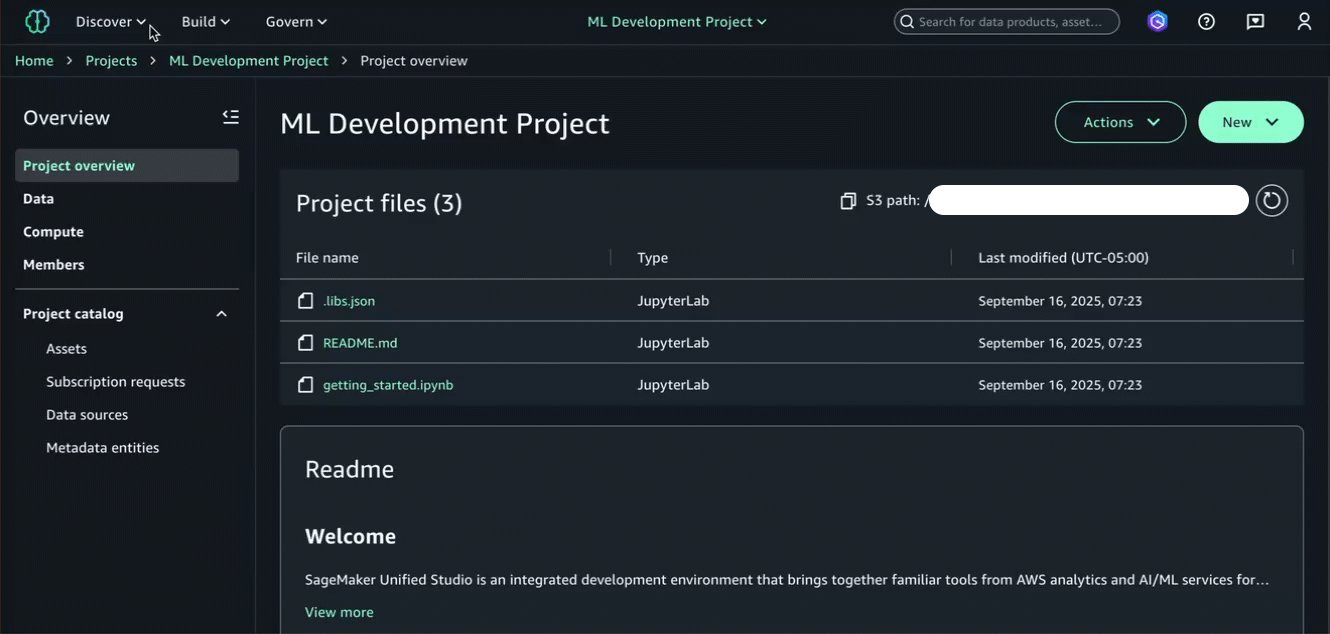
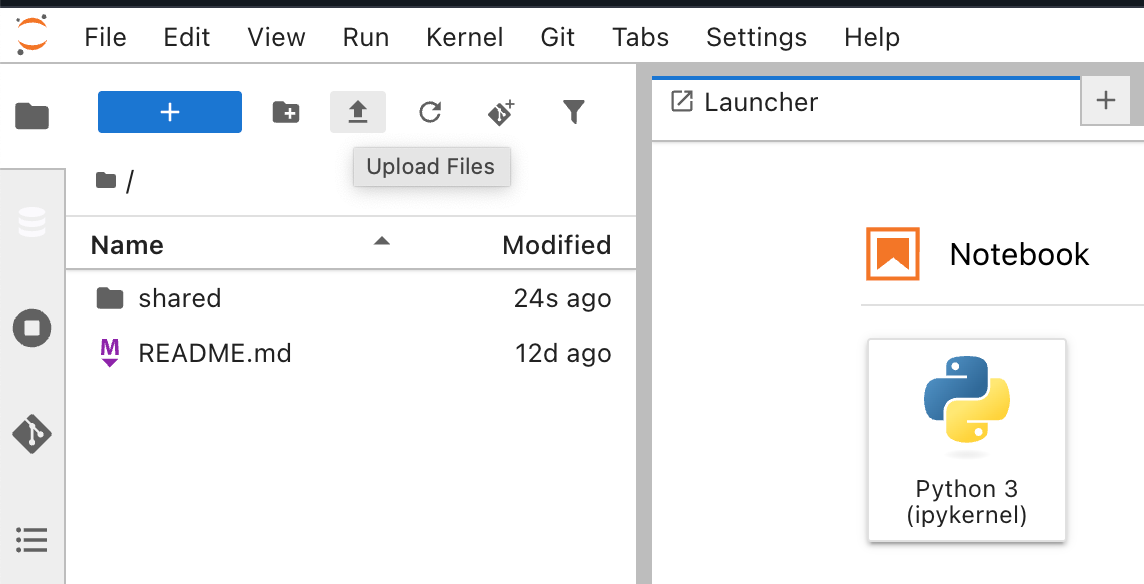
With our house created and operating, we select the Open button to launch the JupyterLab IDE. As soon as loaded, we add the pattern Jupyter pocket book into our house utilizing the Add Recordsdata performance.
Now that we’ve subscribed to the revealed dataset in our ML growth mission, we are able to start the mannequin growth workflow. This entails three key steps: fetching the dataset from our bucket utilizing Amazon S3 Entry Grants, getting ready it for fine-tuning, and coaching our fashions.
Grantees can entry Amazon S3 information by utilizing the AWS Command Line Interface (AWS CLI), the AWS SDKs, and the Amazon S3 REST API. Moreover, you should use the AWS Python and Java plugins to name Amazon S3 Entry Grants. For brevity, we go for the AWS CLI method within the pocket book and the next code. We additionally embody a pattern that exhibits the usage of the Python boto3-s3-access-grants-plugin within the appendix part of the pocket book for reference.
The method contains two steps: first acquiring non permanent entry credentials to the Amazon S3 management aircraft by means of the s3control CLI module, then utilizing these credentials to sync the info domestically. Replace the AWS_ACCOUNT_ID variable with the suitable account ID that homes your dataset.
import json

AWS_ACCOUNT_ID = "123456789" # REPLACE THIS WITH YOUR ACCOUNT ID
S3_BUCKET_NAME = "s3://MY_BUCKET_NAME/" # REPLACE THIS WITH YOUR BUCKET

# Get credentials
end result = !aws s3control get-data-access --account-id {AWS_ACCOUNT_ID} --target {S3_BUCKET_NAME} --permission READ

json_response = json.masses(end result.s)
creds = json_response['Credentials']

# Configure profile with cell magic
!aws configure set aws_access_key_id {creds['AccessKeyId']} --profile access-grants-consumer-access-profile
!aws configure set aws_secret_access_key {creds['SecretAccessKey']} --profile access-grants-consumer-access-profile
!aws configure set aws_session_token {creds['SessionToken']} --profile access-grants-consumer-access-profile

print("Profile configured efficiently!")

!aws s3 sync {S3_BUCKET_NAME} ./ --profile access-grants-consumer-access-profile
After operating the earlier code and getting a profitable output, we are able to now entry the S3 bucket domestically. With our uncooked dataset now accessible domestically, we have to rework it into the format required for fine-tuning our LLM. We’ll create three datasets of various sizes (1k, 5k, and 10k photos) to judge how the dataset dimension impacts mannequin efficiency.
Every coaching dataset incorporates a prepare and validation listing, every of which should include an photos subdirectory and accompanying metadata.jsonl file with coaching examples. The metadata file format contains three key/worth fields per line:
With these artifacts uploaded to Amazon S3, we are able to now fine-tune our LLM by utilizing SageMaker JumpStart to entry the pre-trained Llama 3.2 11B Imaginative and prescient Instruct mannequin. We’ll create three separate fine-tuned variants to judge. We’ve created a prepare() perform to facilitate this utilizing a parameterized method, making this reusable for various dataset sizes:
Our coaching perform handles a number of essential features:
- Mannequin choice: Makes use of the most recent model of Llama 3.2 11B Imaginative and prescient Instruct from SageMaker JumpStart.
- Hyperparameters: The pattern pocket book makes use of the retrieve_default() API within the SageMaker SDK to robotically fetch the default hyperparameters for our mannequin.
- Batch dimension: The one default hyperparameter that we alter, setting to 1 per system as a result of massive mannequin dimension and reminiscence constraints.
- Occasion sort: We use a ml.p4de.24xlarge occasion sort for this coaching job and suggest that you simply use the identical sort or bigger.
- MLflow integration: Mechanically logs hyperparameters, job names, and coaching metadata for experiment monitoring.
- Endpoint deployment: Mechanically deploys every educated mannequin to a SageMaker endpoint for inference.
Recall that the coaching course of will take a number of hours to finish utilizing occasion sort ml.p4de.24xlarge.
Now we’ll consider our fine-tuned fashions utilizing the Common Normalized Levenshtein Similarity (ANLS) metric. This metric evaluates text-based outputs by measuring the similarity between predicted and floor reality solutions, even when there are minor errors or variations. It’s significantly helpful for duties like visible query answering as a result of it could deal with slight variations in solutions. See the Llama 3.2 3B mannequin card for extra info.
MLflow will observe our experiments and outcomes for simple comparability. Our analysis pipeline contains a number of key capabilities for picture encoding for mannequin inference, payload formatting, ANLS calculation, and outcomes monitoring. The training_pipeline() perform orchestrates the whole workflow with nested MLflow runs for higher experiment group.
After orchestrating three end-to-end executions for our three dataset sizes, we assessment the ANLS metric ends in MLflow. Utilizing the comparability performance, we observe the best ANLS rating of 0.902 within the docvqa-10000 mannequin, an enhance of 4.9 proportion factors relative to the bottom mannequin (0.902 − 0.853 = 0.049).
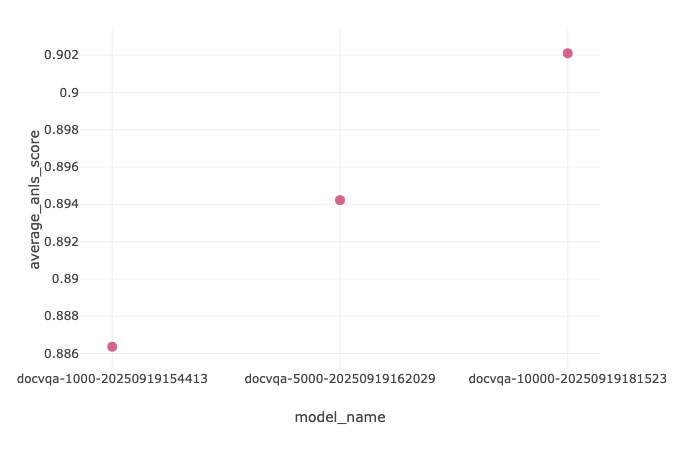
| Mannequin | ANLS |
| docvqa-1000 | 0.886 |
| docvqa-5000 | 0.894 |
| docvqa-10000 | 0.902 |
| Base Mannequin | 0.853 |
Clear Up
To keep away from ongoing costs, delete the assets created throughout this walkthrough. This contains SageMaker endpoints and mission assets such because the MLflow utility, JupyterLab IDE, and area.
Conclusion
Primarily based on the previous information, we observe a optimistic relationship between the scale of the coaching dataset and ANLS in that the docvqa-10000 mannequin had improved efficiency.
We used MLflow for experimentation and visualization round our success metric. Additional enhancements in areas corresponding to hyperparameter tuning and information enrichment might yield even higher outcomes.
This walkthrough demonstrates how the Amazon SageMaker Unified Studio integration with S3 normal goal buckets helps streamline the trail from unstructured information to production-ready ML fashions. Key advantages embody:
- Simplified information discovery and cataloging by means of a unified interface
- Safer information entry by means of S3 Entry Grants with out advanced permission administration
- Clean collaboration between information producers and customers throughout initiatives
- Finish-to-end experiment monitoring with managed MLflow integration
Organizations can now use their current S3 information belongings extra successfully for ML workloads whereas sustaining governance and safety controls. The 4.9% efficiency enchancment from base mannequin to our improved fine-tuned variant (0.853–0.902 ANLS) validates the method for visible query answering duties.
For subsequent steps, think about exploring further dataset preprocessing methods, experimenting with completely different mannequin architectures obtainable by means of SageMaker JumpStart, or scaling to bigger datasets as your use case calls for.
The answer code used for this weblog publish may be present in this GitHub repository.
In regards to the authors

