On October 10, 2024, Amazon introduced the discontinuation of the Amazon Lookout for Imaginative and prescient service, with a scheduled shut down date of October 31, 2025 (see Exploring options and seamlessly migrating knowledge from Amazon Lookout for Imaginative and prescient weblog publish). As a part of our transition steering for patrons, we suggest the usage of Amazon SageMaker AI instruments to construct purposes for patrons who’re keen on AI/ML pc imaginative and prescient fashions for automated high quality inspection use instances. To assist that effort, AWS has made a pre-trained pc imaginative and prescient defect detection mannequin out there on AWS Market that may be fine-tuned utilizing Amazon SageMaker AI for a buyer’s particular use case. If run within the cloud, this mannequin solely requires paying for infrastructure prices for coaching or inference. This method offers the instruments to speed up answer growth whereas facilitating full flexibility to construct an answer that integrates with any present {hardware} and software program infrastructure.
On this weblog publish, you’ll discover ways to migrate your pc imaginative and prescient workloads from Amazon Lookout for Imaginative and prescient to Amazon SageMaker AI by following our step-by-step steering.
AWS is sharing the important underlying fashions used for the service to finish customers within the AWS Market. You should utilize the 2 important forms of fashions, binary classification and semantic segmentation, while you prepare in your personal AWS accounts for deployment on AWS or on the edge.
This mannequin helps clients proceed to make use of AWS defect detection expertise at their very own tempo with higher flexibility. For instance, you possibly can prepare your fashions with bigger occasion varieties for quicker coaching occasions. With entry to set hyperparameters, you can even regulate mannequin habits that was not beforehand out there on the AWS console. For instance, you possibly can set the multi-head mannequin for semantic segmentation to disable the binary classifier head. This will make the mannequin mode extra tolerant of fixing background and lighting situations. It’s also possible to personalize the utmost coaching time, which was set to a non-changeable 24-hour restrict on Amazon Lookout for Imaginative and prescient (L4V).
The GitHub repository for Amazon Lookout for Imaginative and prescient has been up to date with a Jupyter Pocket book that will help you prepare datasets with these two mannequin varieties and package deal them up. From there you possibly can deploy the fashions by utilizing a SageMaker endpoint, or edge gadgets.
To label the pictures past the pattern knowledge, you should utilize Amazon SageMaker Floor Fact to allow crowdsourcing or permit non-public groups to label the info, or use a companion answer corresponding to Edge Impulse, Roboflow, or SuperbAI to take action. When you could have the manifest file of the labeled knowledge, {the marketplace} fashions can be utilized for coaching. You’ll lose a thumbnail-based dataset administration instrument just like the Amazon Lookout for Imaginative and prescient console, so think about one of many beforehand talked about companion options to assist handle datasets. It’s also possible to export your present knowledge from the Lookout For Imaginative and prescient service utilizing this information.
Stipulations
Earlier than you start, be sure you have the next parts and permissions in place:
- Amazon SageMaker Studio or Amazon SageMaker Unified Studio for built-in growth setting (IDE)
- AWS Id and Entry Administration (IAM) function with these permissions to observe the precept of least privilege
- Amazon S3
- s3:GetObject
- s3:PutObject
- s3:DeleteObject
- s3:ListBucket
- SageMaker
- sagemaker:CreateTrainingJob
- sagemaker:CreateModel
- sagemaker:CreateEndpoint
- sagemaker:CreateEndpointConfig
- sagemaker:CreateTransformJob
- sagemaker:DescribeTrainingJob
- sagemaker:DescribeModel
- sagemaker:DescribeEndpoint
- sagemaker:DescribeEndpointConfig
- sagemaker:DescribeTransformJob
- sagemaker:InvokeEndpoint
- sagemaker:DeleteEndpoint
- sagemaker:DeleteEndpointConfig
- sagemaker:DeleteModel
- Amazon S3
- Mannequin subscription:
- An AWS account with a subscription to Laptop Imaginative and prescient Defect Detection Mannequin or
- An IAM function with these three permissions permission to make AWS Market subscriptions within the AWS account you utilize:
- aws-marketplace:ViewSubscriptions
- aws-marketplace:Unsubscribe
- aws-marketplace:Subscribe
- Labeled knowledge (you should utilize the cookie knowledge pattern in Github) or label your personal knowledge with SageMaker Floor Fact or an AWS Companion instrument
- Primary information of making a SageMaker pocket book occasion and operating Jupyter pocket book
Structure overview
The next diagram illustrates the end-to-end move, from picture acquisition to inferencing on the edge. This weblog give attention to steps 2 and three.

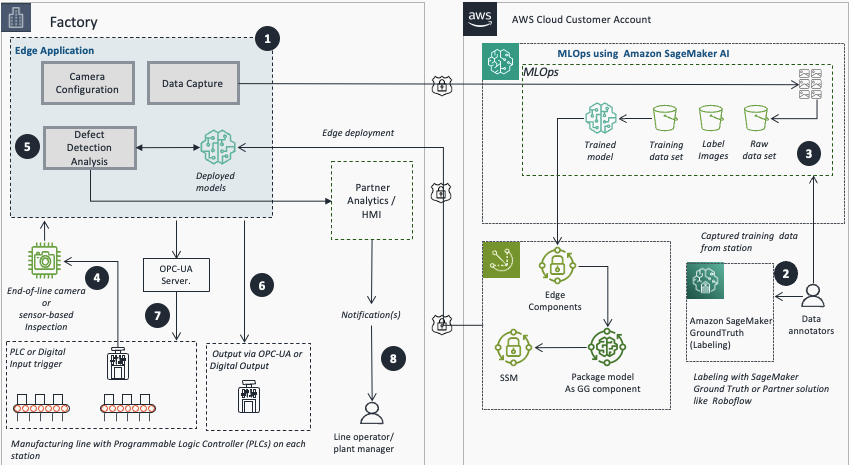
- Use an edge software to configure cameras or sensors and seize coaching photographs.
- Use SageMaker GroundTruth or AWS Companion platforms to export and label photographs.
- Use Amazon SageMaker AI for mannequin coaching.
- Use REST, PLC, or digital enter for picture acquisition and processing.
- Run real-time inference utilizing the educated and deployed mannequin.
- Publish inference outcomes to analytics and monitoring for alerts and analytics.
- Carry out automated motion on the machine of concern or notify plant personnel of anomalies from inspection station element utilizing OPC-UA or digital output.
- Line operators and plant managers obtain notifications for motion.
Arrange the labeling course of
This part covers the steps to arrange the labeling course of utilizing Amazon SageMaker Floor Fact, together with creating a personal labeling group and configuring the labeling job.
- Configure Amazon SageMaker Floor Fact non-public group:
- Choose Amazon SageMaker AI, Floor Fact, Labeling workforces.
- Choose Personal, then Create Personal Workforce.
- Enter a group title.
- Go away different values as their defaults.
- Choose Create a brand new Amazon Cognito consumer group.
- Choose Create non-public Workforce.
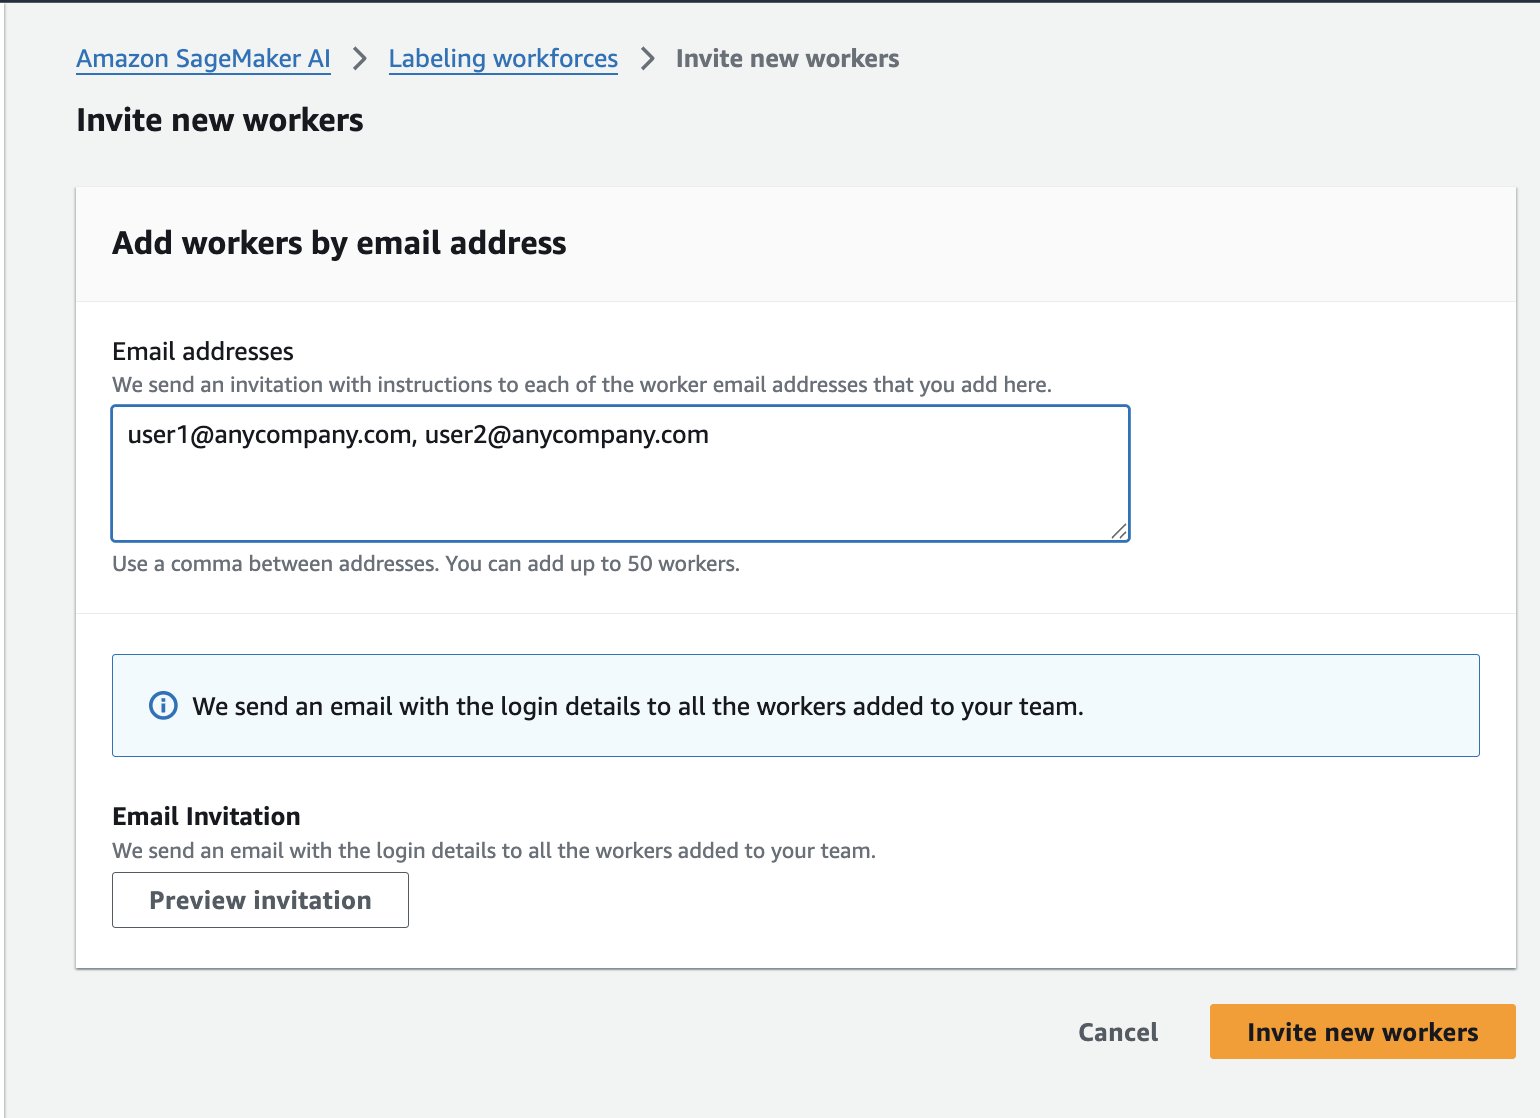
- On the Employees tab, choose Invite New Employees.
- Enter your group members’ electronic mail addresses to ship sign-up invites.
Label the dataset
After efficiently finishing the workforce setup for labelling, the subsequent step is to label the dataset. This part explains tips on how to put together the dataset by importing the pictures to an Amazon Easy Storage Service (Amazon S3) bucket, then create and run the SageMaker Floor Fact labeling job to label the pictures as regular or anomaly.
- Add the picture datasets to an Amazon S3 bucket that SageMaker Floor Fact can entry. In case you don’t have a dataset, you should utilize both the cookie-dataset or aliens-dataset.
- Copy all the photographs from “regular” and “anomaly” folders right into a single listing for SMGT to entry or you’re going to get an error message on the subsequent step.
- To make use of AWS CloudShell, run the next script:
- Alternatively, you probably have the AWS CLI put in, you possibly can copy them with the next instructions (See organising AWS CLI for the way to do that):
Notice: To stop filename conflict from the 2 folders, a suffix anomaly was added. The uploaded recordsdata ought to be in your
/aliens-dataset-all bucket for the Floor Fact job.
- Within the AWS Console, navigate to Amazon SageMaker AI, Floor Fact, Labeling Jobs, Create labeling job.

- There are a number of choices right here to fill in; an important fields to fill or choose are:
- Enter knowledge setup: Choose Automated knowledge setup
- S3 location for enter datasets:
- S3 location knowledge output datasets:
- Information kind: Choose Picture
- IAM Function – Choose Create new function if you happen to don’t have one set as much as permit Floor Fact to work together with SageMaker companies.
- Select Full knowledge setup. An Enter knowledge connection profitable message shows. In case you get an error, test your IAM function to verify S3 entry is enabled, and the listing has picture recordsdata in it, because it is not going to recurse via sub-directories.

- Choose the duty kind. These fashions assist Picture Classification (Single Label), which is binary classification (suppose good or unhealthy), or Semantic segmentation. You can not use a bounding field kind with these fashions. You may change your choice later.
- Select Subsequent.
- For Employee varieties, choose Personal. You may learn extra about Amazon Mechanical Turks or labeling subscriptions within the Developer Information.
- Underneath Personal groups, choose the non-public group you created within the earlier steps.
- For Job timeout and Job expiration time, go away the default values.
- Go away Allow automated knowledge labeling unselected. You may learn extra about automated knowledge labeling right here; nevertheless, it isn’t suitable with semantic segmentation.
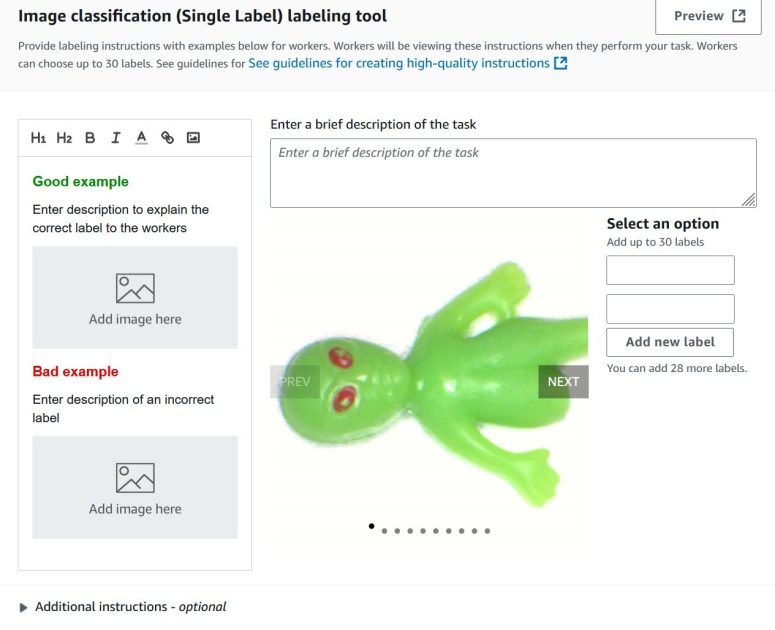
- On the Picture classification display, add two new labels: regular and anomaly. You may fill in the remaining as wanted. Select Preview to see a preview of what it’ll seem like to the tip consumer.
- Select Create.

- Choose Floor Fact, after which choose the Personal tab.
- Open the labeling portal sign-in URL in a brand new tab in your browser after which check in to see your assigned duties.
- Choose an assigned job and select Begin working to label the info.
- Choose regular or anomaly.
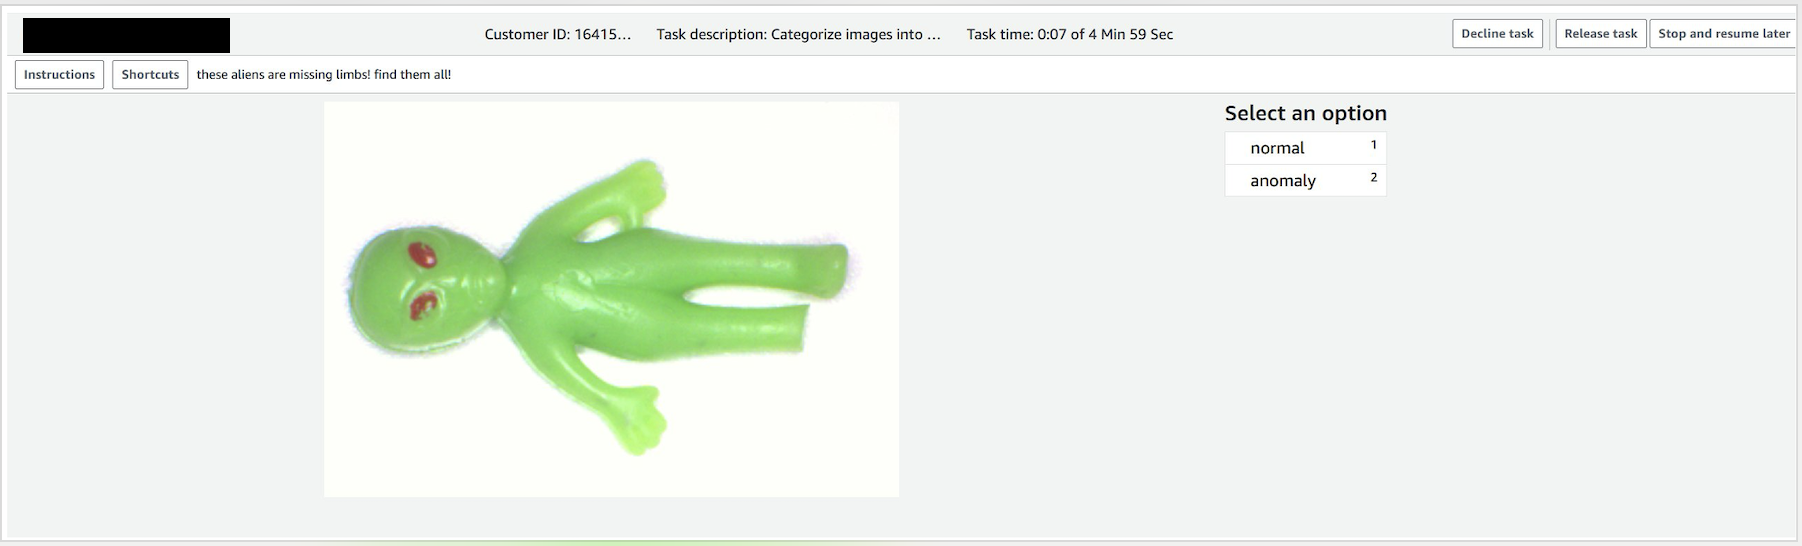
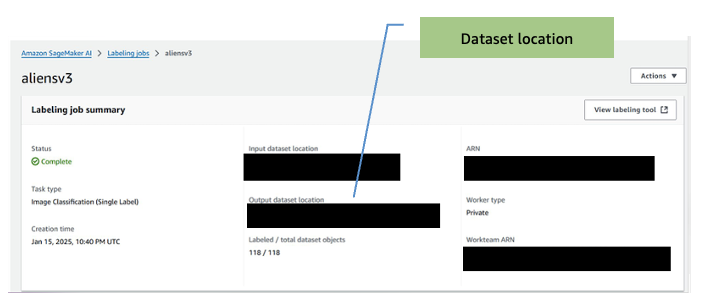
- When the job is full, make word of the output dataset location. You will have this for the coaching step.
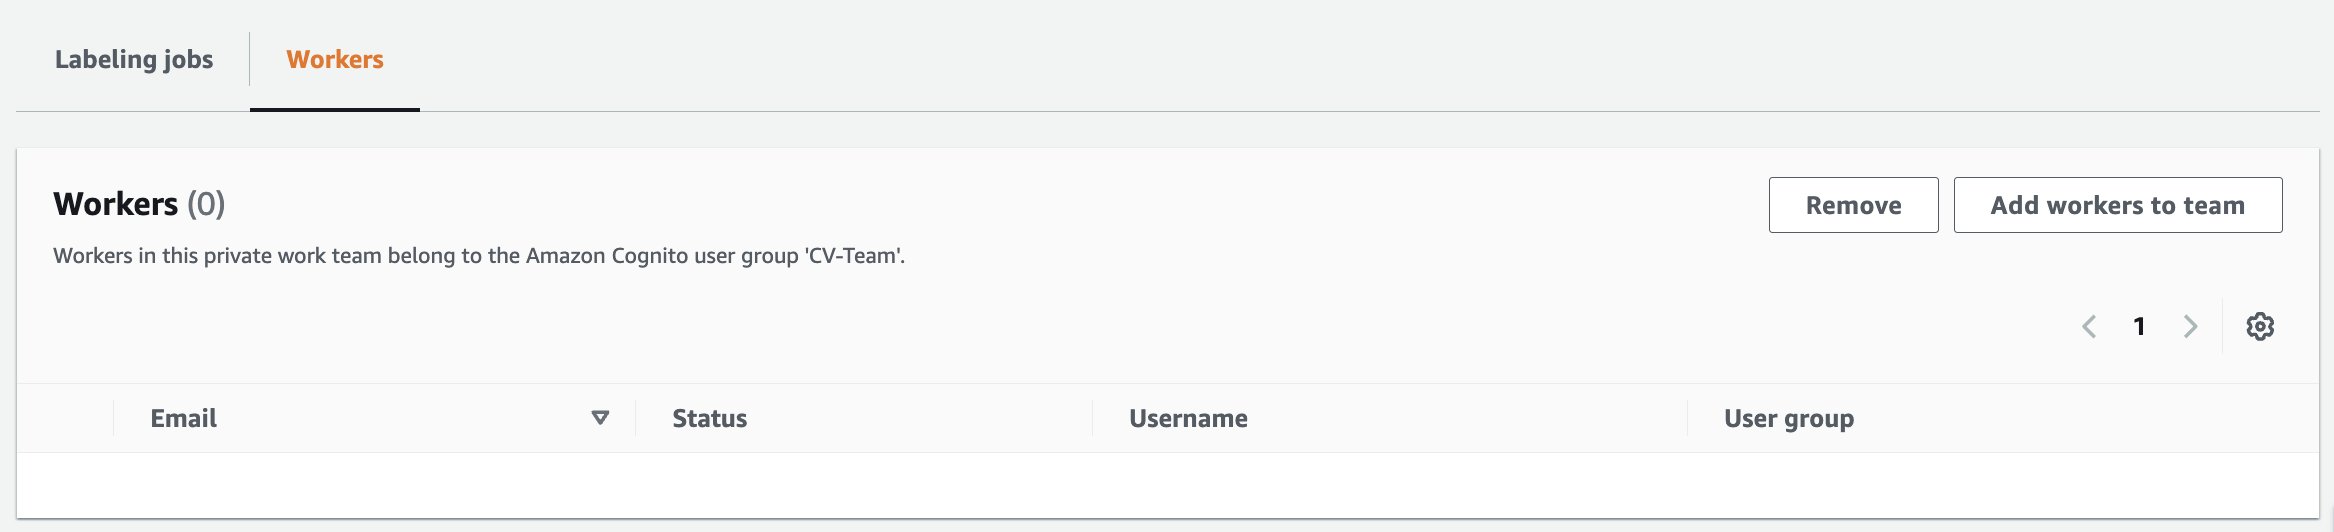
- If you have to add staff to the labelling job:
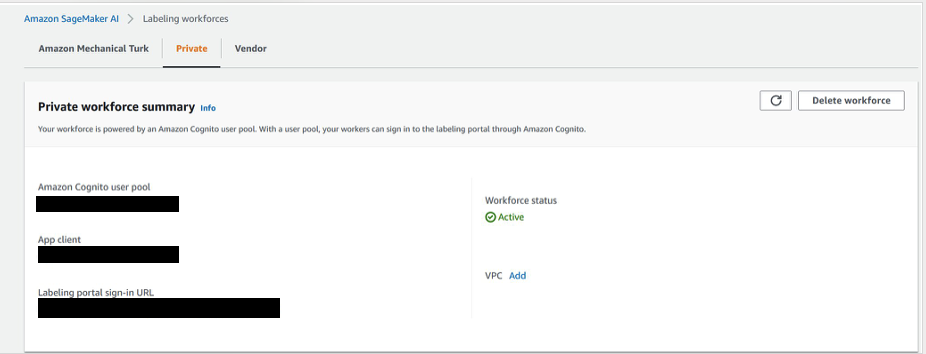
- On the Amazon SageMaker AI Floor Fact web page, choose Labeling workforces.
- Choose the Personal tab.
- Click on on the non-public group that was created earlier (CV-team).
- Choose the Employees tab
- Choose the specified employee from the listing and select Add staff to group.
-
- You’ll then be redirected to the Amazon SageMaker AI, labelling workforces web page with a affirmation message that employee has been added.

After you full the labeling job, the output of the duty is used to coach the Laptop Imaginative and prescient Detection mannequin from the AWS Market.
Prepare the mannequin
This part discusses coaching the pc imaginative and prescient mannequin utilizing the AWS Market Laptop Imaginative and prescient Detection mannequin and the labeled dataset from the earlier step.
- Go to the AWS Market to subscribe to the mannequin, https://aws.amazon.com/market/pp/prodview-j72hhmlt6avp6.
- Select Proceed to Subscribe.
- Select Proceed to configuration.
- Choose the newest software program model, your Area, and ensure Create a coaching job is chosen.
Notice: Copy the Product Arn and retailer in a textual content editor or notepad for later use.
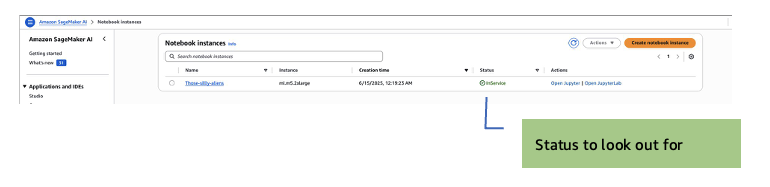
- Go to SageMaker AI, Pocket book cases, Create pocket book occasion.
Notice: GPU-enabled pocket book occasion just isn’t required. Amazon SageMaker Coaching jobs will spin up the GPU cases wanted throughout coaching, so most simple cases shall be ample.
- Choose m5.2xl occasion, Jupyter lab 4, with quantity measurement of 128 GB. The default is 5 GB, which is simply too small.
- Choose an IAM function to permit the pocket book to entry assets in your account. You will have entry to S3.
- Within the Git Repositories – elective part, choose Clone a public Git repository to this pocket book occasion solely.
- Enter the Git repository URL. Go away all the opposite fields as their default, then select Create pocket book occasion to start out the occasion.
- After the occasion begins, (the standing will show as InService), choose Open JupyterLab motion for the brand new pocket book occasion.
JupyterLab opens:
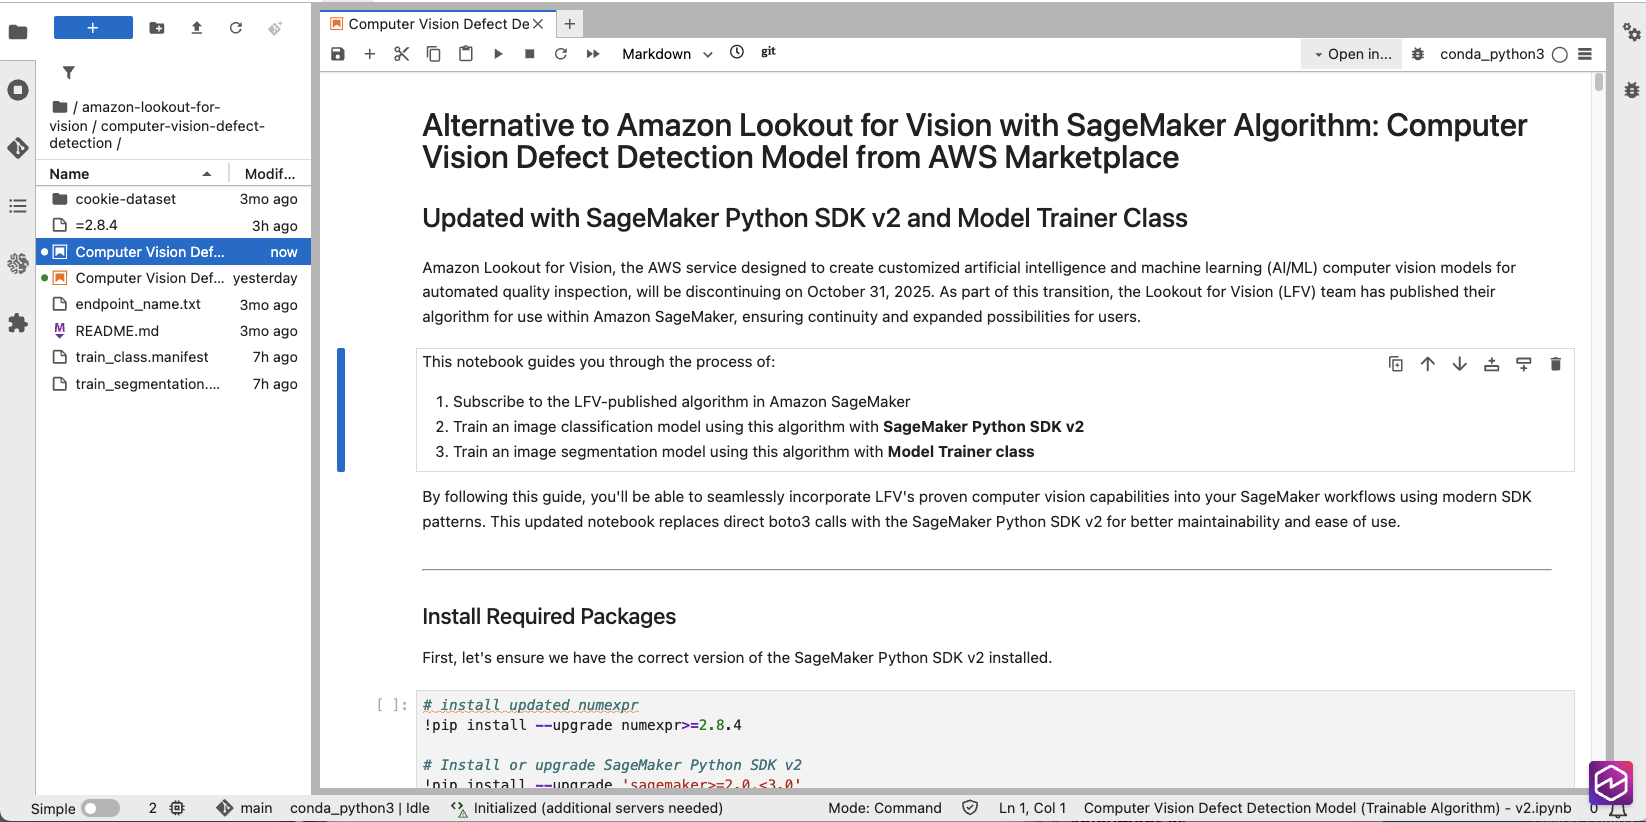
- On the left navigation pane, open the computer-vision-defect-detection folder.
- Within the AWS Console, go to Market, Handle subscriptions, after which copy the ARN of your mannequin subscription.

- Within the Jupyter pocket book, find the snippet beneath and replace the placeholder worth for algorithm_name variable with the Product Arn you copied within the earlier step.
The bucket that will be used for this step can be robotically created and named within the format SageMaker-
- Within the AWS Console, navigate to Amazon SageMaker AI, Floor Fact, Labeling jobs and choose the job that was accomplished.
- Establish and pay attention to the output photographs folder (Output dataset location)
Notice: To start out the coaching job, take a look at the trail for the output manifest in
- Set the bucket variable to be the pictures bucket title that you simply beforehand set and object key the trail to your manifest:
- bucket: the place to retailer the manifest file
- classification_manifest_key: the place the output manifest file is saved (for instance, aliens-dataset-all/[job-name]/manifests/output/output.manifest)
- Evaluate the mannequin coaching configuration within the Classification Mannequin with Algorithm Estimator part.
Notice: The job makes use of NVIDIA G4DN cases. They are often sized as much as a bigger occasion to lower coaching time, however on a solely 118 cases. The picture dataset coaching finishes in lower than 10 minutes with a g4dn.2xl. You may experiment with different occasion varieties, nevertheless outcomes might range as a result of the fashions had been extensively examined on the G4DN cases.
- Validate the values of TestInputDataAttributeNames and TrainingInputDataAttributeNames within the Hyperparameters part, in addition to AttributeNames within the
TrainingInput part. The labels on all three should match the construction of your manifest file. Here’s a pattern manifest:
Notice: Two of the three values embody the labelling job title.
- Run all of the cells or blocks listed within the Classification Mannequin with Algorithm Estimator part to start out the coaching job.
- If you wish to prepare a segmentation mannequin as properly, observe the steps within the Segmentation Mannequin with Algorithm Estimator part.
Notice: After the coaching is accomplished, you might be prepared to check it! There are few inference choices out there for this:
- Actual-time inference utilizing Amazon SageMaker endpoints
- Amazon SageMaker AI Batch Remodel inference.
- Edge deployment
Deploy the mannequin
Amazon SageMaker AI endpoints and Amazon SageMaker AI Batch Remodel inference are each used for inference however serve totally different functions.
Amazon SageMaker AI endpoints
Amazon SageMaker AI endpoints are used for real-time inference, offering low-latency predictions appropriate for purposes requiring quick responses. Endpoints stay lively whereas they’re deployed, making them higher suited to steady and regular visitors, however probably extra pricey as a consequence of ongoing useful resource utilization.
- Within the Jupyter pocket book, navigate to the (Optionally available) Working real-time inference utilizing Amazon SageMaker endpoints part.
- Run the next cell blocks to arrange and invoke the endpoint:
- Validate the inference, then delete the endpoint by operating the next block:
Notice: In case you begin an endpoint, take into account you’ll be billed whereas it’s operating till you flip it off.
Amazon SageMaker AI Batch Remodel
Batch Remodel is designed for offline inference and making predictions on giant datasets saved in S3, and is good for bulk processing the place low latency just isn’t vital. After the job is full, the assets are launched, making it cost-effective for sporadic workloads.
- Navigate to the (Optionally available) Run Batch Remodel Inference utilizing SageMaker SDK v2 part.
- Outline the s3_input_data and s3_output_path parameters.
- Run all of the cells and blocks within the (Optionally available) Run Batch Remodel Inference utilizing SageMaker SDK v2 part to finish the batch inference.
- Validate the batch remodel job after completion by navigating to the s3_output_path folder. The next is a pattern inference output file:
Clear up
To keep away from incurring pointless prices, delete the next assets while you now not want them:
- Delete SageMaker endpoints.
- Navigate to the Amazon SageMaker Console.
- Choose Endpoints.
- Choose the endpoint you created.
- Select Delete.
- Delete SageMaker Pocket book cases.
- Navigate to the Amazon SageMaker Console.
- Choose Pocket book cases.
- Choose the pocket book occasion you created.
- Select Cease if the occasion is operating.
- As soon as stopped, select Delete.
- Delete S3 objects and buckets.
- Navigate to the Amazon S3 Console.
- Delete all objects within the buckets you created for this tutorial.
- Delete the empty buckets.
- Delete the Floor Fact labeling group.
- Navigate to Floor Fact.
- Choose Labeling workforces.
- Choose the Personal tab.
- Choose the non-public group you created.
- Select Delete group.
Conclusion
On this weblog publish, we’ve demonstrated tips on how to transition from Amazon Lookout for Imaginative and prescient to utilizing the underlying Laptop Imaginative and prescient Detection fashions out there via the AWS Market, exhibiting the step-by-step technique of organising labeling, coaching the mannequin, and operating inference via batch transformation. The transition offers clients with higher flexibility when it comes to coaching choices, hyperparameter changes, and deployment decisions whereas persevering with to make use of AWS defect detection expertise at their very own tempo. Additionally make sure you take a look at our edge-based open supply built-in Defect Detection Software on GitHub if you need to mix what you could have discovered right here.
In regards to the authors
 Ryan Vanderwerf is a is a senior companion options architect at Amazon Internet Companies specializing in sensible manufacturing, imaginative and prescient, and machine studying. Ryan beforehand offered Java digital machine-focused consulting and undertaking growth as a software program engineer at OCI on the Grails and Micronaut group. He was chief architect/director of merchandise at ReachForce, with a give attention to software program and system structure for AWS Cloud SaaS options for advertising and marketing knowledge administration. Ryan has constructed a number of SaaS options in a number of domains corresponding to monetary, media, telecom, and e-learning firms since 1996
 Lu Min is a Software program Improvement Engineer for AWS Edge ML companies, targeted on creating machine studying options that function on the edge for AWS clients. With experience in optimizing ML fashions for resource-constrained environments, Lu helps clients implement environment friendly inference capabilities on edge gadgets and cloud communication, in addition to handle mannequin lifecycle utilizing AWS SageMaker.
 Tim Westman is the Product Supervisor and Go-to-Market Lead for Edge Machine Studying, AWS. Tim leads the Product Administration and Enterprise Improvement for the Edge Machine Studying enterprise at Amazon Internet Companies. On this function, he works with clients to assist construct pc imaginative and prescient options on the edge to resolve complicated operational challenges. Tim has greater than 30 years of expertise in gross sales, enterprise growth and product administration roles for main {hardware} and software program firms, with the final 8 years specializing in AI and pc imaginative and prescient for IoT purposes.
 Kunle Adeleke is an enterprise options architect, offering steering to giant AWS industrial clients in numerous industries craft their expertise technique. Kunle has led enterprise structure groups and software program growth groups in each authorities and industrial sectors. His deep experience spans software program growth, answer structure, enterprise structure, safety, and knowledge & AI/ML.


