dashboard to your prospects, shoppers, or fellow staff is turning into an important a part of the talent set required by software program builders, information scientists, ML practitioners, and information engineers. Even should you work totally on back-end processing, the info you’re processing often must be “surfaced” to customers sooner or later. In case you’re fortunate, your organisation could have a devoted front-end staff to maintain that, however typically will probably be all the way down to you.
Being a straight-up Python developer with no expertise in HTML, JavaScript, and so forth., is now not an excuse, as many Python libraries, corresponding to Streamlit and Gradio, have emerged over the previous few years.
This text isn’t about them, although, as a result of I’m a type of straight-up Python builders, and I’ve already executed the Streamlit and Gradio factor. So it was time to roll up my sleeves and see if I might be taught new expertise and create a dashboard with these outdated front-end improvement stalwarts: HTML, JavaScript, and CSS.
The info for our dashboard will come from a neighborhood SQLite database. I created a sales_data desk in SQLite containing dummy gross sales information. Right here is the info in tabular type.
Picture by Creator
Beneath is a few code that you need to use to comply with alongside and create your individual SQLite database and desk with the info as proven.
In case you’re questioning why I’m solely inserting a handful of information into my database, it’s not as a result of I don’t suppose the code can deal with massive information volumes. It’s simply that I wished to focus on the dashboard performance slightly than being distracted by the info. Be at liberty to make use of the script I present under so as to add further information to the enter information set should you like.
So, we keep within the Python world for only a bit longer as we arrange a SQLite DB programmatically.
import sqlite3

# Outline the database identify
DATABASE_NAME = "C:Customersthomatasksmy-dashboardsales_data.db"

# Hook up with SQLite database
conn = sqlite3.join(DATABASE_NAME)

# Create a cursor object
cursor = conn.cursor()

# SQL to create the 'gross sales' desk
create_table_query = '''
CREATE TABLE IF NOT EXISTS gross sales (
    order_id INTEGER PRIMARY KEY,
    order_date TEXT,
    customer_id INTEGER,
    customer_name TEXT,
    product_id INTEGER,
    product_names TEXT,
    classes TEXT,
    amount INTEGER,
    worth REAL,
    complete REAL
);
'''

# Execute the question to create the desk
cursor.execute(create_table_query)

# Pattern information to insert into the 'gross sales' desk
sample_data = [
    (1, "2022-08-01", 245, "Customer_884", 201, "Smartphone", "Electronics", 3, 90.02, 270.06),
    (2, "2022-02-19", 701, "Customer_1672", 205, "Printer", "Electronics", 6, 12.74, 76.44),
    (3, "2017-01-01", 184, "Customer_21720", 208, "Notebook", "Stationery", 8, 48.35, 386.80),
    (4, "2013-03-09", 275, "Customer_23770", 200, "Laptop", "Electronics", 3, 74.85, 224.55),
    (5, "2022-04-23", 960, "Customer_23790", 210, "Cabinet", "Office", 6, 53.77, 322.62),
    (6, "2019-07-10", 197, "Customer_25587", 202, "Desk", "Office", 3, 47.17, 141.51),
    (7, "2014-11-12", 510, "Customer_6912", 204, "Monitor", "Electronics", 5, 22.5, 112.5),
    (8, "2016-07-12", 150, "Customer_17761", 200, "Laptop", "Electronics", 9, 49.33, 443.97)
]

# SQL to insert information into the 'gross sales' desk
insert_data_query = '''
INSERT INTO gross sales (order_id, order_date, customer_id, customer_name, product_id, product_names, classes, amount, worth, complete)
VALUES (?, ?, ?, ?, ?, ?, ?, ?, ?, ?)
'''

# Insert the pattern information
cursor.executemany(insert_data_query, sample_data)

# Commit the transaction
conn.commit()

# Shut the connection
conn.shut()

print(f"Database '{DATABASE_NAME}' has been created and populated efficiently.")
Dashboard Performance
Our dashboard may have the next performance.
Key Metrics. Whole income, complete orders, common order worth, prime class
Completely different Chart Sorts. Income Over Time (line chart), Income by Class (bar chart), Prime Merchandise by Income (horizontal bar chart)
Filtering. By date and class
Knowledge Desk. Show our information information in a paginated and searchable grid format.
Establishing our Setting
Subsequent, we have now a sequence of steps to comply with to arrange our surroundings.
1/ Set up Node.js.
Node.js is a runtime surroundings that allows you to run JavaScript outdoors the browser, permitting you to make use of JavaScript to construct quick and scalable server-side purposes.
So, guarantee Node.js is put in in your system to allow you to run a neighborhood server and handle packages. You possibly can obtain it from the Node.js official web site.
2/ Create a predominant venture folder and subfolders
Open your command terminal and run the next instructions. I’m utilizing Ubuntu on my Home windows field for this, however you possibly can change it to fit your most popular command-line utility and system.
$ mkdir my-dashboard
$ cd my-dashboard
$ mkdir shopper
% mkdir server
3/ Initialise a Node venture
$ npm init -y
This command routinely creates a default package deal.json file in your venture listing with out requiring consumer enter.
The -y flag solutions “sure” to all prompts, utilizing the default values for fields like:
identify
model
description
predominant
scripts
creator
license
Here’s what my package deal file seemed like.
{
  "identify": "my-dashboard",
  "model": "1.0.0",
  "predominant": "index.js",
  "scripts": {
    "take a look at": "echo "Error: no take a look at specified" && exit 1"
  },
  "key phrases": [],
  "creator": "",
  "license": "ISC",
  "description": "",
  "dependencies": {
    "specific": "^4.21.2",
    "sqlite3": "^5.1.7"
  }
}
4/ Set up Categorical and SQLite
SQLite is a light-weight, file-based relational database engine that shops all of your information in a single, moveable file, eliminating the necessity for a separate server.
Categorical is a minimal, versatile net utility framework for Node.js that simplifies the constructing of APIs and net servers via routing and middleware.
We will set up each utilizing the command under.
$ npm set up specific sqlite3
Now, we are able to begin growing our code. For this venture, we’ll want 4 code information: an index.html file, a server.js file, a shopper.js file, and a script.js file.
Let’s undergo every of them step-by-step.
1) shopper/index.html
Gross sales Efficiency Dashboard
Key Metrics
This HTML file establishes the fundamental visible components of our Gross sales Efficiency Dashboard, together with interactive filters for date and class, a piece displaying key gross sales metrics, a dropdown menu to pick chart sorts, and a desk for uncooked information.
Bootstrap is used for styling. Flatpickr is used for date inputs. Chart.js is used for visualisations, and DataTables is used for tabular show. Interactivity is dealt with by an exterior script.js file, which we’ll look at shortly.
Bootstrap is a well-liked front-end framework, initially developed by Twitter, that helps you construct responsive and visually constant net interfaces extra simply and rapidly.
DataTables is a jQuery-based plugin that enhances commonplace HTML
components, reworking them into totally interactive, feature-rich tables.
Flatpickr is a light-weight, customizable JavaScript date and time picker. It lets customers choose dates (and optionally occasions) from a glossy pop-up calendar as an alternative of typing them manually.
Chart.js is an easy but highly effective JavaScript library for creating interactive, animated charts in net purposes utilizing the
We use a cascading model sheet (CSS) to model the fundamental visible elements of our dashboard, for instance, button and textual content colors, spacing between components, and so forth.
The model.css file offers the dashboard its look and total look. It’s a clear, gentle theme with ample spacing and structure changes for readability and readability. The model.css file additionally customises the looks of DataTables’ pagination buttons, making them extra user-friendly and visually according to Bootstrap’s design.
3) server/server.js
const specific = require('specific');
const sqlite3 = require('sqlite3').verbose();
const path = require('path');
const app = specific();
const PORT = 3000;

// Full path to your SQLite database
const DB_PATH = "C:Customersthomatasksmy-dashboardsales_data.db";

// Serve static information from the shopper listing
app.use(specific.static(path.be part of(__dirname, '..', 'shopper')));

// Path to fetch information from SQLite database
app.get('/information', (req, res) => {
    const db = new sqlite3.Database(DB_PATH, sqlite3.OPEN_READONLY, (err) => {
        if (err) {
            console.error("Error connecting to database:", err.message);
            res.standing(500).json({ error: "Database connection failed" });
            return;
        }
    });

    // Question the database
    const question = "SELECT * FROM gross sales;"; // Change 'gross sales' together with your desk identify
    db.all(question, [], (err, rows) => {
        if (err) {
            console.error("Error working question:", err.message);
            res.standing(500).json({ error: "Question failed" });
        } else {
            res.json(rows); // Ship the question outcome as JSON
        }
    });

    db.shut((err) => {
        if (err) {
            console.error("Error closing database:", err.message);
        }
    });
});

// Catch-all path to serve the principle HTML file
app.get('*', (req, res) => {
    res.sendFile(path.be part of(__dirname, '..', 'shopper', 'index.html'));
});

// Begin the server
app.pay attention(PORT, () => {
    console.log(`Server working at http://localhost:${PORT}`);
});
This Node.js script incorporates the JavaScript code that units up a primary Categorical server that powers the Gross sales Efficiency Dashboard. It does two predominant issues:
Serves static information (like HTML, CSS, and JS) from the shopper subfolder so the frontend masses within the browser.
Gives a /information endpoint that reads from a neighborhood SQLite database (sales_data.db) and returns your complete gross sales desk as JSON, enabling dynamic information visualisations and tables on the frontend.
4) shopper/script.js
let chartInstance = null; // International variable to retailer the present Chart.js occasion
// Wait till the DOM is totally loaded
doc.addEventListener('DOMContentLoaded', operate () {
// Fetch gross sales information from the backend API
fetch('/information')
.then((response) => response.json())
.then((information) => {
// Deal with case the place no information is returned
if (!information || information.size === 0) {
const app = doc.getElementById('app');
if (app) {
app.innerHTML = "
No information obtainable.
";
}
return;
}
// Initialize filters and dashboard content material
setupFilters(information);
initializeDashboard(information);
// Re-render charts when chart kind modifications
doc.getElementById('chart-type-selector').onchange = () => filterAndRenderData(information);
})
.catch((error) => {
// Deal with fetch error
console.error('Error fetching information:', error);
const app = doc.getElementById('app');
if (app) {
app.innerHTML = "
Didn't fetch information.
";
}
});
});
// Initialize Flatpickr date pickers and class filter
operate setupFilters(information) {
// Convert date strings to JS Date objects
const dates = information.map((merchandise) => new Date(merchandise.order_date.cut up('/').reverse().be part of('-')));
const minDate = new Date(Math.min(...dates));
const maxDate = new Date(Math.max(...dates));
// Configure begin date picker
flatpickr("#start-date", {
defaultDate: minDate.toISOString().slice(0, 10),
dateFormat: "Y-m-d",
altInput: true,
altFormat: "F j, Y",
onChange: operate () {
filterAndRenderData(information);
},
});
// Configure finish date picker
flatpickr("#end-date", {
defaultDate: maxDate.toISOString().slice(0, 10),
dateFormat: "Y-m-d",
altInput: true,
altFormat: "F j, Y",
onChange: operate () {
filterAndRenderData(information);
},
});
// Arrange class dropdown change listener
const categoryFilter = doc.getElementById('category-filter');
if (categoryFilter) {
categoryFilter.onchange = () => filterAndRenderData(information);
}
}
// Initialize dashboard after filters are set
operate initializeDashboard(information) {
populateCategoryFilter(information); // Populate class dropdown
filterAndRenderData(information); // Preliminary render with all information
}
// Apply filters and replace key metrics, chart, and desk
operate filterAndRenderData(information) {
const chartType = doc.getElementById('chart-type-selector').worth;
const startDate = doc.getElementById('start-date')._flatpickr.selectedDates[0];
const endDate = doc.getElementById('end-date')._flatpickr.selectedDates[0];
const selectedCategory = doc.getElementById('category-filter').worth;
// Filter information by date and class
const filteredData = information.filter((merchandise) => merchandise.classes === selectedCategory)
);
);
updateKeyMetrics(filteredData); // Replace metrics like income and orders
drawChart(filteredData, 'chart-canvas', chartType); // Render chart
populateDataTable(filteredData); // Replace desk
}
// Replace dashboard metrics (complete income, order depend, and so forth.)
operate updateKeyMetrics(information) {
const totalRevenue = information.cut back((acc, merchandise) => acc + parseFloat(merchandise.complete), 0);
const totalOrders = information.size;
const averageOrderValue = totalOrders > 0 ? totalRevenue / totalOrders : 0;
// Calculate complete income per class to seek out prime class
const revenueByCategory = information.cut back((acc, merchandise) => , {});
// Decide class with highest complete income
const topCategory = Object.keys(revenueByCategory).cut back(
(a, b) => (revenueByCategory[a] > revenueByCategory[b] ? a : b),
"None"
);
// Show metrics within the DOM
doc.getElementById('total-revenue').textContent = `$${totalRevenue.toFixed(2)}`;
doc.getElementById('total-orders').textContent = `${totalOrders}`;
doc.getElementById('average-order-value').textContent = `$${averageOrderValue.toFixed(2)}`;
doc.getElementById('top-category').textContent = topCategory || 'None';
}
// Draw the chosen chart kind utilizing Chart.js
operate drawChart(information, elementId, chartType) {
const ctx = doc.getElementById(elementId).getContext('second');
// Destroy earlier chart if one exists
if (chartInstance) {
chartInstance.destroy();
}
change (chartType) {
case 'revenueOverTime':
// Line chart exhibiting income by order date
chartInstance = new Chart(ctx, {
kind: 'line',
information: {
labels: information.map((merchandise) => merchandise.order_date),
datasets: [{
label: 'Revenue Over Time',
data: data.map((item) => parseFloat(item.total)),
fill: false,
borderColor: 'rgb(75, 192, 192)',
tension: 0.1,
}],
},
choices: {
scales: {
y: { beginAtZero: true },
},
},
});
break;
case 'revenueByCategory':
// Bar chart exhibiting complete income per class
const classes = [...new Set(data.map((item) => item.categories))];
const revenueByCategory = classes.map((class) => {
return {
class,
income: information
.filter((merchandise) => merchandise.classes === class)
.cut back((acc, merchandise) => acc + parseFloat(merchandise.complete), 0),
};
});
chartInstance = new Chart(ctx, {
kind: 'bar',
information: {
labels: revenueByCategory.map((merchandise) => merchandise.class),
datasets: [{
label: 'Revenue by Category',
data: revenueByCategory.map((item) => item.revenue),
backgroundColor: 'rgba(255, 99, 132, 0.2)',
borderColor: 'rgba(255, 99, 132, 1)',
borderWidth: 1,
}],
},
choices: {
scales: {
y: { beginAtZero: true },
},
},
});
break;
case 'topProducts':
// Horizontal bar chart exhibiting prime 10 merchandise by income
const productRevenue = information.cut back((acc, merchandise) => , {});
const topProducts = Object.entries(productRevenue)
.type((a, b) => b[1] - a[1])
.slice(0, 10);
chartInstance = new Chart(ctx, {
kind: 'bar',
information: {
labels: topProducts.map((merchandise) => merchandise[0]), // Product names
datasets: [{
label: 'Top Products by Revenue',
data: topProducts.map((item) => item[1]), // Income
backgroundColor: 'rgba(54, 162, 235, 0.8)',
borderColor: 'rgba(54, 162, 235, 1)',
borderWidth: 1,
}],
},
choices: {
indexAxis: 'y', // Horizontal bars
scales: {
x: { beginAtZero: true },
},
},
});
break;
}
}
// Show filtered information in a DataTable
operate populateDataTable(information) {
const tableElement = $('#data-table');
// Destroy current desk if it exists
if ($.fn.DataTable.isDataTable(tableElement)) {
tableElement.DataTable().clear().destroy();
}
// Create a brand new DataTable with related columns
tableElement.DataTable({
information: information.map((merchandise) => [
item.order_id,
item.order_date,
item.customer_id,
item.product_names,
item.categories,
`$${parseFloat(item.total).toFixed(2)}`,
]),
columns: [
{ title: "Order ID" },
{ title: "Order Date" },
{ title: "Customer ID" },
{ title: "Product" },
{ title: "Category" },
{ title: "Total" },
],
});
}
// Populate the class filter dropdown with obtainable classes
operate populateCategoryFilter(information) {
const categoryFilter = doc.getElementById('category-filter');
categoryFilter.innerHTML = '';
categoryFilter.appendChild(new Choice('All Classes', 'all', true, true));
// Extract distinctive classes
const classes = new Set(information.map((merchandise) => merchandise.classes));
classes.forEach((class) => {
categoryFilter.appendChild(new Choice(class, class));
});
}
It’s our most intricate code file, nevertheless it has to do lots. This JavaScript file powers the interactivity and information visualisation for the Gross sales Efficiency Dashboard. Briefly, it …
1/ Fetches gross sales information
When the web page masses (DOMContentLoaded), it calls a backend API on the /information endpoint.
If no information is returned, a “No information obtainable” message is displayed.
2/ Units up filters
Makes use of Flatpickr date pickers to decide on a begin and finish date based mostly on the dataset’s min/max order dates.
Provides a class dropdown, permitting customers to filter by product class.
Provides a chart kind selector to change between completely different chart visualisations.
3/ Initialises the dashboard
Populates the class filter with obtainable classes.
Runs the primary render with the total dataset.
4/ Applies filters and re-renders
Every time the consumer modifications a filter (date vary, class, or chart kind), it:
Filters the dataset by date vary and class.
Updates key metrics: complete income, variety of orders, common order worth, and prime income class.
Redraws the chosen Chart.js chart.
Refreshes the information desk.
5/ Attracts charts with Chart.js
Income Over Time → Line chart exhibiting income developments by date.
Income by Class → Bar chart aggregating complete income per class.
Prime Merchandise → Horizontal bar chart exhibiting the highest 10 merchandise by income.
6/ Shows tabular information
Makes use of DataTables (a jQuery plugin) to render a desk of filtered orders, with columns for order ID, date, buyer ID, product, class, and complete.
7/ Retains the UI in sync
Destroys and recreates charts/tables when filters change to keep away from duplicates.
Retains metrics, charts, and tables according to the lively filters.
Operating our dashboard
Now that we have now all our code sorted, it’s time to run the dashboard, so go to the server subfolder and sort within the following command.
$ node server.js
You’ll get a response to the above command, one thing like,
Server working at http://localhost:3000
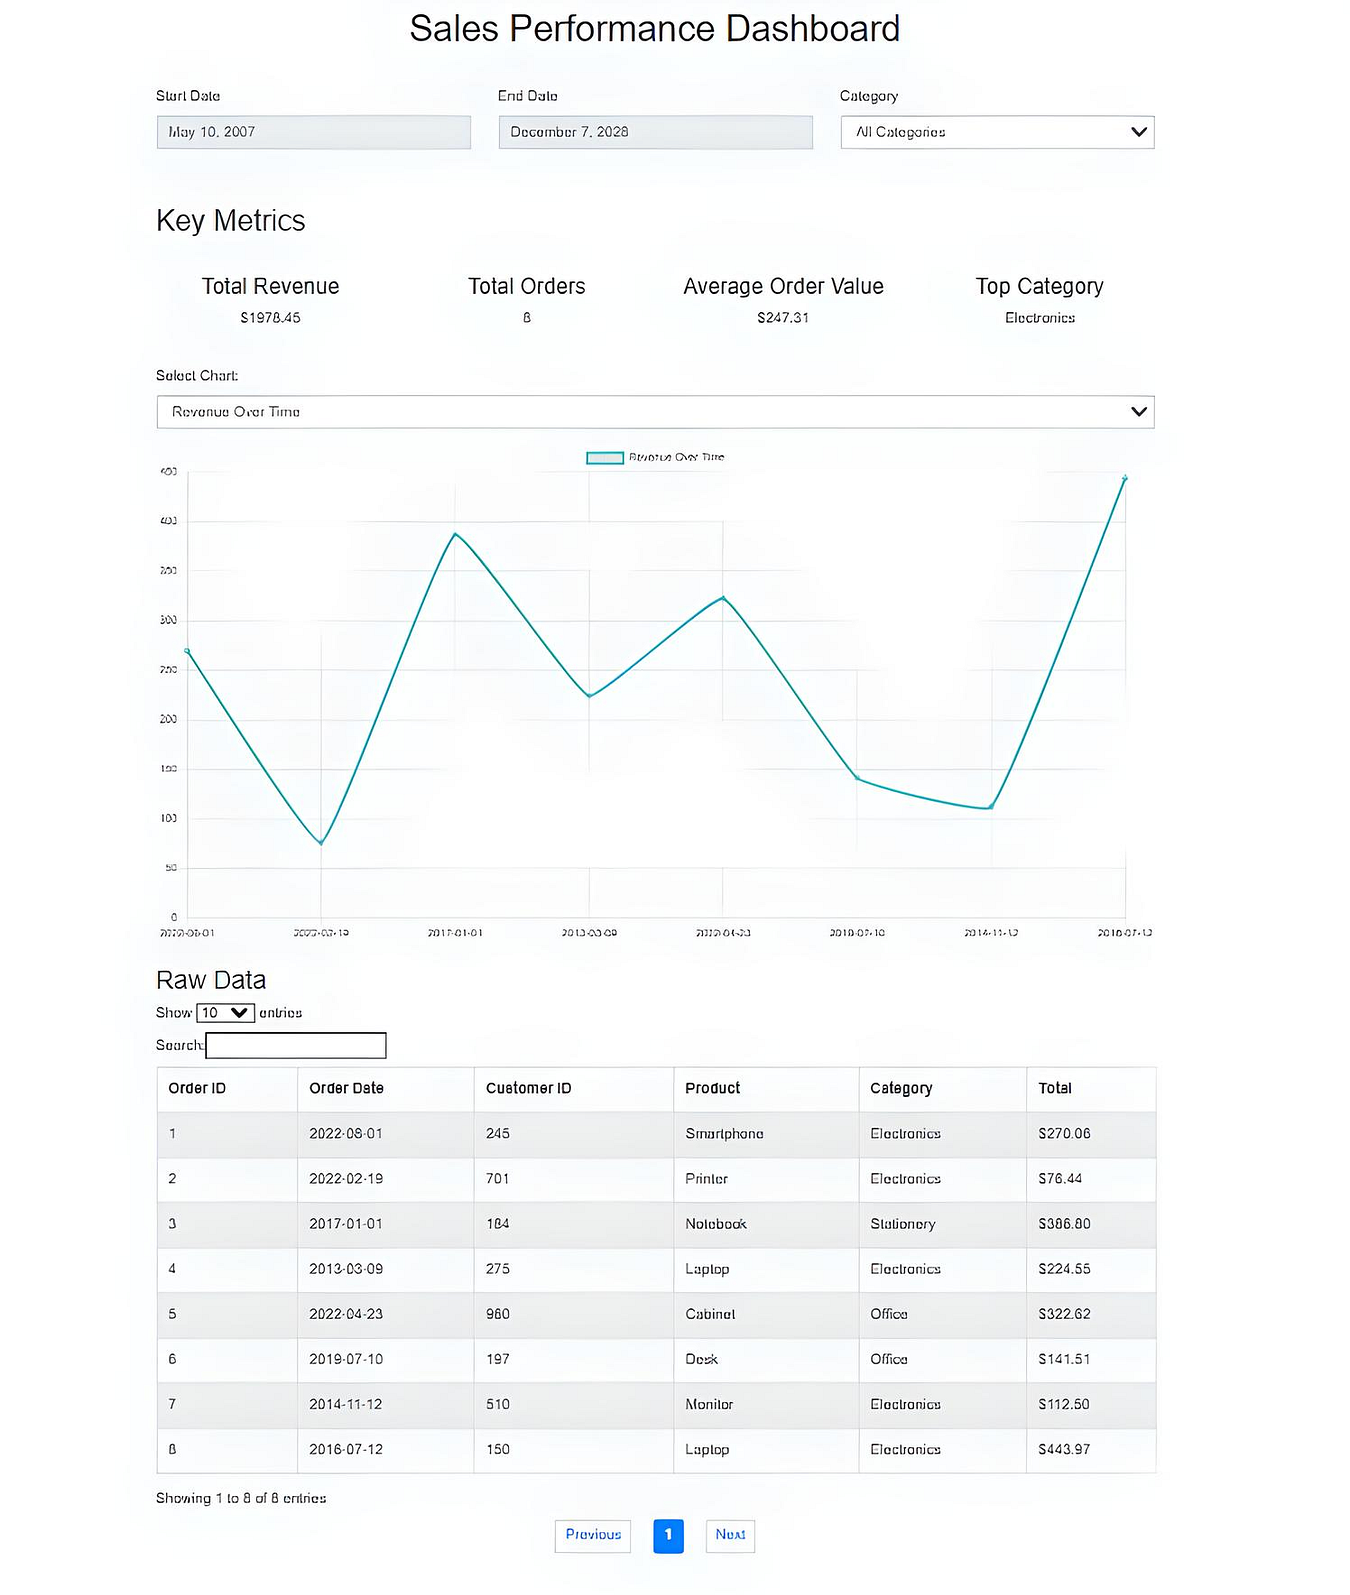
Open an online browser and go to http://localhost:3000. It's best to see your dashboard populated with information from the SQLite database, as proven within the picture under.
Picture by Creator
All of the filters, chart choice, and so forth, ought to work as marketed.
Abstract
On this article, I’ve walked you thru creating a completely useful, interactive gross sales efficiency dashboard utilizing core net applied sciences—HTML, CSS, JavaScript, Node.js, Categorical, and a neighborhood SQLite database.
I confirmed you the way to create and populate a SQLite database in code that we might use because the supply information for our dashboard. We additionally mentioned the surroundings setup and each the front-end and back-end improvement processes, and briefly touched on our information dashboard performance.
Lastly, I walked you thru and defined intimately the 4 code information we would have liked to create, after which confirmed you the way to run the dashboard in a browser.
In direction of Knowledge Science is a group publication. Submit your insights to achieve our world viewers and earn via the TDS Creator Fee Program.


