Automationscribe.com
  • Home
  • AI Scribe
  • AI Tools
  • Artificial Intelligence
  • Contact Us
No Result
View All Result
Automation Scribe
  • Home
  • AI Scribe
  • AI Tools
  • Artificial Intelligence
  • Contact Us
No Result
View All Result
Automationscribe.com
No Result
View All Result

Utilizing Amazon OpenSearch ML connector APIs

admin by admin
June 2, 2025
in Artificial Intelligence
0
Utilizing Amazon OpenSearch ML connector APIs
399
SHARES
2.3k
VIEWS
Share on FacebookShare on Twitter


When ingesting information into Amazon OpenSearch, prospects typically want to reinforce information earlier than placing it into their indexes. As an example, you is likely to be ingesting log information with an IP deal with and need to get a geographic location for the IP deal with, otherwise you is likely to be ingesting buyer feedback and need to establish the language they’re in. Historically, this requires an exterior course of that complicates information ingest pipelines and might trigger a pipeline to fail. OpenSearch affords a variety of third-party machine studying (ML) connectors to assist this augmentation.

This publish highlights two of those third-party ML connectors. The primary connector we reveal is the Amazon Comprehend connector. On this publish, we present you use this connector to invoke the LangDetect API to detect the languages of ingested paperwork.

The second connector we reveal is the Amazon Bedrock connector to invoke the Amazon Titan Textual content Embeddings v2 mannequin with the intention to create embeddings from ingested paperwork and carry out semantic search.

Answer overview

We use Amazon OpenSearch with Amazon Comprehend to reveal the language detection function. That will help you replicate this setup, we’ve offered the required supply code, an Amazon SageMaker pocket book, and an AWS CloudFormation template. You will discover these sources within the sample-opensearch-ml-rest-api GitHub repo.

End-to-end document processing workflow using OpenSearch Service integrating with SageMaker notebooks and AWS AI services

The reference structure proven within the previous determine exhibits the parts used on this answer. A SageMaker pocket book is used as a handy technique to execute the code that’s offered within the Github repository offered above.

Conditions

To run the total demo utilizing the sample-opensearch-ml-rest-api, ensure you have an AWS account with entry to:

Half 1: The Amazon Comprehend ML connector

Arrange OpenSearch to entry Amazon Comprehend

Earlier than you need to use Amazon Comprehend, you’ll want to make it possible for OpenSearch can name Amazon Comprehend. You do that by supplying OpenSearch with an IAM function that has entry to invoke the DetectDominantLanguage API. This requires the OpenSearch Cluster to have advantageous grained entry management enabled. The CloudFormation template creates a task for this referred to as --SageMaker-OpenSearch-demo-role. Use the next steps to connect this function to the OpenSearch cluster.

  1. Open the OpenSearch Dashboard console—you could find the URL within the output of the CloudFormation template—and sign up utilizing the username and password you offered.OpenSearch Dashboards landing page featuring navigation sidebar, visualization tools, and data management options
  1. Select Safety within the left-hand menu (in case you don’t see the menu, select the three horizontal strains icon on the prime left of the dashboard).OpenSearch security setup guide detailing role creation and user mapping processes with action buttons
  2. From the safety menu, choose Roles to handle the OpenSearch roles.OpenSearch roles dashboard with detailed permissions matrix showing security analytics, alerting, and snapshot management access controls
  3. Within the search field. enter ml_full_access function.OpenSearch roles management screen with filtered view of ML full access role, showing detailed permissions and reserved status
  4. Choose the Mapped customers hyperlink to map the IAM function to this OpenSearch function.AWS IAM console displaying full access role with security restrictions and role duplication option
  5. On the Mapped customers display, select Handle mapping to edit the present mappings.AWS IAM role management interface showing zero mapped users with creation and mapping controls
  6. Add the IAM function talked about beforehand to map it to the ml_full_access function, it will permit OpenSearch to entry the wanted AWS sources from the ml-commons plugin. Enter your IAM function Amazon Useful resource Title (ARN) (arn:aws:iam:::function/--SageMaker-OpenSearch-demo-role) within the backend roles subject and select Map.AWS IAM console showing user and backend role mapping options with explanations for role inheritance

Arrange the OpenSearch ML connector to Amazon Comprehend

On this step, you arrange the ML connector to attach Amazon Comprehend to OpenSearch.

  1. Get an authorization token to make use of when making the decision to OpenSearch from the SageMaker pocket book. The token makes use of an IAM function hooked up to the pocket book by the CloudFormation template that has permissions to name OpenSearch. That very same function is mapped to the OpenSearch admin function in the identical method you simply mapped the function to entry Amazon Comprehend. Use the next code to set this up:
awsauth = AWS4Auth(credentials.access_key,
credentials.secret_key,
area,
'es',
session_token=credentials.token)

  1. Create the connector. It wants a couple of items of knowledge:
    1. It wants a protocol. For this instance, use aws_sigv4, which permits OpenSearch to make use of an IAM function to name Amazon Comprehend.
    2. Present the ARN for this function, which is identical function you used to arrange permissions for the ml_full_access function.
    3. Present comprehend because the service_name, and DetectDominateLanguage because the api_name.
    4. Present the URL to Amazon Comprehend and arrange name the API and what information to move to it.

The ultimate name seems to be like:

comprehend = boto3.consumer('comprehend', region_name="us-east-1")
path="/_plugins/_ml/connectors/_create"
url = host + path

payload = {
  "identify": "Comprehend lang identification",
  "description": "comprehend mannequin",
  "model": 1,
  "protocol": "aws_sigv4",
  "credential": {
    "roleArn": sageMakerOpenSearchRoleArn
  },
  "parameters": {
    "area": "us-east-1",
    "service_name": "comprehend",
    "api_version": "20171127",
    "api_name": "DetectDominantLanguage",
    "api": "Comprehend_${parameters.api_version}.${parameters.api_name}",
    "response_filter": "$"
  },
  "actions": [
    {
      "action_type": "predict",
      "method": "POST",
      "url": "https://${parameters.service_name}.${parameters.region}.amazonaws.com",
      "headers": {
        "content-type": "application/x-amz-json-1.1",
        "X-Amz-Target": "${parameters.api}"
      },
      "request_body": "{"Text": "${parameters.Text}"}" 
    }
  ]
}

comprehend_connector_response = requests.publish(url, auth=awsauth, json=payload)
comprehend_connector = comprehend_connector_response.json()["connector_id"]

Register the Amazon Comprehend API connector

The following step is to register the Amazon Comprehend API connector with OpenSearch utilizing the Register Mannequin API from OpenSearch.

  • Use the comprehend_connector that you just saved from the final step.
path="/_plugins/_ml/fashions/_register"
url = host + path

payload = {
    "identify": "comprehend lang id API",
    "function_name": "distant",
    "description": "API to detect the language of textual content",
    "connector_id": comprehend_connector
}
headers = {"Content material-Sort": "software/json"}

response = requests.publish(url, auth=awsauth, json=payload, headers=headers)
comprehend_model_id = response.json()['model_id']

As of OpenSearch 2.13, when the mannequin is first invoked, it’s robotically deployed. Previous to 2.13 you would need to manually deploy the mannequin inside OpenSearch.

Take a look at the Amazon Comprehend API in OpenSearch

With the connector in place, you’ll want to take a look at the API to ensure it was arrange and configured appropriately.

  1. Make the next name to OpenSearch.
path="/_plugins/_ml/fashions/"+ comprehend_model_id + '/_predict'
url = host + path

headers = {"Content material-Sort": "software/json"}
payload = {
    "parameters": {
        "Textual content": "你知道厕所在哪里吗"
    }
}

response = requests.publish(url, auth=awsauth, json=payload, headers=headers)
print(response.json())

  1. It is best to get the next end result from the decision, displaying the language code as zh with a rating of 1.0:
{
   "inference_results":[
      {
         "output":[
            {
               "name":"response",
               "dataAsMap":{
                  "response":{
                     "Languages":[
                        {
                           "LanguageCode":"zh",
                           "Score":1.0
                        }
                     ]
                  }
               }
            }
         ],
         "status_code":200
      }
   ]
}

Create an ingest pipeline that makes use of the Amazon Comprehend API to annotate the language

The following step is to create a pipeline in OpenSearch that calls the Amazon Comprehend API and provides the outcomes of the decision to the doc being listed. To do that, you present each an input_map and an output_map. You employ these to inform OpenSearch what to ship to the API and deal with what comes again from the decision.

path="/_ingest/pipeline/comprehend_language_identification_pipeline"
url = host + path

payload = {
  "description": "ingest establish lang with the comprehend API",
  "processors":[
    {
      "ml_inference": {
        "model_id": comprehend_model_id,
        "input_map": [
            {
               "Text": "Text"
            }
        ],
        "output_map": [
            {  
               "detected_language": "response.Languages[0].LanguageCode",
               "language_score": "response.Languages[0].Rating"
            }
        ]
      }
    }
  ]
}
headers = {"Content material-Sort": "software/json"}
response = requests.put(url, auth=awsauth, json=payload, headers=headers)

You may see from the previous code that you’re pulling again each the highest language end result and its rating from Amazon Comprehend and including these fields to the doc.

Half 2: The Amazon Bedrock ML connector

On this part, you employ Amazon OpenSearch with Amazon Bedrock by way of the ml-commons plugin to carry out a multilingual semantic search. Just remember to have the answer conditions in place earlier than making an attempt this part.

Within the SageMaker occasion that was deployed for you, you may see the next information: english.json, french.json, german.json.

These paperwork have sentences of their respective languages that discuss concerning the time period spring in numerous contexts. These contexts embody spring as a verb which means to maneuver all of a sudden, as a noun which means the season of spring, and eventually spring as a noun which means a mechanical half. On this part, you deploy Amazon Titan Textual content Embeddings mannequin v2 utilizing the ml connector for Amazon Bedrock. You then use this embeddings mannequin to create vectors of textual content in three languages by ingesting the totally different language JSON information. Lastly, these vectors are saved in Amazon OpenSearch to allow semantic searches for use throughout the language units.

Amazon Bedrock supplies streamlined entry to varied highly effective AI basis fashions by way of a single API interface. This managed service consists of fashions from Amazon and different main AI corporations. You may take a look at totally different fashions to seek out the perfect match to your particular wants, whereas sustaining safety, privateness, and accountable AI practices. The service lets you customise these fashions with your individual information by way of strategies similar to fine-tuning and Retrieval Augmented Technology (RAG). Moreover, you need to use Amazon Bedrock to create AI brokers that may work together with enterprise methods and information, making it a complete answer for growing generative AI purposes.

AWS architecture diagram showing document ingestion and processing flow between OpenSearch, SageMaker Notebook, and Bedrock ML

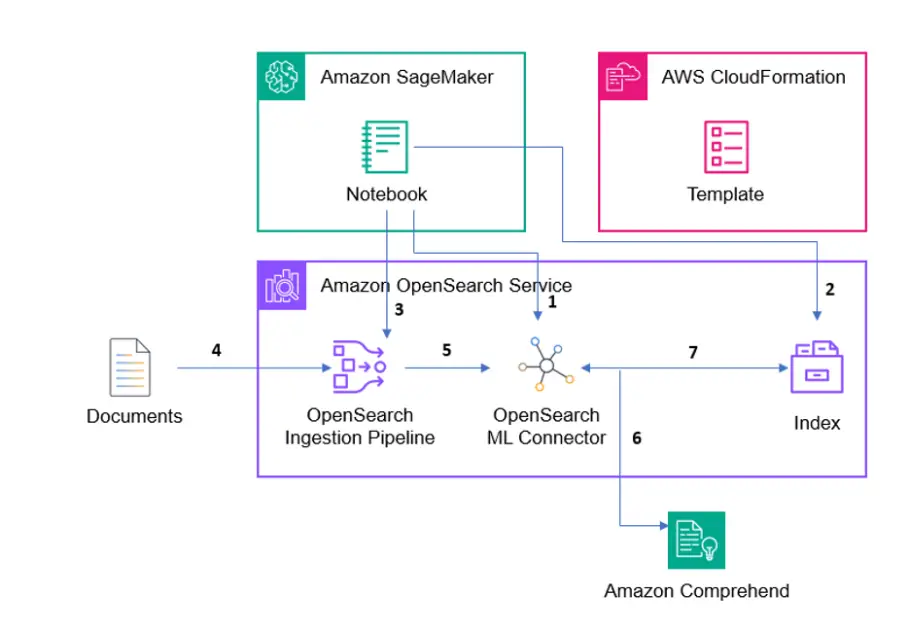
The reference structure within the previous determine exhibits the parts used on this answer.

(1) First we should create the OpenSearch ML connector by way of operating code inside the Amazon SageMaker pocket book. The connector basically creates a Relaxation API name to any mannequin, we particularly need to create a connector to name the Titan Embeddings mannequin inside Amazon Bedrock.

(2) Subsequent, we should create an index to later index our language paperwork into. When creating an index, you may specify its mappings, settings, and aliases.

(3) After creating an index inside Amazon OpenSearch, we need to create an OpenSearch Ingestion pipeline that may permit us to streamline information processing and preparation for indexing, making it simpler to handle and make the most of the info. (4) Now that now we have created an index and arrange a pipeline, we are able to begin indexing our paperwork into the pipeline.

(5 – 6) We use the pipeline in OpenSearch that calls the Titan Embeddings mannequin API. We ship our language paperwork to the titan embeddings mannequin, and the mannequin returns vector embeddings of the sentences.

(7) We retailer the vector embeddings inside our index and carry out vector semantic search.

Whereas this publish highlights solely particular areas of the general answer, the SageMaker pocket book has the code and directions to run the total demo your self.

Earlier than you need to use Amazon Bedrock, you’ll want to make it possible for OpenSearch can name Amazon Bedrock. .

Load sentences from the JSON paperwork into dataframes

Begin by loading the JSON doc sentences into dataframes for extra structured group. Every row can comprise the textual content, embeddings, and extra contextual data:

import json
import pandas as pd

def load_sentences(file_name):
    sentences = []
    with open(file_name, 'r', encoding='utf-8') as file:
        for line in file:
            strive:
                information = json.hundreds(line)
                if 'sentence' in information and 'sentence_english' in information:
                    sentences.append({
                        'sentence': information['sentence'],
                        'sentence_english': information['sentence_english']
                    })
            besides json.JSONDecodeError:
                # Skip strains that aren't legitimate JSON (just like the index strains)
                proceed
    
    return pd.DataFrame(sentences)

# Utilization
german_df = load_sentences('german.json')
english_df = load_sentences('english.json')
french_df = load_sentences('french.json')
# print(french_df.head())

Create the OpenSearch ML connector to Amazon Bedrock

After loading the JSON paperwork into dataframes, you’re able to arrange the OpenSearch ML connector to attach Amazon Bedrock to OpenSearch.

  1. The connector wants the next data.
    1. It wants a protocol. For this answer, use aws_sigv4, which permits OpenSearch to make use of an IAM function to name Amazon Bedrock.
    2. Present the identical function used earlier to arrange permissions for the ml_full_access function.
    3. Present the service_name, mannequin, dimensions of the mannequin, and embedding sort.

The ultimate name seems to be like the next:

payload = {
  "identify": "Amazon Bedrock Connector: embedding",
  "description": "The connector to bedrock Titan embedding mannequin",
  "model": 1,
  "protocol": "aws_sigv4",
  "parameters": {
    "area": "us-east-1",
    "service_name": "bedrock",
    "mannequin": "amazon.titan-embed-text-v2:0",
    "dimensions": 1024,
    "normalize": True,
    "embeddingTypes": ["float"]
  },
  "credential": {
    "roleArn": sageMakerOpenSearchRoleArn
  },
  "actions": [
    {
      "action_type": "predict",
      "method": "POST",
      "url": "https://bedrock-runtime.${parameters.region}.amazonaws.com/model/${parameters.model}/invoke",
      "headers": {
        "content-type": "application/json",
        "x-amz-content-sha256": "required"
      },
      "request_body": "{ "inputText": "${parameters.inputText}", "dimensions": ${parameters.dimensions}, "normalize": ${parameters.normalize}, "embeddingTypes": ${parameters.embeddingTypes} }",
      "pre_process_function": "connector.pre_process.bedrock.embedding",
      "post_process_function": "connector.post_process.bedrock.embedding"
    }
  ]
}

bedrock_connector_response = requests.publish(url, auth=awsauth, json=payload, headers=headers)

bedrock_connector_3 = bedrock_connector_response.json()["connector_id"]
print('Connector id: ' + bedrock_connector_3)

Take a look at the Amazon Titan Embeddings mannequin in OpenSearch

After registering and deploying the Amazon Titan Embeddings mannequin utilizing the Amazon Bedrock connector, you may take a look at the API to confirm that it was arrange and configured appropriately. To do that, make the next name to OpenSearch:

headers = {"Content material-Sort": "software/json"}
payload = {
  "parameters": {
    "inputText": "It is good to see the flowers bloom and listen to the birds sing within the spring"
  }
}
response = requests.publish(url, auth=awsauth, json=payload, headers=headers)
print(response.json())

It is best to get a formatted end result, much like the next, from the decision that exhibits the generated embedding from the Amazon Titan Embeddings mannequin:

{'inference_results': [{'output': [{'name': 'sentence_embedding', 'data_type': 'FLOAT32', 'shape': [1024], 'information': [-0.04092199727892876, 0.052057236433029175, -0.03354490175843239, 0.04398418962955475, -0.001235315459780395, -0.03284895047545433, -0.014197427779436111, 0.0098129278048…

The preceding result is significantly shortened compared to the actual embedding result you might receive. The purpose of this snippet is to show you the format.

Create the index pipeline that uses the Amazon Titan Embeddings model

Create a pipeline in OpenSearch. You use this pipeline to tell OpenSearch to send the fields you want embeddings for to the embeddings model.

pipeline_name = "titan_embedding_pipeline_v2"
url = f"{host}/_ingest/pipeline/{pipeline_name}"

pipeline_body = {
    "description": "Titan embedding pipeline",
    "processors": [
        {
            "text_embedding": {
                "model_id": bedrock_model_id,
                "field_map": {
                    "sentence": "sentence_vector"
                }
            }
        }
    ]
}

response = requests.put(url, auth=awsauth, json=pipeline_body, headers={"Content material-Sort": "software/json"})
print(response.textual content)

Create an index

With the pipeline in place, the subsequent step is to create an index that may use the pipeline. There are three fields within the index:

  • sentence_vector – That is the place the vector embedding will probably be saved when returned from Amazon Bedrock.
  • sentence – That is the non-English language sentence.
  • sentence_english – that is the English translation of the sentence. Embody this to see how nicely the mannequin is translating the unique sentence.
index_name="bedrock-knn-index-v2"
url = f'{host}/{index_name}'
mapping = {
    "mappings": {
        "properties": {
            "sentence_vector": {
                "sort": "knn_vector",
                "dimension": 1024,  
                "methodology": {
                    "identify": "hnsw",
                    "space_type": "l2",
                    "engine": "nmslib"
                },
                "retailer":True
            },
            "sentence":{
                "sort": "textual content",
                "retailer": True
            },
            "sentence_english":{
                "sort": "textual content",
                "retailer": True
            }
        }
    },
    "settings": {
        "index": {
            "knn": True,
            "knn.space_type": "cosinesimil",
            "default_pipeline": pipeline_name
        }
    }
}

response = requests.put(url, auth=awsauth, json=mapping, headers={"Content material-Sort": "software/json"})
print(f"Index creation response: {response.textual content}")

Load dataframes into the index

Earlier on this part, you loaded the sentences from the JSON paperwork into dataframes. Now, you may index the paperwork and generate embeddings for them utilizing the Amazon Titan Textual content Embeddings Mannequin v2. The embeddings will probably be saved within the sentence_vector subject.

index_name = "bedrock-knn-index-v2"

def index_documents(df, batch_size=100):
    whole = len(df)
    for begin in vary(0, whole, batch_size):
        finish = min(begin + batch_size, whole)
        batch = df.iloc[start:end]

        bulk_data = []
        for _, row in batch.iterrows():
            # Put together the motion metadata
            motion = {
                "index": {
                    "_index": index_name
                }
            }
            # Put together the doc information
            doc = {
                "sentence": row['sentence'],
                "sentence_english": row['sentence_english']
            }
            
            # Add the motion and doc to the majority information
            bulk_data.append(json.dumps(motion))
            bulk_data.append(json.dumps(doc))

        # Be a part of the majority information with newlines
        bulk_body = "n".be part of(bulk_data) + "n"

        # Ship the majority request
        bulk_url = f"{host}/_bulk"
        response = requests.publish(bulk_url, auth=awsauth, information=bulk_body, headers={"Content material-Sort": "software/x-ndjson"})

        if response.status_code == 200:
            print(f"Efficiently listed batch {begin}-{finish} of {whole}")
        else:
            print(f"Error indexing batch {begin}-{finish} of {whole}: {response.textual content}")

        # Non-obligatory: add a small delay to keep away from overwhelming the cluster
        time.sleep(1)

# Index your paperwork
print("Indexing German paperwork:")
index_documents(german_df)
print("nIndexing English paperwork:")
index_documents(english_df)
print("nIndexing French paperwork:")
index_documents(french_df)

Carry out semantic k-NN throughout the paperwork

The ultimate step is to carry out a k-nearest neighbor (k-NN) search throughout the paperwork.

# Outline your OpenSearch host and index identify
index_name = "bedrock-knn-index-v2"
def semantic_search(query_text, ok=5):
    search_url = f"{host}/{index_name}/_search"
    # First, index the question to generate its embedding
    index_doc = {
        "sentence": query_text,
        "sentence_english": query_text  # Assuming the question is in English
    }
    index_url = f"{host}/{index_name}/_doc"
    index_response = requests.publish(index_url, auth=awsauth, json=index_doc, headers={"Content material-Sort": "software/json"})
    
    if index_response.status_code != 201:
        print(f"Didn't index question doc: {index_response.textual content}")
        return []
    
    # Retrieve the listed question doc to get its vector
    doc_id = index_response.json()['_id']
    get_url = f"{host}/{index_name}/_doc/{doc_id}"
    get_response = requests.get(get_url, auth=awsauth)
    query_vector = get_response.json()['_source']['sentence_vector']
    
    # Now carry out the KNN search
    search_query = {
        "measurement": 30,
        "question": {
            "knn": {
                "sentence_vector": {
                    "vector": query_vector,
                    "ok": 30
                }
            }
        },
        "_source": ["sentence", "sentence_english"]
    }

    search_response = requests.publish(search_url, auth=awsauth, json=search_query, headers={"Content material-Sort": "software/json"})
    
    if search_response.status_code != 200:
        print(f"Search failed with standing code {search_response.status_code}")
        print(search_response.textual content)
        return []

    # Clear up - delete the short-term question doc
    delete_url = f"{host}/{index_name}/_doc/{doc_id}"
    requests.delete(delete_url, auth=awsauth)

    return search_response.json()['hits']['hits']

# Instance utilization
question = "le soleil brille"
outcomes = semantic_search(question)

if outcomes:
    print(f"Search outcomes for: '{question}'")
    for end in outcomes:
        print(f"Rating: {end result['_score']}")
        print(f"Sentence: {end result['_source']['sentence']}")
        print(f"English: {end result['_source']['sentence_english']}")
        print()
else:
    print("No outcomes discovered or search failed.")

The instance question is in French and might be translated to the solar is shining. Holding in thoughts that the JSON paperwork have sentences that use spring in numerous contexts, you’re in search of question outcomes and vector matches of sentences that use spring within the context of the season of spring.

Listed below are a number of the outcomes from this question:

Search outcomes for: ' le soleil brille'
Rating: 0.40515712
Sentence: Les premiers rayons de soleil au printemps réchauffent la terre.
English: The primary rays of spring sunshine heat the earth.

Rating: 0.40117615
Sentence: Die ersten warmen Sonnenstrahlen kitzeln auf der Haut im Frühling.
English: The primary heat solar rays tickle the pores and skin in spring.

Rating: 0.3999985
Sentence: Die ersten Sonnenstrahlen im Frühling wecken die Lebensgeister.
English: The primary rays of sunshine in spring awaken the spirits.

This exhibits that the mannequin can present outcomes throughout all three languages. It is very important notice that the boldness scores for these outcomes is likely to be low since you’ve solely ingested a pair paperwork with a handful of sentences in every for this demo. To extend confidence scores and accuracy, ingest a strong dataset with a number of languages and loads of sentences for reference.

Clear Up

To keep away from incurring future expenses, go to the AWS Administration Console for CloudFormation console and delete the stack you deployed. It will terminate the sources used on this answer.

Advantages of utilizing the ML connector for machine studying mannequin integration with OpenSearch

There are a lot of methods you may carry out k-nn semantic vector searches; a preferred strategies is to deploy exterior Hugging Face sentence transformer fashions to a SageMaker endpoint. The next are the advantages of utilizing the ML connector method we confirmed on this publish, and why must you use it as an alternative of deploying fashions to a SageMaker endpoint:

  • Simplified structure
    • Single system to handle
    • Native OpenSearch integration
    • Easier deployment
    • Unified monitoring
  • Operational advantages
    • Much less infrastructure to keep up
    • Constructed-in scaling with OpenSearch
    • Simplified safety mannequin
    • Easy updates and upkeep
  • Value effectivity
    • Single system prices
    • Pay-per-use Amazon Bedrock pricing
    • No endpoint administration prices
    • Simplified billing

Conclusion

Now that you just’ve seen how you need to use the OpenSearch ML connector to reinforce your information with exterior REST calls, we advocate that you just go to the GitHub repo in case you haven’t already and stroll by way of the total demo yourselves. The complete demo exhibits how you need to use Amazon Comprehend for language detection and use Amazon Bedrock for multilingual semantic vector search, utilizing the ml-connector plugin for each use circumstances. It additionally has pattern textual content and JSON paperwork to ingest so you may see how the pipeline works.


Concerning the Authors

John Trollinger photo

John Trollinger is a Principal Options Architect supporting the World Broad Public Sector with a give attention to OpenSearch and Knowledge Analytics. John has been working with public sector prospects over the previous 25 years serving to them ship mission capabilities. Exterior of labor, John likes to gather AWS certifications and compete in triathlons.

Shwetha Radhakrishnan photo

Shwetha Radhakrishnan is a Options Architect for Amazon Net Companies (AWS) with a spotlight in Knowledge Analytics & Machine Studying. She has been constructing options that drive cloud adoption and assist empower organizations to make data-driven selections inside the public sector. Exterior of labor, she loves dancing, spending time with family and friends, and touring.

Tags: AmazonAPIsconnectorOpenSearch
Previous Post

LLM Optimization: LoRA and QLoRA | In direction of Information Science

Next Post

Evaluating LLMs for Inference, or Classes from Educating for Machine Studying

Next Post
Evaluating LLMs for Inference, or Classes from Educating for Machine Studying

Evaluating LLMs for Inference, or Classes from Educating for Machine Studying

Leave a Reply Cancel reply

Your email address will not be published. Required fields are marked *

Popular News

  • How Aviva constructed a scalable, safe, and dependable MLOps platform utilizing Amazon SageMaker

    How Aviva constructed a scalable, safe, and dependable MLOps platform utilizing Amazon SageMaker

    401 shares
    Share 160 Tweet 100
  • Diffusion Mannequin from Scratch in Pytorch | by Nicholas DiSalvo | Jul, 2024

    401 shares
    Share 160 Tweet 100
  • Unlocking Japanese LLMs with AWS Trainium: Innovators Showcase from the AWS LLM Growth Assist Program

    401 shares
    Share 160 Tweet 100
  • Proton launches ‘Privacy-First’ AI Email Assistant to Compete with Google and Microsoft

    401 shares
    Share 160 Tweet 100
  • Streamlit fairly styled dataframes half 1: utilizing the pandas Styler

    400 shares
    Share 160 Tweet 100

About Us

Automation Scribe is your go-to site for easy-to-understand Artificial Intelligence (AI) articles. Discover insights on AI tools, AI Scribe, and more. Stay updated with the latest advancements in AI technology. Dive into the world of automation with simplified explanations and informative content. Visit us today!

Category

  • AI Scribe
  • AI Tools
  • Artificial Intelligence

Recent Posts

  • Evaluating LLMs for Inference, or Classes from Educating for Machine Studying
  • Utilizing Amazon OpenSearch ML connector APIs
  • LLM Optimization: LoRA and QLoRA | In direction of Information Science
  • Home
  • Contact Us
  • Disclaimer
  • Privacy Policy
  • Terms & Conditions

© 2024 automationscribe.com. All rights reserved.

No Result
View All Result
  • Home
  • AI Scribe
  • AI Tools
  • Artificial Intelligence
  • Contact Us

© 2024 automationscribe.com. All rights reserved.